Your coupon for will be reflected when you check out!
✖
Your coupon for
✖
Hello!
You're visiting the PartSelect site in U.S.
Would you like to shop on the Canadian site?
Stay on this site
Go to Canadian site
✖
Model Number Locations
1Select Category Type
Select Category Type
2Select Product Type
Select Product Type
3Select {MODEL} Type
Select {MODEL} Type
Sample Model Number Tags
Model numbers can be made up of numbers (1005400, for example) or a combination of letters and numbers (LAT1000AAE). The model number will most likely appear on either a paper sticker or a metal plate. Your appliance's model number tag may look similar to the sample model number tags shown here (model number highlighted in yellow):
Model has been saved to My Models. If you're not signed in, your lists are available on this device and will expire within 30 days.
Model has been saved to My Models.
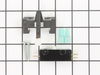
This washer/dryer lid or door switch kit serves as a critical safety component, designed to prevent the appliance from operating when the lid or door is open. It ensures that the washer does not fill ...
This is a five-loop broil element for an oven, range, or stove. It is approximately 11-3/4 inches wide and 18-5/8 inches long with approximately 11-3/4 inches between terminal connections. It features...
This dryer blower belt is designed to connect the motor to the blower wheel in compatible Whirlpool dryers, enabling proper air circulation during the drying cycle. Manufactured to OEM specifications,...
Used toothpick for a year to push switch acctuator far enough to engage switch. Broke my foot and found time to order part thru PartSelect. Went from cast to boot and received part 2 days after ordered. Had difficulty with foot and getting to switch. Went back into PartSelect and figured out how to dis-assemmble panels thru the diagrams.
... Read moreTime on my job doesn't, just that their service and expertise that is available to everyone is there to use. Broken bones or not, I will always get my parts and advice from PartSelect. Thanks to PartSelect.
I removed the two screws holding the control panel on. Pulled the control panel back. Disconnected the ground wire of the lid switch. removed the two top clamps that hold the panel to the top of the machine. Pulled back the casing (outside of the washer) and placed
... Read moreit on it's side on the floor. Here I could reach the switch. Removed old, installed new and reversed the process.
The part that gave me the biggest problem was setting the casing back on to the frame. You have to slide the front part in at the bottome, then lean back the rest of it.
I ordered the switch, which is what most people told me the problem was. I didn't have a multimeter, so I couldn't test the current one.
I removed the two screws from above the lid switch, removed the control panel screws on either side, and used a flat screwdriver to pry the top off by popping the clips.
The swit
... Read morech was easy to reach, and I compared the old and new switch after removing the paddle assembly. The new switch has three prongs, whereas my old one had two, so I put the gray wire terminal onto the bottom prong. I set everything down, plugged it in, and tested it, but still no spin cycle.
After some further research, I realized the problem was with the spin solenoid under the washer, or the red wire that leaves the lid switch and goes to the spin solenoid, also called a wig-wag solenoid. (This is a belt driven model, not direct drive.) It's not too common that the solenoids fail, but it is rather common that the wires break inside the insulation on this model.
Moral of the story is always ohm through the switches and wires before ordering replacement parts. (Remember, never ohm through a live circuit.)


 – Part Number: 299761")