Your coupon for will be reflected when you check out!
✖
Your coupon for
✖
Hello!
You're visiting the PartSelect site in U.S.
Would you like to shop on the Canadian site?
Stay on this site
Go to Canadian site
✖
Model Number Locations
1Select Category Type
Select Category Type
2Select Product Type
Select Product Type
3Select {MODEL} Type
Select {MODEL} Type
Sample Model Number Tags
Model numbers can be made up of numbers (1005400, for example) or a combination of letters and numbers (LAT1000AAE). The model number will most likely appear on either a paper sticker or a metal plate. Your appliance's model number tag may look similar to the sample model number tags shown here (model number highlighted in yellow):
Model has been saved to My Models. If you're not signed in, your lists are available on this device and will expire within 30 days.
Model has been saved to My Models.
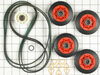
This Whirlpool Dryer Repair Kit is a convenient solution for fixing noise and drum movement problems in 27-inch dryers. Compatible with models from Whirlpool, Kenmore, Maytag, and more, the kit includ...
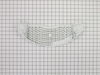
This screen door grille serves as the top cover for the lint filter in select dryers, helping to protect clothing from snagging and ensuring efficient lint collection. Made from durable plastic, it is...
This gas conversion kit is used to convert natural gas burners to liquid propane in dryers. If your dryer will not start, heat, or there is an unusual smell, replacing this part can be a solution to t...
This part is the replacement motor pulley for your dryer. The motor pulley allows the dryer belt to run straight while the dryer is operating. If your motor pulley is damaged, your dryer may not tumbl...
Appliance spray paint is a great way to cover up any chips and scratches that have appeared on your appliances. Instead of replacing the part entirely, this is an easy fix. This is also a great way to...
Maximize the efficiency of your Whirlpool 27 inch dryer with this genuine OEM drying rack. It's specifically designed for dryers with lint screens located inside the front door opening. What makes thi...
This lint screen outlet housing is designed to securely hold the lint screen within the dryer's exhaust duct, helping to prevent lint from escaping into the drum or vent system. By maintaining proper ...
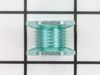
Presenting the Whirlpool Dryer Wire Harness, a genuine OEM part that ensures the proper functioning of selected Whirlpool, KitchenAid, Maytag, Jenn-Air, Amana, Inglis, and Magic Chef clothes dryers. K...
The actual physical measurement of this part is 23 3/4 inches and has a 2 1/2 inch clearance. If there is any excess length, it can be trimmed to fit according to your specific needs.
$45.29
In Stock
Order now and your part arrives by Jul 2
Questions And Answers for 11071112021
Be the first to ask our experts a question about this model!
✖
Ask a Question
Ask our experts a question on this model and we'll respond as soon as we can.
The issue was the idler pulley. First I began opening up the front panel based on a youtube video but soon realized the model was slightly different and required a lot more items to remove. I saw the pulley in the back with nothing in the way so I put the front panel crap back on and removed the rear panel. There it was, very simple to re
... Read moremove and replace. I'm not looking forward to drum rollers though. Hopefully they're aren't as difficult as they appear.
I purchased the dryer repair kit with the drum belt, wheels and idler pulley. I watched the instructional videos online and it seemed fairly straight forward. Breaking down the dryer and replacing the pulleys was easy enough. My problem began when I tried to feed the drum belt around the idler pulley. After finishing the job, the dryer wo
... Read moreuld not turn and the sensor light stayed on. I thought something else was broken with the dryer and spent hours trouble shooting other problems that I was having. Finally I figured out that the drum belt was not installed correctly around the idler pulley. However, I could not get it properly installed from the front of the machine so I tried from the rear still with no avail. I finally had to fish the old belt out of the garbage can that I had thrown away earlier. I lined up the old belt with the new one in the kit and discovered that the new belt was much smaller, so I put the old one back on the drum. Here's the lesson I learned...make sure the belts are the same size before attempting to install. The old idler was responsible for the squeaking and that stopped but I am still using the same old drum belt. Hope it lasts.
I found that the dryer would not start turning by itself. Could manually help it start and it would run fine. Anyway, after a new set of rollers, belt, etc. found that the motor still would not start by itself. Ordered new motor and it was taken care of. You have to take the back off, remove the belt and remove the tumbler. After tha
... Read moret, it is fairly easy. Two screws hold the motor down and then you can take the whole motor assembly out. Be careful removing the fan as it takes a 3/8 socket drive and it is plastic. Two clips hold the motor to the assembly. Needle nose pliers takes care of it. Replace and all should be good.