


10632 - Overview
Models starting with 10632
Click on the best match to narrow your results.
- 10632 Lawn Boy Lawn Mower (20" Mulching/Rear Bagging Lawn Mower)
- 10632 ( 313000001 - 313999999 2013 ) Lawn Boy Lawn Mower (20-Inch Walk-Behind Mower)
- 10632242101 Kenmore Refrigerator
- 10632243101 Kenmore Refrigerator
- 10632249101 Kenmore Refrigerator
- 1063283353 Kenmore Air Purifier
- 10632842010 Kenmore Refrigerator
- 10632852010 Kenmore Refrigerator
- 10632852011 Kenmore Refrigerator
- 10632853010 Kenmore Refrigerator
- 10632853011 Kenmore Refrigerator
- 10632862010 Kenmore Refrigerator
- 10632862011 Kenmore Refrigerator
- 10632863010 Kenmore Refrigerator
- 10632863011 Kenmore Refrigerator
- 10632872010 Kenmore Refrigerator
- 10632873010 Kenmore Refrigerator
- 10632882010 Kenmore Refrigerator
- 10632883010 Kenmore Refrigerator
- 10632889010 Kenmore Refrigerator
- 10632942101 Kenmore Refrigerator
- 10632943101 Kenmore Refrigerator
- 10632949101 Kenmore Refrigerator
Keep searches simple, eg. "belt" or "pump".

Light Bulb - 40W
PartSelect #: PS884734
Manufacturer #: 8009
This an authentic OEM 40-Watt replacement light bulb, used in a number of household appliances. It is specially designed to withstand extreme temperatures, which is why these replacement bulbs are mos...
$19.54
In Stock

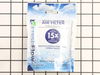
Refrigerator Air Filter
PartSelect #: PS2580853
Manufacturer #: W10311524
This Refrigerator Air Filter is a white 1.8x3.2" plastic filter which neutralizes odor and bacteria in the air. It should be replaced every six months at a minimum. Refer to your user manual and model...
$17.15
In Stock

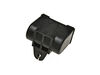
Refrigerator Door Switch
PartSelect #: PS12728638
Manufacturer #: W11384469
Door switch turns the light off when you close the door.
$30.53
In Stock

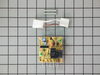
Refrigerator Capacitor
PartSelect #: PS11757023
Manufacturer #: WPW10662129
This capacitor (Refrigerator and Freezer Compressor Run Capacitor, Run Capacitor) provides the voltage or energy current required to start the compressor and keep it running. It allows the compressor ...
$45.29
In Stock

Refrigerator Bimetal Defrost Thermostat
PartSelect #: PS11750673
Manufacturer #: WPW10225581
If you have ice building up in your freezer, or if your freezer is getting too warm during the defrost cycle you may need to replace the bi-metal defrost thermostat. The function of the defrost bi-met...
$34.74
In Stock

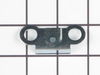
Refrigerator Door Shelf Retainer Bar End Cap
PartSelect #: PS11738927
Manufacturer #: WP2156003
The door shelf retainer bar end cap connects to the retainer bar on your refrigerator’s door shelf, and attaches it to the refrigerator door. If your shelf retainer bar has become disconnected, a dama...
$11.77
In Stock

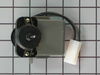
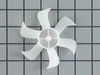
Freezer Evaporator Fan Motor
PartSelect #: PS11740359
Manufacturer #: WP2315539
This evaporator fan motor is located in the back of the freezer, and circulates air over the refrigerator coils. These coils will convert the heat into cool air, which is then circulated.
$55.29
In Stock

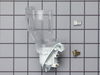
ICE MAKER KIT-PKG ASSEMBLY (EZ
PartSelect #: PS17629131
Manufacturer #: W11700559
This genuine OEM ice maker kit is designed to fit refrigerators that did not originally come with an ice maker. This kit contains everything needed to install the new ice maker on your refrigerator in...
$146.56
In Stock

Crisper Pan
PartSelect #: PS11739936
Manufacturer #: WP2256704
This refrigerator crisper pan is designed to maintain optimal humidity levels for storing produce, meats, and other perishables, helping extend freshness and reduce spoilage. Made from clear, durable ...
$108.11
In Stock

Door Shelf Bar - Clear
PartSelect #: PS11755255
Manufacturer #: WPW10468559
Sold individually.
$76.17
In Stock

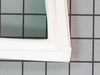
Touch-Up Paint - White
PartSelect #: PS385132
Manufacturer #: 72017
This touch-up paint can be used on a wide variety of household appliances. It is most often used on washers, dryer, refrigerators, dishwashers, ranges, freezers, trash compactors, or microwaves. It is...
$11.77
In Stock

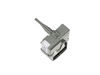
Refrigerator Screw
PartSelect #: PS11742758
Manufacturer #: WP489497
Sold individually.
$11.77
In Stock
Exact Part matches for your search term
[Viewing 2 of 2]
WHEAT-MODEL 9018813
This part number matches the current model number 10632
PartSelect #: PS814627
Manufacturer #: 10632
No Longer Available
Heat sink
This part number matches the current model number 10632
PartSelect #: PS12181558
Manufacturer #: 10632
No Longer Available
Common Symptoms of models starting with 10632
[Viewing 19 of 19]Fridge too warm
Fixed by
these parts
these parts

Show All
Light not working
Fixed by
these parts
these parts

Show All
Fridge and Freezer are too warm
Fixed by
these parts
these parts
Show All
Will Not Start
Fixed by
these parts
these parts
Show All
Freezer not defrosting
Fixed by
these parts
these parts

Show All
Freezer section too warm
Fixed by
these parts
these parts
Show All
Door won’t open or close
Fixed by
these parts
these parts

Show All
Clicking sound
Fixed by
these parts
these parts

Show All
Frost buildup
Fixed by
these parts
these parts

Show All
Noisy
Fixed by
these parts
these parts
Show All
Too warm
Fixed by
these parts
these parts
Show All
Fridge too cold
Fixed by
these parts
these parts

Show All
Ice maker not making ice
Fixed by
these parts
these parts

Show All
Leaking
Fixed by
these parts
these parts


Show All
Door Sweating
Fixed by
these parts
these parts

Show All
Freezer too cold
Fixed by
these parts
these parts
Show All
Fridge runs too long
Fixed by
these parts
these parts
Show All
Ice maker won’t dispense ice
Fixed by
these parts
these parts
Show All
Won’t start
Fixed by
these parts
these parts
Show All


Keep searches simple. Use keywords, e.g. "leaking", "pump", "broken" or "fit".
My refrigerator stopped cooling and the freezer section stopped freezing
I knew the chances of all the freon leaking out was unlikely so I looked at the wiring to the compressor and there was a capacitor and a starter/overload so i figured I would start there. I went on line and found the parts at this site and they were less than the minimum service call charge for a service tech so I figured what the heck le
... Read more
t's give her a shot so I did give it a shot. I ordered the parts and they were there in less time than a service tech could come out and i installed the parts and guess what for 90.00 in parts and 15 minutes in time I repaired my refrigerator. Thanks guys, It took less time to order the parts than it did to make the repair so thanks, your website rocks and is very well designed so my hat is off to you guys!
Read less
Parts Used:
-
garth from forest lake, MN
-
Difficulty Level:Really Easy
-
Total Repair Time:15 - 30 mins
-
Tools:Nutdriver, Screw drivers
436 of 549 people
found this instruction helpful.
Was this instruction helpful to you?
Thank you for voting!
Evaporator Fan failure
The reason I repaired it myself was because the repairman that diagnosed the problem.didn't come back in two weeks. The evaporator fan sits behind a vented wall in the freezer and directs cold air into freezer and refrigerator.I removed the ice make assembly first and then the freezer wall held in place by two sheet metal nuts. Then remov
... Read more
ed wires from fan motor. Removed the fan blade from fan motor,which was press fitted on,then removed fan motor from bracket assembly(make sure and retain the two vibration rubber washers on back and front of motor. Reinstall new motor with vibration washers and press fan blade on new motor. Install in bracket assemble and reassemnble.
Read less
Parts Used:
-
William from Middletown, NY
-
Difficulty Level:Easy
-
Total Repair Time:15 - 30 mins
-
Tools:Nutdriver
164 of 190 people
found this instruction helpful.
Was this instruction helpful to you?
Thank you for voting!
Fridge was getting too warm, ice buildup on coils.
WARNING: REPLACING THIS PART REQUIRES CUTTING AND SPLICING ELECTRICAL WIRES. RISK OF ELECTRICAL SHOCK OR FIRE. DO NOT ATTEMPT THIS REPAIR IF YOU ARE NOT EXPERIENCED WITH ELECTRICAL WIRING.
Part Info:
The bi-metal strip is clipped onto the evaporator coils and is designed to regulate the defrost coil temperature. If it is n ... Read more ot functioning properly you may notice ice buildup preventing air flow (and preventing proper refrigeration), or more rarely the freezer side may get too warm during the defrost cycle.
Materials:
* Replacement bi-metal strip
* Wire cutters
* Wire strippers
* Wire nuts
* Electrical tape
* 10MM socket
Steps:
1: UNPLUG THE FRIDGE! If there is ice buildup, wait until the ice has melted. A box fan blowing at the ice will help melt it more quickly.
2: Remove the panel covering the evaporator coils. It's located inside the fridge, on the freezer side.
3: Un-clip the bi-metal strip from the evaporator coils.
4: Unplug the wires from the evaporator fan, defrost coil and bi-metal strip, then disconnect the main connector that is plugged into the rear wall.
5: Clip both wires to the old ( bad ) bi-metal strip. Cut close to the casing of the bi-metal strip so there are long wires to splice onto.
6: Strip 1/4 to 1/2 inches of insulation off of the ends of the wires ( depending on the size of the wire-nuts you use). Twist the bare wires slightly to prevent fraying.
7: Do the same for the ends of the wires on the (new) bi-metal strip.
8: Take the ends of the wires belonging to the (new) bi-metal strip and the wires coming from the main plug. Take the like-colored wires, and twist the bare metal ends together.
9: Twist on wire nuts, for both sets of wires. Make sure they are snug, with no bare wire showing.
10: Tape over the wire nuts with electrical tape. Tape over the wires nuts in a spiral fashion, completely covering the nut and both wires that are now spliced together. This will prevent accidental shorting.
11: Plug the main plug back into the rear wall of the fridge. Also re-connect the connectors to the evaporator fan and defrost coil. Make sure the clips on the connectors are snug to ensure a good connection.
12: Clip the new bi-metal strip onto the coils, in the same spot as before. ( Usually just after the small incoming copper tubing that connects to the coils, known as the expansion valve. That is usually the coldest spot on the coils during operation).
13: Replace the panel that covers the coils.
14: Plug the fridge back in... Now you fridge should defrost correctly. If it does not, your defrost coil could be burned out, or the control board could be faulty.
Read less
Parts Used:
-
Cathy from Winter Park, FL
-
Difficulty Level:A Bit Difficult
-
Total Repair Time:15 - 30 mins
-
Tools:Nutdriver
159 of 186 people
found this instruction helpful.
Was this instruction helpful to you?
Thank you for voting!