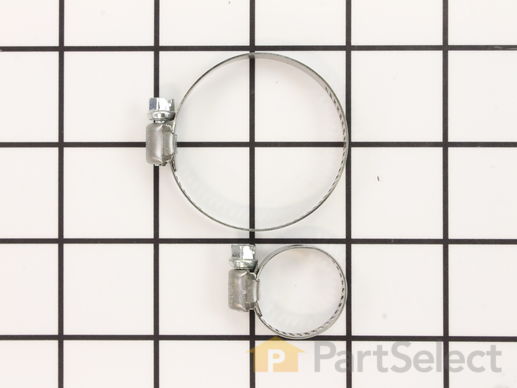
Part Location Diagram of WH1X2036 GE Hose Clamp Kit
See part 790 in the diagram
( Grid squares measure 1x1 inch )
Customer Service Representative

Get in touch, we're here to help!

Monday to Saturday
8am - 9pm EST

customerservice@partselect.com

Hose Clamp Kit WH1X2036

 Fits your VVSR1070D5WW Washer!
★★★★★
★★★★★
2 Reviews

Rated by 1 customer 

Easy 

Less than 15 mins 

Ratings submitted by customers like you who bought this part.

$ 15.92
  In Stock
Get FREE EconoShip on orders over $100! T&C apply

Get this part fast! Average delivery time for in-stock parts via standard shipping: 1.8 days.

 Fits your VVSR1070D5WW Washer!
PartSelect Number PS270806
Manufacturer Part Number WH1X2036
Manufactured by GE
Product Description

Hose Clamp Kit Specifications

This is a water hose clamp kit for a variety of appliances including dishwashers and washers. This is a genuine replacement part. The kit includes two hose clamps. The smaller of the two is 1 inch in diameter while the larger one is 2 inches in diameter. The hose clamps secure the end of the water hose in place to prevent the hose from leaking. If you notice leaking from the hose of your appliance, you may need to replace this kit. Protect your hands with work gloves during this repair to avoid injury.
How Buying OEM Parts Can Save You Time and Money

How Buying OEM Parts Can Save You Time and Money

Troubleshooting
This part fixes the following symptoms:
Leaking
This part works with the following products:
Dishwasher, Washer, Air Conditioner, Washer Dryer Combo.
This part works with the following products:
General Electric, Hotpoint, Kenmore.
Part# WH1X2036 replaces these:
AP2044593, 277528, WC01X0187, WC1X187, WD01X0157, WD01X0414, WD01X0486, WD01X0487, WD01X0488, WD01X0496, WD01X0593, WD01X0606, WD01X0808, WD01X0891, WD01X0943, WD01X0964, WD01X1052, WD01X1303, WD01X5009, WD02X0222 , WD03X0199, WD03X0216, WD03X0326, WD03X0343, WD17X5006, WD17X5044, WD17X5045, WD17X5047, WD1X1052, WD1X1303, WD1X157, WD1X414, WD1X486, WD1X487, WD1X488, WD1X496, WD1X5009, WD1X593, WD1X606, WD1X808, WD1X891, WD1X943, WD1X964, WD2X222, WD3X199, WD3X216, WD3X326, WD3X343, WH01M0240, WH01M0242, WH01M0390, WH01M0567, WH01M0568, WH01X0044, WH01X0064, WH01X0117, WH01X0159, WH01X0381, WH01X0459, WH01X0481, WH01X0762, WH01X0763, WH01X1005, WH01X1021, WH01X1204, WH01X1205, WH01X1206, WH01X1226, WH01X1281, WH01X1282, WH01X1286, WH01X1316, WH01X1373, WH01X1525, WH01X1532, WH01X1581, WH01X1583, WH01X1618, WH01X1620, WH01X1713, WH01X1759, WH01X2020, WH01X2021, WH01X2036, WH01X2460, WH01X2465, WH01X2481, WH01X5313, WH01X5478, WH1M240, WH1M242, WH1M390, WH1M567, WH1M568, WH1X1005, WH1X1021, WH1X117, WH1X1204, WH1X1205, WH1X1206, WH1X1226, WH1X1281, WH1X1282, WH1X1286, WH1X1316, WH1X1373, WH1X1525, WH1X1532, WH1X1581, WH1X1583, WH1X159, WH1X1618, WH1X1620, WH1X1713, WH1X1759, WH1X2020, WH1X2021, WH1X2460, WH1X2465, WH1X2481, WH1X381, WH1X44, WH1X459, WH1X481, WH1X5313, WH1X5478, WH1X64, WH1X762, WH1X763, WH49X0266, WH49X266, WL01X0002, WL01X0006, WL01X0010, WL01X0011, WL01X0021, WL01X0026, WL01X0036, WL01X0051, WL01X0071, WL01X0074, WL01X0125, WL01X0128, WL01X0143, WL01X0193, WL02X0052, WL1X10, WL1X11, WL1X125, WL1X128, WL1X143, WL1X193, WL1X2, WL1X21, WL1X26, WL1X36, WL1X51, WL1X6, WL1X71, WL1X74, WL2X52, WR02X3145, WR02X3177, WR02X3533, WR02X3669, WR2X3145, WR2X3177, WR2X3533, WR2X3669 Show less
Back to Top
Customer Reviews
Average Rating:
★★★★★
★★★★★
2 Reviews
3.0
Filter By Rating:
  • 5 Stars
    1
  • 4 Stars
    0
  • 3 Stars
    0
  • 2 Stars
    0
  • 1 Star
    1
Sort by:
  • 1
Sorry, we couldn't find any existing reviews that matched. Try using some different or simpler keywords.
  • 1
Customer Repair Stories
 Average Repair Rating: 4.5 / 5.0, 1 reviews. What's this?
Sort by:
  • 1
Sorry, we couldn't find any existing installation instruction that matched.
washer had heavy wet clothes left after spin cycle
The trick is to pull the front cover off by using a putty knife .slide it under the cover at both front corners.it will click on each corner.then pull front cover off .lift off the bottom catch hooks.look for the pump on the bottom right side.unplug the wite connector .take 2-5/16 bolts out holding the bracket.then grab a pliers .squeeze the hose clamps and pull the 2 hoses off.assemble new pump.
Other Parts Used:
Drain Pump and Motor Assembly Hose Clamp Kit
  • Richard from Garden City, NY
  • Difficulty Level:
    Easy
  • Total Repair Time:
    Less than 15 mins
  • Tools:
    Pliers, Socket set
8 of 12 people found this instruction helpful.
Was this instruction helpful to you?
Thank you for voting!
  • 1
Questions and Answers

Be the first to ask our experts a question about this part!

You May Also Need ?
Customer Service Representative

Get in touch, we're here to help!

Monday to Saturday
8am - 9pm EST

Contact Customer Service