Models > 1065855

1065855 Kenmore - Overview

Models starting with 1065855

Keep searches simple, eg. "belt" or "pump".
Replacement Ice Maker – Part Number: 4317943
Replacement Ice Maker
★★★★★
★★★★★
(221)
PartSelect #: PS358591
Manufacturer #: 4317943
This ice maker (Complete Icemaker Assembly, Whirlpool Icemaker Kit, Ice Maker Assembly, Refrigerator Ice Maker, Icemaker) receives water from the water inlet valve, freezes it, and dispenses it into t...
$147.35
  In Stock
Water Inlet Valve – Part Number: W10408179
Water Inlet Valve
★★★★★
★★★★★
(79)
PartSelect #: PS3497634
Manufacturer #: W10408179
The water inlet valve (Refrigerator Water Inlet Valve Kit) provides water for the ice maker and water dispenser. This part is located at the back of the refrigerator, and connects to the water supply....
$110.55
  In Stock
Bi-Metal Defrost Thermostat – Part Number: WPW10225581
Bi-Metal Defrost Thermostat
★★★★★
★★★★★
(27)
PartSelect #: PS11750673
Manufacturer #: WPW10225581
If you have ice building up in your freezer, or if your freezer is getting too warm during the defrost cycle you may need to replace the bi-metal defrost thermostat. The function of the defrost bi-met...
$46.68
  In Stock
Ice Maker Water Fill Tube Kit – Part Number: WP2196157
Ice Maker Water Fill Tube Kit
★★★★★
★★★★★
(24)
PartSelect #: PS11739222
Manufacturer #: WP2196157
The icemaker water fill tube provides water to the icemaker so it can produce ice and dispense water. If you notice that your ice maker is not making or dispensing ice, or is leaking, you may need to ...
$10.16
  In Stock
Water Fill Cup and Bearing – Part Number: WP628356
Water Fill Cup and Bearing
★★★★★
★★★★★
(10)
PartSelect #: PS11743318
Manufacturer #: WP628356
This refrigerator ice maker fill cup dispenses the water into the ice cube mold during the fill cycle. Replacing the water fill cup is a possible solution if you notice that the ice maker is leaking, ...
$40.40
  In Stock
Touch-Up Paint - White – Part Number: 72017
Touch-Up Paint - White
★★★★★
★★★★★
(1)
PartSelect #: PS385132
Manufacturer #: 72017
This touch-up paint can be used on a wide variety of household appliances. It is most often used on washers, dryer, refrigerators, dishwashers, ranges, freezers, trash compactors, or microwaves. It is...
$8.02
  In Stock
ARM-SHUT – Part Number: W11342242
ARM-SHUT
★★★★★
★★★★★
(6)
PartSelect #: PS12712096
Manufacturer #: W11342242
This ice level arm, also known as an ice shutoff arm, is designed to detect the level of ice within the ice bin of your ice maker or refrigerator and turn it off when enough ice has been made. When th...
$46.24
  In Stock
Ice Mold – Part Number: WPW10190929
Ice Mold
★★★★★
★★★★★
(13)
PartSelect #: PS11749915
Manufacturer #: WPW10190929
This is an ice maker mold and heater assembly for a refrigerator ice maker. It is used with modular style icemakers and is located in the freezer section of the refrigerator. This ice mold is flake re...
$166.06
  In Stock
Screw – Part Number: WP489478
Screw
★★★★★
★★★★★
(1)
PartSelect #: PS11742754
Manufacturer #: WP489478
Sold individually.
$5.43
  In Stock
RELAY-STRT – Part Number: W10920279
RELAY-STRT
★★★★★
★★★★★
(6)
PartSelect #: PS11770133
Manufacturer #: W10920279
This is a push-on start relay for your refrigerator. It attaches to the compressor and starts it by briefly boosting it. It will then shut off as soon as the motor is up to the required speed. You may...
$67.25
  In Stock
Compression Nut – Part Number: WP627018
Compression Nut
★★★★★
★★★★★
(1)
PartSelect #: PS11743305
Manufacturer #: WP627018
The compression nut is used as a connection between the water supply line and other components in your refrigerator such as your ice maker and your water dispenser. Tools required for this repair incl...
$13.15
  In Stock
Ice Container and Auger Assembly – Part Number: WPW10312300
Ice Container and Auger Assembly
★★★★★
★★★★★
(13)
PartSelect #: PS11752583
Manufacturer #: WPW10312300
This part may come with a plastic or metal auger depending on the factory. It will work with your appliance if found with the model number. (Make sure you install properly at back of ice container, be...
$293.21
  In Stock

Common Symptoms of models starting with 1065855

[Viewing 18 of 18]
Ice maker not making ice
Fixed by
these parts
Fixing Fixing Fixing
Show All
Leaking
Fixed by
these parts
Fixing Fixing Fixing
Show All
Fridge too warm
Fixed by
these parts
Fixing Fixing Fixing
Show All
Not dispensing water
Fixed by
these parts
Fixing Fixing
Show All
Freezer not defrosting
Fixed by
these parts
Fixing Fixing
Show All
Ice maker won’t dispense ice
Fixed by
these parts
Fixing Fixing Fixing
Show All
Freezer section too warm
Fixed by
these parts
Fixing Fixing
Show All
Will Not Start
Fixed by
these parts
Fixing Fixing
Show All
Fridge and Freezer are too warm
Fixed by
these parts
Fixing Fixing
Show All
Ice maker dispenses too much ice
Fixed by
these parts
Fixing Fixing Fixing
Show All
Fridge too cold
Fixed by
these parts
Fixing
Show All
Frost buildup
Fixed by
these parts
Fixing
Show All
Freezer too cold
Fixed by
these parts
Fixing
Show All
Ice maker dispenses too little ice
Fixed by
these parts
Fixing Fixing
Show All
Too warm
Fixed by
these parts
Fixing
Show All
Clicking sound
Fixed by
these parts
Fixing
Show All
Fridge runs too long
Fixed by
these parts
Fixing
Show All
Won’t start
Fixed by
these parts
Fixing
Show All
Keep searches simple. Use keywords, e.g. "leaking", "pump", "broken" or "fit".
was not making ice
take out ice bucket, just loosen the top 2 screws, remove the bottom screw, slide ice maker up & out, srewdriver to release wiring harness clip, reverse to put back in. was very simple. did not install water inlet kit yet. water under fridge stopped after i changed the ice maker.
Parts Used:
Water Inlet Valve Replacement Ice Maker
  • GLENN from ORLAND PARK, IL
  • Difficulty Level:
    Really Easy
  • Total Repair Time:
    15 - 30 mins
  • Tools:
    Nutdriver, Screw drivers
697 of 776 people found this instruction helpful.
Was this instruction helpful to you?
Thank you for voting!
Ice Maker quit working, I could manually cycle unit but then the water would overflow when unit was re-filling.
I backed out the 2 top screws about a quarter inch and then removed bottem screw with a quater inch nut driver. I then lifted Ice Maker clear of the two top screws and lowered it enough to unclip the power connection with a small screwdriver. The new Ice Maker was wired correctley for my refrigeator so all I had to do wea reconnect the power connection and mount new Ice Maker on the two top screws and install the bottem screw. It took e while for the new Ice Maker to start it's cycle but after it did, it worked GREAT. Part Select service was OUTSTANDING, ordered part one day and received the next. THANKS!!!!
Parts Used:
Replacement Ice Maker
  • Max from Green Castle, IN
  • Difficulty Level:
    Really Easy
  • Total Repair Time:
    15 - 30 mins
  • Tools:
    Nutdriver, Screw drivers
585 of 621 people found this instruction helpful.
Was this instruction helpful to you?
Thank you for voting!
When the remote water was turned on, water was pouring onto floor from rear of refrigerator
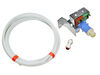
First I unplugged the fridge, then using the socket set I removed the cardboard shield from the lower rear of the refrigerator. I located the leaking water from a cracked solenoid water valve just inside the lower cavity directly behind the water intake line. Removing the valve was a snap - most of the valve plastic compression coupling
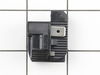
s unscrewed and came off. The metal compression fittings required an adjustable wrench and a pair of pliers to hold the solenoid unit steady. A couple of hex nuts kept the solenoid bolted to the refrigerator frame and came off easily with the socket. Two simple push-on electrical plugs came right off just by pulling on them. The new valve unit wasn't exactly like the original one. It had push-on instead of compression water fittings and the plugs were oriented differently. I recommend studying which water lines entered which port on the valve because I was a little unsure after I took the old one apart (whoops). After figuring out how to put it pack together, the push-on water fittings were even easier, and the unit was scewed back into place on the fridge frame. The electric plugs have different sized contacts so you can't mix them up. I put the cardboard shield back on. Viola!
Parts Used:
Water Inlet Valve
  • Mark from Wolfeboro, NH
  • Difficulty Level:
    Easy
  • Total Repair Time:
    15 - 30 mins
  • Tools:
    Pliers, Socket set, Wrench (Adjustable)
214 of 248 people found this instruction helpful.
Was this instruction helpful to you?
Thank you for voting!