Maytag Dryer Fuses
- Search your model number to find:
- Genuine OEM parts guaranteed to fit
- Free manuals and guides
- Repair instructions and videos

Popular Maytag Dryer Fuses
Your Price
$19.63
In Stock
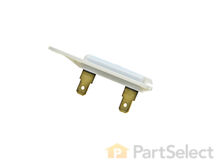
Maytag Dryer Thermal Fuse
Not knowing what the problem was I started looking at the coils and could not see any broken parts.
So then checked the thermal fuse for continuity I removed the two wires from it with a small pair of needle nose pliers, it was held in place by two screws, once they were removed the fuse came out easily, I checked continuity with a volt meter placing the meter on X1 Ohms and could not get a reading.
I replaced with a new one and put it all back together the way I took it apart.
Then I plugged it in and it worked first time, I now have warm dry clothes. Read more...
PartSelect Number PS11741460
Manufacturer Part Number WP3392519
The Dryer Thermal Fuse (Thermal Cutoff, Temperature Fuse) is a 2 by ½ inch, white, plastic safety mechanism that stops the flow of electricity to the motor circuit when a dryer overheats. If the fuse is missing or broken, your dryer will not start. A thermal fuse fails when the exhaust temperature exceeds the fuse rating, that is when the temperature rises above the temperature that the fuse is designed to handle. This can occur when a heating element is shorted, a regulating thermostat or thermister fails, or with a partially restricted exhaust vent. The fuse attaches to the blower wheel housing. It must be replaced when there is no longer continuity between the terminals. This is a one-time fuse, meaning it cannot be re-set. The replacement part features two 3/16 inch terminals.
Fixes these symptoms
- Heat stays on after drum has stopped
- Not Heating
- Too hot
- See more...
Installation Instructions
ANTHONY from CHESHIRE, CT
Dryer was working, but no heat.
First I unplugged the dryer, then removed the back panel, this exposed most all of the wiring and I could see the heater coils.Not knowing what the problem was I started looking at the coils and could not see any broken parts.
So then checked the thermal fuse for continuity I removed the two wires from it with a small pair of needle nose pliers, it was held in place by two screws, once they were removed the fuse came out easily, I checked continuity with a volt meter placing the meter on X1 Ohms and could not get a reading.
I replaced with a new one and put it all back together the way I took it apart.
Then I plugged it in and it worked first time, I now have warm dry clothes. Read more...
Your Price
$36.58
In Stock
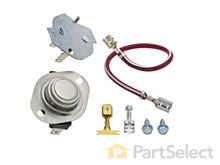
Maytag Dryer Thermal Cut-Off Kit
PartSelect Number PS334299
Manufacturer Part Number 279816
The thermal cut-off (Dryer Thermal Cut-Off Fuse Kit, Dryer Thermal Cut-Off Kit) prevents the dryer from overheating when the dryer high limit thermostat fails in a closed circuit condition. This part fails when the heater housing does not have adequate airflow through it; this is normally caused by restriction in the exhaust vent, plugged lint screen, or broken blower wheel. If this part fails, the dryer may not produce any heat. This kit includes one high-limit thermostat with a limit of 250 degrees Fahrenheit, and one thermal cut-off fuse (309 degrees), jumper wires, and new female spade terminals. Both components are mounted on the heater housing, and measure approximately 2 inches long and 1.5 inches wide each. This kit comes in silver and is constructed of metal.
Fixes these symptoms
- Heat stays on after drum has stopped
- Not Heating
- Too hot
- See more...
Installation Instructions
Vernon from Niceville, FL
No Heat
First tried heating element and thermal fuse with no luck. Ordered thermal cutoff and fixed problem. Had I used an ohm meter first I would have determined problem before having ordered heating element and fuse, as both had resistance. I wast just lazy and ordered the took the most common failed components first before taking dryer back off.
Read more...
Your Price
$53.28
In Stock
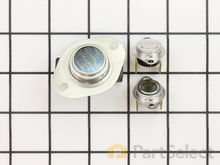
Maytag Dryer High Limit Thermostat and Thermal Cut-Off Kit
PartSelect Number PS334387
Manufacturer Part Number 279973
Also known as Thermal Cut-Off kit. The thermostat acts as a safety mechanism that keeps the dryer from overheating and the fuse is like a backup system - it's set to trip at a higher temperature than the thermostat. Once it trips, it has to be replaced.
Fixes these symptoms
- Not Heating
- Too hot
- See more...
Installation Instructions
Vince from Kathleen, GA
Clothes would not Dry
I simply removed the back of the dryer to gain access to the heating element. Once I removed the heating element I figured I would also replace the thermostat and thermal fuse as preventive maintenance.
Read more...
Your Price
$33.01
In Stock
Maytag Dryer High Limit Kit
2. Lift dryer top from front (hinged in rear). Just friction holding top down. Use flat scewdriver wrapped in cloth to help lift.
3. Locate heating element - rear top behind drum
4. Unplug red wires to the high limit thermal fuse
5. Unplug red wires to the heating element
6. Unlug white wires to the high limit fuse
7. Remove high limit thermal fuse
8. Remove heating element
9. Remove high limit fuse
10 Clean heating box
Installation is reverse order but do the following first!
Clean lint trap - Remove front of dryer
1. Unplug white door switch wires. inside front top right
2. remove two screws securing the front of dryer - inside front top left and top right. Front of dryer is hinged at bottom
3. Clean all the lint you can find. If you have never cleaned out the lint, there might be a lot and the cause of over heating (shorting fuse life). Add to your yearly things to do list.
4. While your at it check the alignment of the plastic glides the drum sits on.
5. Also check the foam gasket between the fan housing and lint trap. Mine was off a bit. Realigned with doubled sided tape. Read more...
PartSelect Number PS2162282
Manufacturer Part Number LA-1053
The high limit kit comes with three separate thermal fuses for dryers. One electric thermal fuse with a limit of 258, one gas high limit at 240, and one gas and electric high limit thermostat with a limit at 300. The thermal fuse kit shuts off the motor in the dryer when it begins to overheat. If the dryer will not heat, is overheated, shuts off too soon, or takes too long to dry then the thermal fuse might have exploded and need to be replaced. For replacement instructions refer to the diagram by manufacturer. For safety, unplug the dryer before installing the part.
Fixes these symptoms
- Too hot
- Will Not Start
- Won’t Start
- See more...
Installation Instructions
Ronald from Fredericksburg, VA
Electric dryer would not heat - Thermal fuses - $25 fix - I love DIY
1. Unplug dryer from power outlet2. Lift dryer top from front (hinged in rear). Just friction holding top down. Use flat scewdriver wrapped in cloth to help lift.
3. Locate heating element - rear top behind drum
4. Unplug red wires to the high limit thermal fuse
5. Unplug red wires to the heating element
6. Unlug white wires to the high limit fuse
7. Remove high limit thermal fuse
8. Remove heating element
9. Remove high limit fuse
10 Clean heating box
Installation is reverse order but do the following first!
Clean lint trap - Remove front of dryer
1. Unplug white door switch wires. inside front top right
2. remove two screws securing the front of dryer - inside front top left and top right. Front of dryer is hinged at bottom
3. Clean all the lint you can find. If you have never cleaned out the lint, there might be a lot and the cause of over heating (shorting fuse life). Add to your yearly things to do list.
4. While your at it check the alignment of the plastic glides the drum sits on.
5. Also check the foam gasket between the fan housing and lint trap. Mine was off a bit. Realigned with doubled sided tape. Read more...
Your Price
$17.97
In Stock
Maytag Dryer Disposable Thermal Fuse - Two Terminal
PartSelect Number PS11741444
Manufacturer Part Number WP3390719
This part attaches to the exhaust duct of your clothes dryer.
Fixes these symptoms
- Not Heating
- Too hot
- See more...
Installation Instructions
Russell from LA VERNE, CA
dryer would not heat.
I checked parts select.com and followed the guide lines,ordered the correct parts thanks to the web site help.parts arrived in 2 days,A very easy install and back to work drying clothes.Thanks parts select.
Read more...
Maytag Dryer Thermal Cut-Off with High Limit Thermostat
PartSelect Number PS991443
Manufacturer Part Number 280148
The thermal cut-off (fuse) is meant to trip at a higher temperature than that of a high limit thermostat. This is a one time use fuse, so when it does trip, you must replace it. The hi-limit thermostat acts as a safety mechanism that keeps the dryer from overheating. Once the dryer temperature reaches a certain point, this piece will shut down power to the heating element.
Fixes these symptoms
- Too hot
- See more...
Installation Instructions
Raymond from CAMERON, NC
No heat in the dryer
Went to Kenmore website, got parts diagram, watched You Tube videos on dryer repair for this model, ordered parts. When parts arrived (in 4 days, great job!), re-watched You Tube videos, installed parts, dryer works great. Took longer than industry standards because I had to suction out/vacuum a great deal of lint/hair. as I went along.
Read more...
Your Price
$12.97
In Stock
Maytag Dryer High Limit Thermal Fuse
PartSelect Number PS11742274
Manufacturer Part Number WP40113801
Meant as a backup to a high limit thermostat, this fuse is typically set to trip at a higher temperature than that of a high limit thermostat. This is a one-time use fuse, so when it does trip, you do need to replace it. It's letting you know that something is wrong with your dryer.
Fixes these symptoms
- Too hot
- See more...
Installation Instructions
Mark from West Chester, PA
Timer won't advance for auto-sensing cycles. Low Heat.
First I unplugged the dryer from the wall outlet. Then, removed the access panel in the lower front (held on by 2 screws near the floor). Then, I removed the black plastic air duct (held by 3 screws) in front of the blower. Then, with a Sharpie marker, next to each wire terminal lug, I labeled on the chassis the COLOR of each wire where it plugs on to a terminal lug (for proper wiring re-assembly later). Then, thru the lower front, I reached into the lower left rear of the dryer to remove the heating element assembly from its metal duct (held by 3 or 4 screws) - it slides down a bit, then it is easily removable. I layed the element on the floor in front of the dryer - all wiring still intact. Then, using the NEW HEATING ELEMENT and SENSORS ordered, I assembled them to match the original, re-using screws off of the old unit - and moving the wiring one-by-one from the original to the new assembly. I then installed the new heating element assembly into the duct at the lower rear of the dryer. I then replaced the 2 sensors on the front metal panel of blower housing, with new parts from my order, re-using the original wiring and screws. Then I re-installed the black plastic duct onto the front of the blower. Then, on the top of the dryer, I dissassembled the control panel from the rear, by removing 5 screws. I then found the resistor mounted on the back of the timer, and replaced it with the new one. Since the new resistor did not come with terminal lugs crimped on its wires, I had to cut the terminal lugs off of the original resistor and solder them onto the new resistor. I then reassembled the control panel. I then plugged the dryer back into the wall outlet and did a test run with no clothes. IT WORKED !! Then I reinstalled the lower front access panel and ran the dryer with wet clothes. IT WORKED !!
Read more...
Your Price
$43.12
In Stock
Maytag Dryer Thermal Fuse
Remove front cover replace switches and fuses.
De- lint the blower and vent duct.
Reinstall cover door finished. Read more...
PartSelect Number PS11740687
Manufacturer Part Number WP307473
This thermal fuse is mounted on either the heating element or burner tube housing.
Installation Instructions
Andrew from Goldsboro, NC
Unit would not come on due to blown fuse
Remove 2 front door screws and 2 side cover screws . Remove front cover replace switches and fuses.
De- lint the blower and vent duct.
Reinstall cover door finished. Read more...
Maytag Dryer One Time Use Thermal Fuse
thermostats and the thermal fuse in the dryer and now it works better than even before it went bad !. Turned out that I did not need the element, but I'm keeping it anyways in case I do at some point in the future. Read more...
PartSelect Number PS11741511
Manufacturer Part Number WP3399849
This part is a one time use thermal fuse cannot be re-set and must be replaced when continuity between the pins is no longer present.
Installation Instructions
Sean from Portland, OR
Dryer does not heat
After much grief and finding out that to replace my existing washer/dryer unit would cost about $ 1200, I was doing some research and found Partselect. I replaced twothermostats and the thermal fuse in the dryer and now it works better than even before it went bad !. Turned out that I did not need the element, but I'm keeping it anyways in case I do at some point in the future. Read more...
Maytag Dryer Thermal Cut-Off
PartSelect Number PS11746693
Manufacturer Part Number WP8573713
The thermal cut off fuse will disrupt the power flow to the drive motor when the dryer gets too hot. If your dryer will not heat properly, or will not heat at all the issue could be with a faulty or damaged thermal cut off fuse. Before you replace the faulty cut off fuse, make sure you disconnect the power from your dryer.
Related Maytag Dryer Parts
- All Maytag Dryer parts
- Maytag Dryer Belts
- Maytag Dryer Brackets and Flanges
- Maytag Dryer Caps and Lids
- Maytag Dryer Circuit Boards and Touch Pads
- Maytag Dryer Doors
- Maytag Dryer Drums and Tubs
- Maytag Dryer Ducts and Vents
- Maytag Dryer Elements and Burners
- Maytag Dryer Fans and Blowers
- Maytag Dryer Filters
- Maytag Dryer Handles
- Maytag Dryer Hardware
- Maytag Dryer Hinges
- Maytag Dryer Hoses and Tubes
- Maytag Dryer Knobs
- Maytag Dryer Latches
- Maytag Dryer Lights and Bulbs
- Maytag Dryer Panels
- Maytag Dryer Pulleys
- Maytag Dryer Seals and Gaskets
- Maytag Dryer Sensors
- Maytag Dryer Springs and Shock Absorbers
- Maytag Dryer Switches
- Maytag Dryer Thermostats
- Maytag Dryer Timers
- Maytag Dryer Valves
- Maytag Dryer Wheels and Rollers
- Maytag Dryer Wire Plugs and Connectors


