Enter the code DIYDAD10 at checkout to apply your discount. Discount will be applied at checkout when the code is entered & applies to all parts. Cannot be combined with any other coupon or special offer & cannot be applied to a previously placed order. Not valid toward tax or shipping & handling. Discount has no cash value. Discount expires on June 17 at 11:59pm EST.
You've Got 10% Off Your First Order!Save 10% with code at checkout *click to copy coupon code
This 40-Watt light bulb is sold individually and is a genuine OEM replacement option for your home appliances. It is specially designed to withstand extreme temperatures, so this bulb is compatible wi...
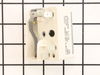
This part is also known as the "brains" of the appliance. ***NOTE: The wiring could be different than the original control. This part may need to be installed by an appliance repair person.
The dual radiant element for your range or cooktop provides the heat that you cook with. It is found under the main cooktop. If your element will not heat, you will need to replace it with this part. ...
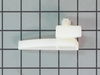
This is a replacement drawer support for your oven. The drawer support provides stability to the drawer unit as it opens and closes. If your oven drawer is hanging or will not slide in or out efficien...
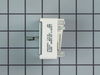
This part is the replacement light socket for your oven. The oven light socket provides power to the light, and at the same time holds the light bulb in place.
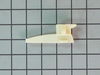
This part is a replacement lens for your oven or range. The lens is red in color, and when the elements are turned on, the light behind the lens will turn on to inform the user that the element is, in...
After removing the back of the range the oven control board was visible and accessible by removing four nuts. There was some resistance removing the leads from the oven coils and light-bulb mechanisms but with some leverage and pliers they came loose. The only challenge was the face plate of the unit is attached using adhesive and neede
... Read mored to be carefully peeled off and added to the new oven control board. Getting this right was just a matter of taking time and lining up the components correctly. After applying the face, the new control board went right in. I reattached the back, plugged the unit back in, and the over has worked great for the past week. Part select being able to identify the part numbers listed from the component likely saved me at least $100 of having a GE certified repair technician come in.
called service co. and described problem while i was looking at parts diagram and he agreed with my feeling what part got fried. he told me the part would be 183.00 plus labor and drive time. when i told him i was looking at the part on line for 65 dollars he hung up on me. i recieved the part and was slightly dissapointed to know there
... Read more was a sepperate adhesive overlay. i saw that it was a sepperate part but if i knew it was adhesive i would have spent the extra 20 dollars for a new one. but, to my surprise the old one peeled off easily and gently re-apllied it to the new conrol board alighning it well seemed to be the trickiest part of the job. took the five wires with connectors out of the old one and inserted them into the same place on the new one. removed the old one from the frame (4 pan phillp sheet metal screws) and then screwed the new wired control board in. plugged in the unit and pressed the bake button and then mixed the brownie batter. replaced the back panel cover. 65 dollars and 15 minutes.
I started by Unscrewing the range top. 2 small screws. I took off the old piece by unclipping the piece . Then I color coded each wire so that I would know exactly where I would place the wires for the new part. 30 min maximum time spent changing the part. Please don't forget to unplug the range before you start.