The ice bucket auger is located within the ice bucket assembly in your freezer. It stirs and dispenses the ice in the bucket. You may need to replace the auger if your ice maker is noisy, or not dispe...
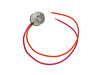
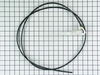
This sensor (Temperature Sensor, Thermistor, Refrigerator Temperature Sensor) sends the temperature reading of the compartment to the control board. If you notice your refrigerator is too warm, too co...
This defrost termination thermostat (Defrost Limiter Thermostat, High Limit Thermostat, Refrigerator Defrost Bi-Metal Thermostat) acts as a safety device to stop the evaporator coil from overheating, ...
This drawer slide rail is for the right side of your refrigerator. The drawer slide rail attaches horizontally to the refrigerator wall and supports the drawer so it can easily slide in and out. If th...
This is a manufacturer-approved drawer slide rail for your refrigerator. This slide rail is for the left side of the fridge. All you need to complete this repair is a Phillips screwdriver. Remove the ...
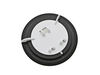
This “Dispenser Door Assembly” (Door Recess Assembly, Ice Door Assembly, Dispenser Door, Refrigerator Dispenser Ice Chute Door Kit, Dispenser Door Flap, Ice Chute Door, Flapper) keeps the room air fro...
This is the replacement dairy door for a refrigerator. It is installed on the inner door and rotates up and down to allow access to the dairy compartment. It is made of clear plastic. If your dairy do...
This door recess spring or dispenser lever spring in your refrigerator is used to return the ice door to the closed position or the dispenser lever to the home position once released. You will find th...
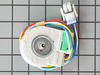
I used a digital camera and photographed the assembled unit and the metal blades before I started the repair. Then, I removed the top screw on the clear shield. Flip over ice tray and removed two Phillips screws on bottom. Exterior plastic white cover comes off next. The cover sides have hard push-in white plastic tabs. Push them in; pry
... Read moreup top cover with small flathead screwdriver. Slide white top cover up and you will now see the metal blades and assembly. Auger is held in place with a metal c-clip and washer on the end. Use flat head screwdriver to pry off c-clip. Then you will see a nylon round slotted nut. The threads are reverse, use pliers and loosen nut. It is not that tight but pliers are needed. Then it all is loose and ready for removal. I slid all the blades off at one time and kept them stacked together. Slide out auger and clear flat shield cover. Install new auger, clear shield, and metal blade stack. When you put it all back together take a look at the long metal J-hook on the bottom make sure it is in the slot before you make everything tight. Failing to do this will prevent cubed ice from dispensing. It is not that hard to do the repair it just takes some patience and paying attention to details.
After replacing the defrost heater, main board and thermistor I still had the same problem. Called a repair guy and he (with the help of GE on the phone) diagnosed that the temperature sensor was bad. So I ordered from partselect and installed it and it fixed the problem. Been good for a couple months (knocking on wood). To install I
... Read morehad to cut the 2 wires to the old sensor, crimp the 2 new wires on and snap the new sensor to the clip on the evaporator. Very easy. Make sure you seal the ends of the wire crimps so moisture doesn't get in and corrode the connection.
The flap to the ice dispenser would not close, which allowed the ice dispenser to frost up, freezing the water dispenser.
This was a simple fix. The solenoid had stopped working, so it would not automatically close the door flap. I read some posts on this site that suggest that you had to remove the trim around the entire dis
... Read morepenser to get at the solenoid. My fridge may be a newer model, but in any event it was much easier than that. Just below the touch pad for choosing water, ice, or crushed ice (above where the ice/water dispenses) there are three very small holes spaced about an inch a part. After unplugging the fridge, I stuck a small philips-head screw driver in each, freeing spring clips. That allowed the touch pad to come off. I then removed four screws to remove a plastic piece covering the chute, giving me access to the flap and solenoid. I just unplugged the solenoid from the circuit board on the back of the touch pad and then removed three screws to remove the old solenoid. I replaced it with the new solenoid and plugged it into the circuit board. The touch pad then snapped back into place.
The hardest part was figuring out how to get at the solenoid. After I found that pushing the clips in those three holes allowed me to remove the touch pad, it could not be any easier.