Enter the code DIYDAD10 at checkout to apply your discount. Discount will be applied at checkout when the code is entered & applies to all parts. Cannot be combined with any other coupon or special offer & cannot be applied to a previously placed order. Not valid toward tax or shipping & handling. Discount has no cash value. Discount expires on June 17 at 11:59pm EST.
You've Got 10% Off Your First Order!Save 10% with code at checkout *click to copy coupon code
This is a multi-use and multi-appliance screw. It can be used on a microwave, refrigerator, range/oven, air conditioner, dehumidifier, washer, or dryer. The measurements of this screw are 8 x 1/2 inch...
$20.83
In Stock
Order within the next 12 hrs and your part ships today!
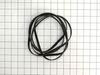
The drum belt attaches to the motor pulley and causes the drum to spin as the motor is rotating. The drum belt is made of black rubber. This is an easy repair and should only take a few minutes. This ...
$50.27
In Stock
Order within the next 12 hrs and your part ships today!
This is a thermistor, also known as a dryer thermistor. The thermistor is attached to the blower housing, it will help regulate and oversee the temperature within the dryer. The most common symptom of...
$29.87
In Stock
Order within the next 12 hrs and your part ships today!
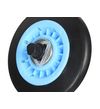
The drum support roller and axle, which includes the roller shaft and mounting clips, is used in dryers. This part holds the drum as it rotates on the support wheels. When the roller begins to wear ou...
$43.07
In Stock
Order within the next 12 hrs and your part ships today!
This thermostat is a genuine OEM part and is manufacturer-approved for electric dryers. The thermostat is responsible for monitoring and maintaining the temperature inside the dryer during the drying ...
$25.07
In Stock
Order within the next 12 hrs and your part ships today!
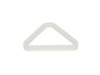
This moisture sensor plate is specifically designed to fit with your Samsung dryer. It is made of stainless steel and measures approximately 5 inches long. It is designed to detect the amount of moist...
$19.33
In Stock
Order within the next 12 hrs and your part ships today!
The high limit thermostat is designed for use in your dryer. The function of this part is to make sure that your dryer does not get too hot. If your dryer is not regulating heat properly, you may need...
This thermal cut-off fuse bracket assembly is a genuine replacement part supplied directly by Samsung for use in dryers. It is a safety component that is designed to protect the dryer from overheating...
$58.67
In Stock
Order within the next 12 hrs and your part ships today!
YouTube, YouTube, YouTube. I YouTubed many videos on how to take a dryer apart to reach the drum support roller and axle. After watching numerous videos, I settled on one that had my exact model of dryer. For my dryer, previous inputs said I needed two rollers to for my model. That is not the case. My model actually has 4 rollers, 2 in th
... Read moree front and two in the back. I ordered 2 initially but only needed 1 thankfully since only one roller was bad. Keep it simple stupid is how I got it done. Dryer's are pretty simple machines mechanically. Don't trash your noisy dryer. We bought ours in 2014 and it only recently started giving us issues. This is after 2 moves and being run daily for a family of 6. I'm glad I found partselect.com. They saved me a ton of money.
Cleaned the sensors from inside the drum with alcohol and that did not work. Ordered two sensors. Lift top cover. Remove screws on each of the front side that secures front cover. Unplug door sensor and pull front cover towards you and lift at same time removing from frame. I own dogs and immediately noticed dog hair and surprisingly
... Read morelint all over the place. Remove the screws from the lint trap. (Theres one you access from inside the drum.) Unplug your sensor wires. Remove lint trap. The sensors simply push in/out. While I was in there I removed the cover for the lint tube and cleaned it out good. Lint had started to gather around the fan. Reverse your process and your done. TIP: Keep your screws orderly as you unscrew them. If you have this problem, just a good cleaning of hair, lint, dirt may do the trick as it essentially packs around the plug of the sensors. I had already ordered my sensors so I just put them in. I took my time and cleaned good and it was about an hour. It could be done in 15-30 minutes easily.


 Samsung Dryer")
 Samsung Dryer")
 Samsung Dryer")
 Samsung Dryer")
 Samsung Dryer")
 Samsung Dryer")