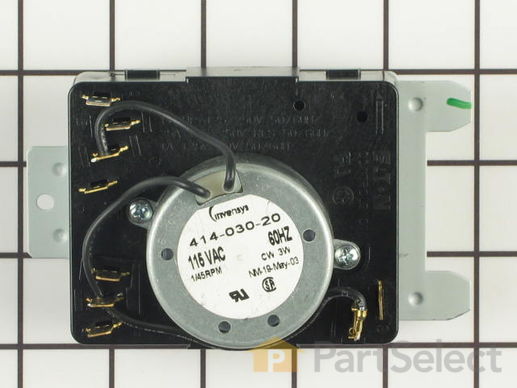
This dryer timer is used to control the unit's cycles by regulating the length of time that power is directed to each setting.
How Buying OEM Parts Can Save You Time and Money
Troubleshooting
This part works with the following products:
Dryer.
Part# WE4X791 replaces these:
AP2042833, 1231, 175D1445G004, WE04X0791
Customer Repair Stories
Average Repair Rating: 3.2 / 5.0, 5 reviews.
What's this?
Sort by:
< Prev
1
Next >
Search filter:
Clear Filter
Your search term must have 3 or more characters.
Keep searches simple. Use keywords, e.g. "leaking", "pump", "broken" or "fit".
Sorry, we couldn't find any existing installation instruction that matched.
The timer on my dryer quit working. The dryer still ran, but the timer would not run down.
This was one of the easiest repair jobs I have ever done. The top panel on the dryer has a removable back so that you can get to the controls. I simply removed the screws on the back panel, and the timer was right there. The timer is held in place to the front panel by one screw, and there are 3 wires that plug into it. Those wires ha
... Read moreve a head on them which slides easily into place on the new timer. It is really easy to see which one goes where. So all you have to do is remove the screw and the 3 wires, put the new timer in place, attach the wires to it and screw it back in. Also, you need to remove the knob from the old timer (it simply pulls straight out) and replace it on the new timer before you screw the timer back in. I made the mistake of thinking that the knob attaches to the timer from the front, after the timer is in place, but the knob will not stay in place that way. The rim of the knob is actually behind the front panel, so that it doesn't pull back out. Super easy job!!! Good luck!
Read less
Jennifer from Lake Wylie, SC
Difficulty Level:
Really Easy
Total Repair Time:
15 - 30 mins
Tools:
Nutdriver, Screw drivers
9 of 11 peoplefound this instruction helpful.
Was this instruction helpful to you?
Thank you for voting!
Intermittant no heat
Unplug appliance !!I remove the 2 screws holding the backsplash asm on. Tip backsplash forward. remove rear cover screws & cover. Remove timer 1 screw. remove knob, pulls off. transfer wires to new timer 1 @ a time , making sure to place wire in correct position, letters on old & new timer indicate location. Reinstall knob. Reinstall time
... Read morer & backsplash cover & remount backsplash..Plug in dryer & Check operation
Timer knob broke because timer became hard to turn.
Removed the control panel to determine the cause of the problem was the timer unit. Ordered the timer unit and a knob. The parts arrived within three days. Replaced timer unit and knob; problem solved!
Timer was not shutting down, running continously, and with no heat regulation
Removed the 2 hex head scres holding the front panel assembly to the main unit. Then removed the screws holding the back sheet metal panel to the control panel. Pull back on the control panel to disengage the slotted flanges from the main dryer body. Rotate the control panel forward to expose the wiring and guts of the panel. Remove the h
... Read moreolding screw for the timer assembly and place it out of the way. DO NOT remove any of the wire connectors from the old timer assembly yet. Rmove the control knob from the old timer assembly using a flat head screwdriver to pry it from the control rod. Place the knob on te new timer assembly and screw the completed assembly to the control panel. Now remove the bridging wire terminal and attach to the new timer in the same position as the old one. Now one at a time remove the wire connectors from the old timer and attach to the corresponding terminals on the new assembly. Reattach the sheet metal back cover with the screws and then replace the entire panel assembly back into the main body slots. Replace the hex head scews and reattach the power which you disconnected prior to doing anything else. Clean up the dust bunnies as long as you are back there. Tell the wife that this was a very complicated repair and worthy of a beer and some golf course time.
Read less
David from Parker, CO
Difficulty Level:
Really Easy
Total Repair Time:
Less than 15 mins
Tools:
Screw drivers
5 of 8 peoplefound this instruction helpful.
Was this instruction helpful to you?
Thank you for voting!
Intermittent then no heat
First guess is one of the thermostats. Used ohm meter to test all 5 thermostats. All looked good. (first clue) Bypassed all thermostats, dryer worked. Ordered thermostats. (a couple at a time) Replaced thermostats. Dryer did not work. Tested heating element. Looked good. (Second Clue) Replaced heating element. Still no go! Dryer started w
... Read moreorking then stopped. Very confused. Ordered timer. Replaced timer. Everything great! Works like a new one. Moral to this story, trust your meter! Should have been a very easy repair. Replaced belt while dryer apart.
We're sorry, but our Q&A experts are temporarily unavailable.
Please check back later if you still haven't found the answer you need.
1 question answered by our experts.
Sort by:
< Prev
1
Next >
Search filter:
Clear Filter
Your search term must have 3 or more characters.
Keep searches simple. Use keywords, e.g. "leaking", "pump", "broken" or "fit".
Sorry, we couldn't find any existing answers that matched.Try using some different or simpler keywords, or submit your new question by using the "Ask a Question" button above!
Dennis
January 12, 2020
I have a GE electric clothes dryer model # dde8500sbmww. The dryer no longer shuts off by itself.To start this dryer you turn a knob to the right and it springs back. This part: (partselect number ps268236 is expensive, so i’d like some assurance that it will fix the problem. Thanks.
For model number DDE8500SBMWW
Good Day Dennis. Thank you for your question in regards to your unit (Model Number DDE8500SBMWW). Based on our research, the issue you are having could be the result of needed to replace one or more of the following parts: 1) Door Switch (PartSelect Number PS2344321). 2) D-Shaped Knob Insert Clip (PartSelect Number PS267091). 3) Timer (PartSelect Number PS268236). 4) Selector Knob with Clip (PartSelect Number PS271094). 5) Drum Bearing Slide - White (PartSelect Number PS755842). 6) Timer Knob (PartSelect Number PS266954). 7) Drum Bearing Slide - Green (PartSelect Number PS6447706). We do apologize but we do not have technicians on staff, for more specialized assistance or to speak with someone about this we would recommend calling the manufacturer of the equipment directly. They may be able to provide you confirmation of which part that you need. Once you have this information, please feel free to check back with us for pricing and availability information. Best Regards.
Item is in stock and will ship today if your order is placed before 4:00 PM Eastern Standard Time.
If your order is placed after 4:00 PM EST, the in stock items will ship on the next business day.
On Order
Item is not in stock and usually ships 3-5 business days from the time you place your order.
Special Order
Item is not in stock and usually ships 10-15 business days from the time you place your order.
NLA - No Longer Available
This item is no longer being made by the manufacturer, and cannot be added to your shopping cart.
[{"position":0,"name":"Home","title":"Home","url":"/"},{"position":1,"name":"Dryer","title":"Dryer","url":"/Dryer-Parts.htm"},{"position":2,"name":"Circuit Board or Touch Pad","title":"Circuit Board or Touch Pad","url":"/Dryer-Circuit-Boards-and-Touch-Pads.htm"},{"position":3,"name":"WE4X791","title":"WE4X791","url":""}]
You added 1 item to your cart
✖
$
Qty:
Total item(s) in cart:
Order Subtotal
$
*Taxes and shipping will be applied during checkout