Keep searches simple. Use keywords, e.g. "leaking", "pump", "broken" or "fit".
Sorry, we couldn't find any existing reviews that matched. Try using some different or simpler keywords.
★★★★★
★★★★★
Deanna B - January 14, 2019
Verified Purchase
Part for clothes dryer was exactly what was needed
Excellent condition and I'm definitely satisfied and will order any future parts we need. Happy to be able to dry my laundry again after searching and searching for what I needed. Thanks again
< Prev
1
Next >
Customer Repair Stories
Average Repair Rating: 3.4 / 5.0, 4 reviews.
What's this?
Sort by:
< Prev
1
Next >
Search filter:
Clear Filter
Your search term must have 3 or more characters.
Keep searches simple. Use keywords, e.g. "leaking", "pump", "broken" or "fit".
Sorry, we couldn't find any existing installation instruction that matched.
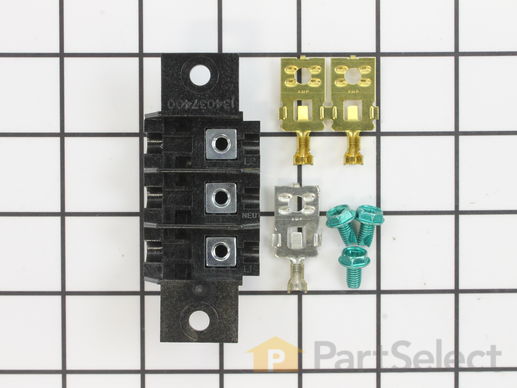
Missing power cable cover/damaged terminal block
While changing power cable from 3 prong to 4 prong connection on a recently purchased used dryer I found the terminal block partially melted due to improper connectors which overheated. The bracket and cover were also missing which presented a shock hazard for anyone touching the exposed connections and there was no way to connect the str
... Read moreain relief. I disconnected the old 3 prong cable, removed the old terminal block, installed the new terminal block (required opening the dryer top for access), threaded power cable through bracket and fastened with strain relief leaving loose, attached the neutral/ground wires to middle terminal connection point, red to red wire in terminal block and black to black wire also in terminal block and tightened bracket and added cover.
Used nut driver to remove screw and cover from dryer cord terminal block, used screw driver to remove two screws securing old terminal block, cut dammaged wire and stripped wire back and crimped on new terminal connecter, replaced old terminal block with new one, replaced two screws, installed new cord, and replaced cover plate and screw.
Edwin from Eagar, AZ
Difficulty Level:
Really Easy
Total Repair Time:
30 - 60 mins
Tools:
Nutdriver, Pliers, Screw drivers
7 of 9 peoplefound this instruction helpful.
Was this instruction helpful to you?
Thank you for voting!
Burning odor, melted terminal block
0) Turned off breaker at panel and disconnected power cord from 240v wall outlet 1) Removed screws that hold electrical cover plate on back of dryer. 2) Lifted the top of dryer using putty knife on 2 top edges of lid. This lifts up like a cars hood. 3) Removed the screws that attach the power cord to the terminal block
... Read more and disconnected power cord 4) Removed screws that attach terminal block to dryer 5) Removed melted terminals by prying out of terminal block. Note metal lip on terminal has to be lifted in order to slide connector out. Also unscrewed ground wire from terminal block to dryer. 6) Drew diagram of what color wires go to what terminals 7) Cut terminals off of wires and connected new terminals. Crimped closed and used butane solder torch to solder connection between terminal and wire 8) Reconnected terminals to terminal block by sliding in. **Note, had to file down the edges of the terminals using moto-tool to make it fit as they are connected together using break-away tabs that leave a large piece of metal connected not allowing to fit in terminal block 9) Reconnected terminal block to dryer and reconnected ground wire. 10) Reconnected power cord to terminal block with screws 11) Replaced cover over wiring terminal block 12) Reconnected power cored to 240ac wall outlet 13) Turned breaker back on
Read less
DAVID from DURHAM, NC
Difficulty Level:
Easy
Total Repair Time:
30 - 60 mins
Tools:
Nutdriver, Screw drivers
12 of 13 peoplefound this instruction helpful.
Was this instruction helpful to you?
Thank you for voting!
Terminal Block Melts when power cord connector is left loose by install crew.
1) Removed Top Dryer Cover (pushed 2 compression clips on front side 1" from top and 2" in from each side) to gain access to terminal block in rear. 2) Removed 2 screws over terminal block cover and 2 screws holding bad terminal block in place. Removed 3 screws holding bad power cord, 3) Removed good terminal connectors from
... Read morebad terminal block and reinstalled them in the new terminal block. 4) Cut dryer wire from bad terminal block connector and soldered (optional) them to the new terminal block connector. Installed this connector into the new terminal block. 5) Installed new terminal block in dryer with 2 screws. 6) Installed new power cord on new terminal block ensuring contacts were tight and cord had pull guard properly installed. Reinstalled terminal block cover with 2 screws. 7) Reinstalled Dryer Top Cover.
Read less
Arthur from Grand Prairie, TX
Difficulty Level:
Really Easy
Total Repair Time:
30 - 60 mins
Tools:
Nutdriver, Pliers, Screw drivers, Socket set
47 of 67 peoplefound this instruction helpful.
Was this instruction helpful to you?
Thank you for voting!
< Prev
1
Next >
Questions and Answers
We're sorry, but our Q&A experts are temporarily unavailable.
Please check back later if you still haven't found the answer you need.
3 questions answered by our experts.
Sort by:
< Prev
1
Next >
Search filter:
Clear Filter
Your search term must have 3 or more characters.
Keep searches simple. Use keywords, e.g. "leaking", "pump", "broken" or "fit".
Sorry, we couldn't find any existing answers that matched.Try using some different or simpler keywords, or submit your new question by using the "Ask a Question" button above!
John
August 25, 2017
My dryer will not start. I have replaced the starter switch and the switch button in the door. I also purchased a thermal block kit partselect number ps419369
Manufacturer part number 134101400
Manufactured by Frigidaire does this kit work for a gas dryer? If so, where is it located?
For model number FGRB7800DS0
Hi John,
Thank you for the question. The PS419369 is the correct block for this Gas appliance. The block on this appliance looks to be on the back of the appliance in the top corner.
Hope this helps!
1 person found this helpful.
Was this helpful?
Thank you for voting!
Carter
December 24, 2017
My dryer will start for about 10 seconds and then turns off. It does spin and it is very loud. Sometimes it doesn't start when clicking the start button and i have to turn the knob multiple times in order to get it to turn on again. Do these sound like symptoms that could be solved with this part? Thanks!
For model number FEX831FS2
Hi Carter,
Thank you for your question. If your dryer is not tumbling, there are some parts that you will need to check to see which one is causing the issue. You will need to check the belts, the idler pulley and the motor. I hope this helps. Thank you and have a great day!
1 person found this helpful.
Was this helpful?
Thank you for voting!
Melissa
March 14, 2018
My dryer will run for about 2 minutes then it starts to make a really loud noise and gets extremely hot. I have made sure that there is good airflow and the dryers completely clean
For model number fre5711kw
Hi Melissa,
Thank you for your question. If your dryer is getting too hot, there are some parts that you will need to check to see which ones are causing the issue. You will need to check the thermal limiter, the high limit thermostat, the heating element assembly, the thermostat - 4 terminal - L135-15F and the drum belt. I hope this helps. Thank you and have a great day!