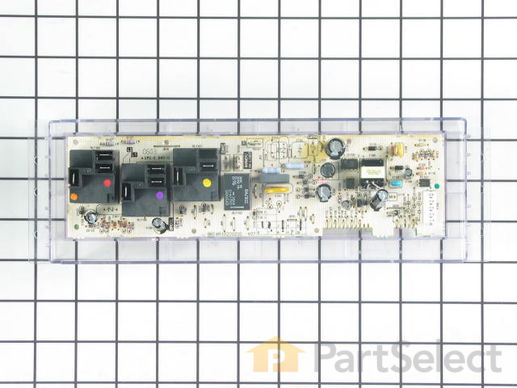
Part Location Diagram of WB27X45466 GE CONTROL OVEN TO9
See part 16 in the diagram
( Grid squares measure 1x1 inch )
Customer Service Representative

Get in touch, we're here to help!

Monday to Saturday
8am - 9pm EST

customerservice@partselect.com

CONTROL OVEN TO9 WB27X45466

 Fits your JBS55DM2WW!
★★★★★
★★★★★
53 Reviews

Rated by 29 customers 

Really Easy 

30 - 60 mins 

Ratings submitted by customers like you who bought this part.

$ 198.26
  In Stock
Get FREE EconoShip on orders over $100! T&C apply

Get this part fast! Average delivery time for in-stock parts via standard shipping: 1.8 days.

 Fits your JBS55DM2WW!
PartSelect Number PS16873547
Manufacturer Part Number WB27X45466
Manufactured by GE for General Electric, Hotpoint, Kenmore
Product Description

CONTROL OVEN TO9 Specifications

This part is also known as the "brains" of the appliance. ***NOTE: The wiring could be different than the original control. This part may need to be installed by an appliance repair person.
How Buying OEM Parts Can Save You Time and Money

How Buying OEM Parts Can Save You Time and Money

Troubleshooting
This part fixes the following symptoms:
Touchpad does not respond | Will Not Start | Little to no heat when baking | Will not program
This part works with the following products:
Range, Wall Oven, Cooktop.
Part# WB27X45466 replaces these:
WB18X20153, WB27K10097, WB27K10098, WB27K10152, WB27K10202, WB27K10203, WB27K10204, WB27K10212, WB27K10213, WB27K10214, WB27K10344, WB27K10345, WB27K10346, WB27K10358, WB27K10359, WB27K10360, WB27T10467, WB27T10468, WB27T10604, WB27T10816 , WB27T10817, WB27T10818, WB27T10864, WB27T11153, WB27T11154, WB27T11165, WB27T11250, WB27T11273, WB27T11274, WB27T11275, WB27T11276, WB27T11278, WB27T11279, WB27T11280, WB27T11282, WB27T11311, WB27T11312, WB27T11313, WB27T11486, WB27X20230, WB27X26540, WB27X26760, WB27X26761, WB27X29089, WB27X29091, WB27X29092, WB27X29093, WB27X29137, WB27X37105, WB27X37226 Show less
Back to Top
Customer Reviews
Average Rating:
★★★★★
★★★★★
53 Reviews
4.5
Filter By Rating:
  • 5 Stars
    37
  • 4 Stars
    11
  • 3 Stars
    3
  • 2 Stars
    0
  • 1 Star
    2
Sort by:
  • 1
  • 2
  • 3
Sorry, we couldn't find any existing reviews that matched. Try using some different or simpler keywords.
  • 1
  • 2
  • 3
Customer Repair Stories
 Average Repair Rating: 4.1 / 5.0, 29 reviews. What's this?
Sort by:
  • 1
  • 2
  • 3
Sorry, we couldn't find any existing installation instruction that matched.
Oven control panel shorted while remove a broken lightbulb from the oven
I removed the new control panel from its packaging and noticed that the button overlay was not included. I grabbed a putty knife and carefully loosened the adhesive on the old panel and was able to apply it to the new control panel. After installing it I looked up the number of my old panel on the included paperwork and simply entered the “profile” number after powering up the new one and It worked perfectly. I was very relieved to not have to buy a new range!
Other Parts Used:
CONTROL OVEN TO9 Light Bulb - 40W
  • Terry from SEATTLE, WA
  • Difficulty Level:
    Very Easy
  • Total Repair Time:
    30 - 60 mins
  • Tools:
    Nutdriver, Pliers
1 person found this instruction helpful.
Was this instruction helpful to you?
Thank you for voting!
Oven shut down due to overtemperature (code F2). Also, one surface element had erratic control.
Putting the faceplate graphics onto the oven control is tricky. Use the tabs on the bottom and one side of the control unit to line up the faceplate. Be careful because once the faceplate sticks it sticks. That was the hardest part of the repair process. Installing the oven control unit and the surface control unit was straight forward.
Other Parts Used:
FACEPLATE GRAPHICS (WW) CONTROL OVEN TO9 Range Surface Element Control Switch - 6 Inch - 1560 W
  • Michael from YORKTOWN HTS, NY
  • Difficulty Level:
    Easy
  • Total Repair Time:
    30 - 60 mins
  • Tools:
    Nutdriver, Screw drivers
2 of 2 people found this instruction helpful.
Was this instruction helpful to you?
Thank you for voting!
OVEN CLOCK CONTROL MALFUNCTIONED
I turned off the circuit breaker and unplugged the stove. I removed the back panel and marked the location of the wires on the new oven clock control. I detached the wires and removed the old card. I installed the new one and reconnected the wires. I plugged the stove and turned on the circuit breaker. All the lights came on and the oven worked fine. I reinstalled the back panel and it took me less than thirty minutes to complete the job.
  • Gregoire from N CHESTERFLD, VA
  • Difficulty Level:
    Really Easy
  • Total Repair Time:
    15 - 30 mins
  • Tools:
    Pliers, Screw drivers, Wrench set
1 person found this instruction helpful.
Was this instruction helpful to you?
Thank you for voting!
Oven would not get come up to temperature
I knew I had a bad control board. Using the repair videos, replacing this part was very easy to do. While I was at it, I replaced my oven temperature sensor. as well, and even though it wasn't bad, I replaced my oven heating element so that I could get some more mileage out of my 14-year-old range. The issue: after completing my repair actions, my oven element still would not heat. I double-checked my connections and I discovered I hadn't ensured one of the wires on the control board was properly seated. This was one of the wires that go to the heating element. After ensuring proper connection, everything worked perfectly!
  • Arthur from INDIANAPOLIS, IN
  • Difficulty Level:
    Really Easy
  • Total Repair Time:
    30 - 60 mins
  • Tools:
    Pliers, Screw drivers, Socket set
1 person found this instruction helpful.
Was this instruction helpful to you?
Thank you for voting!
Controls would not work properly, faceplate cracked.
Installed the faceplate to the front of control board (you might wait until you remove the old board first). Removed 3 screws with a nutdriver holding the top stove black plate and 4 screws holding the control board in place. Disconnected the wiring harness from the 4 pin jack at end of the board and the 4 color coded wires from the color coded pins on several components on the board. Connected the color coded wires and replaced the board into the stove with the 4 screws and replaced the top plate to the back of the stove. My faceplate came in a long envelope and was not bent.
Other Parts Used:
CONTROL OVEN TO9 FACEPLATE GRAPHICS (White)
  • Phillip from SHELBYVILLE, TN
  • Difficulty Level:
    Very Easy
  • Total Repair Time:
    Less than 15 mins
  • Tools:
    Nutdriver
2 of 2 people found this instruction helpful.
Was this instruction helpful to you?
Thank you for voting!
When you touched any button on the controls LOC on appeared.
Talked to parts select tech after ordering the control board. Tech advised me that he felt the range could be repaired without installing any parts. Advised me to contact manufacture tech support and explain the problem. I did to find that the child safety lock was on, probably from cleaning and touching too many buttons at once while whipping surface. Told me to hold down + and - at the same time for three seconds and it was fixed.
Parts select tech had told me don’t worry the parts are guaranteed so I called for a RMA and returned the parts for a refund. Thanks Parts Select, y’all are real professionals and that is greatly appreciated.
Thank you all.
  • Roger from HUNTSVILLE, AL
  • Difficulty Level:
    Very Easy
  • Total Repair Time:
    Less than 15 mins
2 of 2 people found this instruction helpful.
Was this instruction helpful to you?
Thank you for voting!
THE FACE PLATE IS HARD TO GET OFF THE OLD CONTROL BOARD. USE A THIN KNIFE
THE INSTRUCTIONS THAT COME IN THE EMAIL ARE VERY GOOD. BE SURE TO TAKE A PICTURE OF THE WIRING.
  • Melvin from WEBSTER, TX
  • Difficulty Level:
    Really Easy
  • Total Repair Time:
    15 - 30 mins
  • Tools:
    Nutdriver, Pliers
1 person found this instruction helpful.
Was this instruction helpful to you?
Thank you for voting!
Oven board went out
One wire at at time then used my razor blade to get front off stuck right back on
  • Jackie from TICKFAW, LA
  • Difficulty Level:
    Very Easy
  • Total Repair Time:
    15 - 30 mins
  • Tools:
    Pliers
1 person found this instruction helpful.
Was this instruction helpful to you?
Thank you for voting!
Shorted the control panel changing bulb without shutting off power dumbass
Replaced control panel after removing original control panel facing with heat gun and Wala
Other Parts Used:
CONTROL OVEN TO9 RECEPTACLE PUSH-IN Light Bulb - 40W
  • Stephen from BELLINGHAM, MA
  • Difficulty Level:
    Really Easy
  • Total Repair Time:
    30 - 60 mins
  • Tools:
    Nutdriver, Screw drivers
5 of 6 people found this instruction helpful.
Was this instruction helpful to you?
Thank you for voting!
My electronic control board went out so I could not use my oven. My oven light blew as well.
I started with changing the bulb. I removed the small bracket that holds the glass cover over the bulb unscrewed the bulb and reversed to replace the bulb. To replace the control board I removed the top plate on the back of my stove took the small screw's out of the control panel and unplugged the wire's. Plugged the wire's into the right spots on the new control board and put it back together.
Other Parts Used:
CONTROL OVEN TO9 Light Bulb - 40W
  • Stella from PADUCAH, KY
  • Difficulty Level:
    Really Easy
  • Total Repair Time:
    Less than 15 mins
  • Tools:
    Pliers, Socket set
1 person found this instruction helpful.
Was this instruction helpful to you?
Thank you for voting!
  • 1
  • 2
  • 3
Questions and Answers

We're sorry, but our Q&A experts are temporarily unavailable.
Please check back later if you still haven't found the answer you need.

1 question answered by our experts.
Sort by:
  • 1
Sorry, we couldn't find any existing answers that matched.Try using some different or simpler keywords, or submit your new question by using the "Ask a Question" button above!
Susan
December 9, 2023
I cleaned the oven with the self-cleaning feature and after cleaning the message was "Unlock Door" but the door was not locked and I cannot set the bake temperature to use the oven.
For model number R B757B H1WH
PartSelect logo
Hi Susan, thank you for getting in touch. Based on the description that you have provided, we would recommend checking the latch assembly, part number PS1480683, as it has most likely failed due to the heat from the self-clean cycle. Please contact us anytime if you require further assistance!

Was this helpful?
Thank you for voting!
Related Parts:
  • 1
You May Also Need ?
Model Cross Reference
This part works with the following models:
PartSelect Number: PS16873547
Manufacturer Part Number: WB27X45466
Brand
Model Number
Description
General Electric
137480
Range
General Electric
137481
Range
Kenmore
91192090300
Range
Kenmore
91192090301
Range
Kenmore
91192091300
Range
Kenmore
91192091301
Range
Kenmore
91192812300
Range
Kenmore
91192812301
Range
Kenmore
91192814300
Range
Kenmore
91192814301
Range
Kenmore
91193090300
Range
Kenmore
91193090301
Range
Kenmore
91193091300
Range
Kenmore
91193091301
Range
Kenmore
91193490300
Range
Kenmore
91193812300
Range
Kenmore
91193812301
Range
Kenmore
91193814300
Range
Kenmore
91193814301
Range
Kenmore
91194400300
Range
Kenmore
91194400301
Range
Kenmore
91194401300
Range
Kenmore
91194401301
Range
Kenmore
91194401993
Range
Kenmore
91194402300
Range
Kenmore
91194402301
Range
Kenmore
91194404300
Range
Kenmore
91194404301
Range
Kenmore
91194410300
Range
Kenmore
91194411300
Range
Customer Service Representative

Get in touch, we're here to help!

Monday to Saturday
8am - 9pm EST

Contact Customer Service