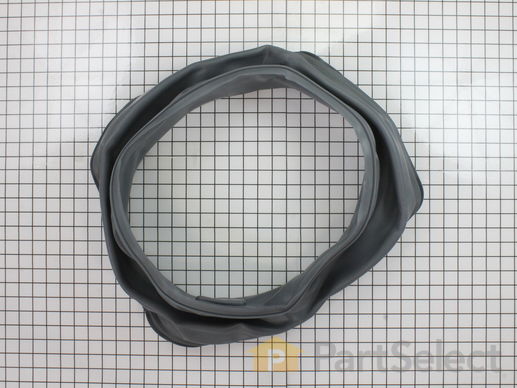
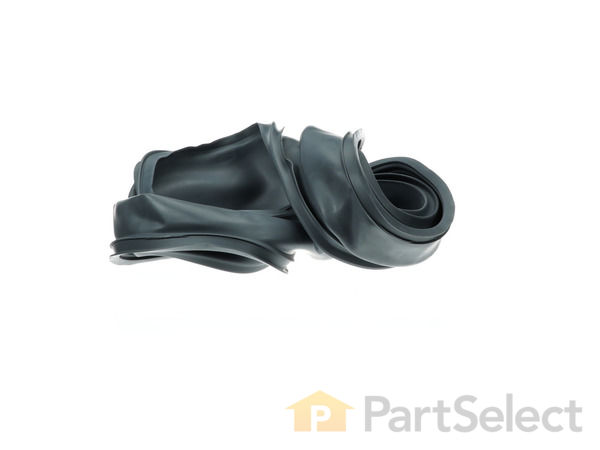
This is a door bellow, also known as a door gasket or seal, that is compatible with washing machines. Door bellows are used as a method to seal the inner drum of the washing machine and the soapy water inside it, from the rest of the washer cabinet and your home. If you notice any leaks at the front of your washing machine, this door bellow may be worn out or damaged, so inspect it to ensure it needs replacing. This door bellow is made of a thick rubberized material and wraps around the inner drum and will need a clamp to stay secure. This door bellow is sold as an individual OEM part and is not sold with any other parts or accessories.
How Buying OEM Parts Can Save You Time and Money
Part Videos
Replacing your Kenmore Washer Washer Door Bellow
Troubleshooting
This part fixes the following symptoms:
Leaking | Marks left on clothes
This part works with the following products:
Washer.
Part# WP8182119 replaces these:
AP6011758, 8182119, W10003800, WP8182119VP
Customer Reviews
Average Rating:
★★★★★
★★★★★
32 Reviews
4.8
Filter By Rating:
5 Stars
25
4 Stars
6
3 Stars
1
2 Stars
0
1 Star
0
Sort by:
< Prev
1
2
3
Next >
Search filter:
Clear Filter
Your search term must have 3 or more characters.
Keep searches simple. Use keywords, e.g. "leaking", "pump", "broken" or "fit".
Sorry, we couldn't find any existing reviews that matched. Try using some different or simpler keywords.
★★★★★
★★★★★
Deryck S - June 21, 2023
Verified Purchase
Easy repair instructions
The part was in great condition and the appliance is back to normal
★★★★★
★★★★★
James P - November 20, 2022
Verified Purchase
No more leakage!
The part and repair video were both adequate. Original part was thicker but it tore and leaked. Hopefully the replacement will last years. The video was helpful as were the comments. I needed to re adjust the retainers twice but asked Mt wife for help after reading the comments and we got it repaired.
No more leakage!
★★★★★
★★★★★
John B - September 5, 2021
Verified Purchase
A great replacement
Its slightly different then the bellow originally on the washer. But the install went fine and it functions and installs perfectly fine. If you decide to go for it, look into getting a tse1 tension spring expander tool to help get the tension spring back on and an right angle bit driver to loosen and tighten the rataininer band. (Big time saver and saves some hassle)
★★★★★
★★★★★
Suzanne D - October 21, 2020
Verified Purchase
Great part - great price
Pleased that Parts Select had the exact replacement part at a great part.
★★★★★
★★★★★
Joon C - September 21, 2020
Verified Purchase
Easy Repair!
the part arrived in a good condition. how to video was right on the dot. I am 5' 98lb lady and I was able to replace the washer door bellow all on my own following Steve's how to step by step video. Thank you!
★★★★★
★★★★★
CRAIG B - July 17, 2020
Verified Purchase
easy repair
The part took about a week and after receiving it it only took me abot 30 min to intsall .
Just take your time and make sure that the new boot is in its proper channel's befor clamping into position
★★★★★
★★★★★
James D - June 30, 2020
Verified Purchase
Relatively easy repair
Fit perfect. Pretty easy repair. Getting the ring on the spring did require another hand and I’m glad my son was there to help. The entire job took less than 10 minutes.
★★★★★
★★★★★
Verl T - April 29, 2020
Verified Purchase
Wifes Help
I have an older Whirlpool front load washing machine. No Problem getting the right part. Used online store with Model Number and had the part within three days.
Recieved part and let is sit outside for two days because of Corvid 19 just to be safe.
I had my wife help me put on the two gasket clamps and some of the screws , easier with four hands.
Nice to have a new Gasket on the Machine no more smell from the build up of mold common with the older model front loader.
Should have replaced it sooner.
★★★★★
★★★★★
TIMOTHY L - July 14, 2019
Verified Purchase
Easy repair..fast shipping
Works like new again no more socks lost or water leaks
★★★★★
★★★★★
Chad L - May 15, 2019
Verified Purchase
Fixed our leak
Fix our leak, great installation video. Very happy with the product and service. Thank you
< Prev
1
2
3
Next >
Customer Repair Stories
Average Repair Rating: 3.0 / 5.0, 25 reviews.
What's this?
Sort by:
< Prev
1
2
3
Next >
Search filter:
Clear Filter
Your search term must have 3 or more characters.
Keep searches simple. Use keywords, e.g. "leaking", "pump", "broken" or "fit".
Sorry, we couldn't find any existing installation instruction that matched.
Machine was leaking from side.
We do not wish to have our repair published. The part itself was perfect and corrected our leaking problem but we did have difficulty with the installation despite detailed instructions. We appreciate a good price for the perfect part!
Suzanne from MENDON, MA
Difficulty Level:
Really Easy
Total Repair Time:
30 - 60 mins
1 personfound this instruction helpful.
Was this instruction helpful to you?
Thank you for voting!
Bellow was torn and water was leaking onto the floor
(These instructions improve on the excellent instructions provided by customer Franck from Anandale, Va.) The first step is to remove the retainer wire and spring that holds the outside of the bellow in place. To do this, Open the washer door as far as you can to get it out of the way. Look underneath of the front of the bellow
... Read moreon the outside of the washer where it meets the door. Put your head almost on the floor and look up. You will find a spring stretched about 3" connected to a small diameter wire (1mm.) that runs all the way around the outside portion of the bellow. Use a small screwdriver or needle-nosed pliers to pull and pry the spring away from the rubber bellow. Be careful not to damage the spring or ring. Once you have grip on it, pull it carefully toward you then up and off of the bellow.
The front portion of the bellow is now free and can be peeled off. Start at any point and pull the rubber bellow in toward the opening of the washer, it comes off easily. When you get to the detergent outlet on the upper left side, grab the plastic tube and carefully pull the bellow from around it. There is no adhesive or clamp holding this in place, just friction. Remove the rest of the front portion of the bellow. Push as much of the bellow into the washer as possible to get it out of the way.
Once this is off comes the slightly tricky part. Look up at the top right portion of the bellow that is still attached. You may need to feel with your hand but you should be able to see it. This is where the flashlight or worklight will be helpful. You are looking for the screw/nut end of a giant hose clamp. This hose clamp goes around the entire bellow and secures it to the portion that holds the basket. This is where the stubby screw driver comes in handy. There is not nearly enough room for a standard one and a nut driver or wratchet are too big. The nut will be pointing down and will need to be replaced the same way. Loosen the hose clamp almost all of the way, perhaps 5 turns on the nut. It is not necessary to have the hose clamp come completely apart. You can now remove the entire hose clamp from around the bellow by pulling it forward. You will need to remove the hose clamp from the washer. To do this, squeeze it in from the sides about 6", don't kink it. Push it down toward the floor between the basket and the metal front panel. You will now be able to remove it from the top of the opening and be able to pull the bottom portion out. Pull the old bellow completely out, very easy to do.
Time to install the new bellow. Figure out which side goes in and which faces out. The big hint is that the water inlet is on the upper left side. You will notice at the top of the bellow on the portion that goes inside of the washer, you will find a small triangular shaped tab about 1/4" high. This is your centering mark. This will be at the very top. If you keep this at the top, everything will line up perfectly.
This next step takes a bit of dexterity because you need to slide both the bellows and the hose clamp into the machine with the triangular shaped tab on the bellow at the top as above. Unbend anything that might have bent on the clamp. Put a tiny bit of lube oil or Vaseline on the clamp screw thread to make it easier for your fingers to tighten it with the stubby screwdriver later. The hose clamp must go in now because once the bellow is slid over the detergent inlet tube the hose clamp can not be installed. Slip the bellow over the edge of the portion that holds the basket where you removed the old one. I started at the top and worked left so I could install the detergent inlet tube. Pull this through the bellow carefully. It doesn't take a lot of force. I found that wetting it with water made it easier to slide the bellow over it. As you are pressing the bellow on this lip, you will notice that there is a 1/2" high back stop all of the way around. This is great because as you press it on, there is a positive stop and you can't go further than necessary. Continue to press it in all of the way around. With the nut at the top or top right with the nut facing down to the floor while holding it vertically, squish it slightly inward, put the bottom portion in first then the top portion. Orient is as it was when you took it off. Slide it around the bellow. You will feel a positive stop. Run your fingers around the entire bellow to be sure the clamp is seated in the channel on the bellow and that the bellow is against its backstop. This assures you won't have a bad leak upon your next wash. Grab the stubby screwdriver and tighten down the hose clamp. I did about a medium force when tightening. It doesn't take a lot of force.
Now it is time to pull the remaining part of the bellow out of the basket and fit it into place. Press it around the outside portion of the opening so it hooks over the lip. Now take the retainer wire and spring assembly and use it to clamp the bellow over the lip. After fitting the wire around
Read less
Robert from GLENVILLE, NY
Difficulty Level:
Easy
Total Repair Time:
15 - 30 mins
Tools:
Screw drivers
1 personfound this instruction helpful.
Was this instruction helpful to you?
Thank you for voting!
Ripped bellowspul
Pull spring wire on front. Remove large hose lamp at tub. Reinstall in reverse order.
WILLIAM from REPUBLIC, MO
Difficulty Level:
Easy
Total Repair Time:
30 - 60 mins
Tools:
Pliers, Screw drivers
1 personfound this instruction helpful.
Was this instruction helpful to you?
Thank you for voting!
The door bellows had a cut in it
I purchased a new bellows from this site I followed their instructions. Just tricky getting the inner clamp on aligned and tightened.
Arthur from MORGANTOWN, PA
Difficulty Level:
A Bit Difficult
Total Repair Time:
30 - 60 mins
Tools:
Nutdriver, Screw drivers
2 of 3 peoplefound this instruction helpful.
Was this instruction helpful to you?
Thank you for voting!
Torn bellows was leaking and eating clothes
Followed directions as shown in your repair video, having done this for the first time it took a bit longer than a repairman would have but was able to git-r-done. The most difficult part was fitting the adjustable wire back around the front of the washer, in the video it is made to look really easy however in real life it is a little mor
... Read moree difficult and could not be attached so easily and took quite a bit of time to make sure it was attached correctly. thank you for your help.
The video supplied by you was great and it worked very well.
It was fast and pretty easy to do.
Michael from NEWBERG, OR
Difficulty Level:
Really Easy
Total Repair Time:
30 - 60 mins
Tools:
Nutdriver, Screw drivers
1 personfound this instruction helpful.
Was this instruction helpful to you?
Thank you for voting!
Torn bellow. Water leaking
I found a you tube video with step by step instructions. Very easy to follow. Repair would have been quicker had my kids not been at home. I had to have my boyfriend help me put on the outer bellow spring clamp, as I was not strong enough. Washer works great.
Removed the outer spring with pliers. Pushed the bellow into the drum. Loosened the clamp on the bellow with a stub nose screwdriver. Removed the bellow. lined bellow up with soap fiting. Reversed procedure to reinstall.
Eric from Vacaville, CA
Difficulty Level:
A Bit Difficult
Total Repair Time:
30 - 60 mins
Tools:
Pliers, Screw drivers
3 of 5 peoplefound this instruction helpful.
Was this instruction helpful to you?
Thank you for voting!
Kenmore Bellow between door and washer tub ripped
I followed the repair blog by the poster most liked...
Jerome from Albquerque, NM
Difficulty Level:
Really Easy
Total Repair Time:
Less than 15 mins
Tools:
Screw drivers
18 of 21 peoplefound this instruction helpful.
Was this instruction helpful to you?
Thank you for voting!
< Prev
1
2
3
Next >
Questions and Answers
We're sorry, but our Q&A experts are temporarily unavailable.
Please check back later if you still haven't found the answer you need.
17 questions answered by our experts.
Sort by:
< Prev
1
2
Next >
Search filter:
Clear Filter
Your search term must have 3 or more characters.
Keep searches simple. Use keywords, e.g. "leaking", "pump", "broken" or "fit".
Sorry, we couldn't find any existing answers that matched.Try using some different or simpler keywords, or submit your new question by using the "Ask a Question" button above!
E
December 7, 2019
I want to replace the door bellow. I found the replacement part online. My question is this replacement can be done by ourselves or need a professional technician? If do need a professional technician, i am in chino hills area, could please find me a service contract information?
For model number WFW9200SQ02
Hello E and thanks for writing.
For your convenience, we have attached the link to our video with repair instruction. We would suggest to watch it and then decide if you can do the repair yourself. We hope this helps. Good luck with your repair. For service contract information please call Electrolux US Transfer 877-435-3287 We hope this helps. Please contact us anytime.
https://www.partselect.com/PS11744957-Whirlpool-WP8182119-Washer-Door-Bellow.htm
8 people found this helpful.
Was this helpful?
Thank you for voting!
Keith
November 29, 2017
I installed a new bellow and the washer does not spin. The water fills and drains but the drum does not agitate. Do you have any suggestions?
For model number MFW9700SB1
Hello Keith,
Thanks for your question. Inspect the drive belt for any signs of damage and replace it it if is showing damage. You may also want to test your control board to see if any components in it have burned or are not working. Check the drive pulley to see if it is damaged. Lastly, the drive motor could be at fault, though that is rarely the case.
I hope this helps.
I have a Kenmore washer with the above model number. Despite multiple automatic cleanings and cycles with no detergent, we keep getting error code sud or f35 when starting any wash or cleaning cycle. If you try enough times it eventually starts the selected cycle. Any ideas on what we should do or part(s) we should replace?
For model number 110.47789701
Hi Jerry, Thank you for the question. You will first need to make sure the proper detergent is being used. It will take a fair bit of just water loads to clean the suds. If you use a cup of vinegar in the water it can help.You may need to rinse out the Water Level Pressure Switch tube to make sure it is clear.If everything is clear, the Water Level Pressure Switch, PartSelect Number PS11754448 will need to be replaced. Hope this helps!
Water comes out front door, not on every load, water has also gotten into front door, not a lot but in the bottom of the of the clear plastic, will the seal fix my problem
For model number 11047781701
Hello Dennis, thank you for contacting us. Yes, the Bellow part PS11744957 may fix this problem. There are also Bellow Clamps that could be creating the issue, parts PS11744959 and PS11765855. We hope this helps.
3 people found this helpful.
Was this helpful?
Thank you for voting!
Juan
February 17, 2020
Get a fh error code, noticed the boot seal is ripped... could this be the cause for the error code? thank you
For model number Kenmore 110.45081404
Hello Juan, thank you for your question. The FH error code on your Kenmore Elite washing machine is an indicator that there is a problem with incoming water. When there is little water coming into the machine, the FH code will appear and the washer will stop. We would recommend unplugging the unit and plugging it back in to reset it. If the error continues you will want to test/replace the water valve, pressure switch and check to be sure the dispenser drawer and all related tubes are clean and clear of clogs. It would also be a good idea to replace the door seal as it is cracked and will leak. However, the seal is not the cause of this error code. I hope this helps.
3 people found this helpful.
Was this helpful?
Thank you for voting!
Donny
January 3, 2020
Do you have a video on how to install a bellow on this particular model. It’s different thank the video attached. Thanks! Wfw9400sw03
For model number WFW9400SW03
Hi Donny, sadly we do not. The procedure should generally be the same however you can contact the manufacturer directly to see if they have more specific information. Thank you for your question and good luck with your repair!
2 people found this helpful.
Was this helpful?
Thank you for voting!
Sanford
May 27, 2019
Front load washer in the machine the rubber door seal has an oval opening with some part inside which leaks once cycle is finished...?....help
For model number MFW9700SQ0
Hello Sanford, thank you for your question. We would recommend checking the dispenser to tub hose, which runs from the dispenser to this part. Check the dispenser as well to be sure all the water is out of that area when a load is done. If the water is accumulating and leaking down into the bellow that could be a result of another issue. I hope this helps!
2 people found this helpful.
Was this helpful?
Thank you for voting!
Regina
July 15, 2019
Does this bellow fit this Kenmore model? Thanks
For model number 79640272900
Hi Regina,
Thank you for your question. No, this would not be the correct bellow for your washer. The part number listed under your model number for the bellow is PS3524977. I hope this helps. Thank you and have a great day!
2 people found this helpful.
Was this helpful?
Thank you for voting!
Blain
September 2, 2019
There is a white nylon ring inside the bellows. Looks like maybe on the inner tub. It is rubbing something and shredding off and onto clothes. Can't tell exactly what it is.
For model number Kenmore Elite front loader
Hello Blain, thank you for writing. We would be happy to look into this, but we will need the model number for your machine to do so. We look forward to hearing back from you!
2 people found this helpful.
Was this helpful?
Thank you for voting!
Tanya
September 17, 2019
Hi, I have a few questions before I buy: you say it doesn’t come with clamps, but is there any reason why I can’t use the existing clamps in there? For my washer number Maytag model# mfw9700sb0 is this the original Maytag made seal? I can’t seem to find a Maytag one on your website but maybe I missed it. If you don’t have the Maytag one are you 100% sure this one works with it?
Hello Tanya, Thank you for contacting us. I have researched the model you have provided and have found the part you are looking for is PartSelect Number PS11744957. This is the original OEM part. Whirlpool owns Maytag so there brand will be listed. The original clamps can be reused with the new bellow as long as they are not damaged or worn. Hope this helps!
Item is in stock and will ship today if your order is placed before 4:00 PM Eastern Standard Time.
If your order is placed after 4:00 PM EST, the in stock items will ship on the next business day.
On Order
Item is not in stock and usually ships 3-5 business days from the time you place your order.
Special Order
Item is not in stock and usually ships 10-15 business days from the time you place your order.
NLA - No Longer Available
This item is no longer being made by the manufacturer, and cannot be added to your shopping cart.
[{"position":0,"name":"Home","title":"Home","url":"/"},{"position":1,"name":"Washer","title":"Washer","url":"/Washer-Parts.htm"},{"position":2,"name":"Seal or Gasket","title":"Seal or Gasket","url":"/Washer-Seals-and-Gaskets.htm"},{"position":3,"name":"WP8182119","title":"WP8182119","url":""}]
You added 1 item to your cart
✖
$
Qty:
Total item(s) in cart:
Order Subtotal
$
*Taxes and shipping will be applied during checkout