Models > JGSC12GEV1BG

JGSC12GEV1BG General Electric Range - Overview

Sections of the JGSC12GEV1BG

[Viewing 4 of 4]
Keep searches simple, eg. "belt" or "pump".
Door Handle End Cap – Part Number: WB7X7183
Door Handle End Cap
★★★★★
★★★★★
(40)
PartSelect #: PS256613
Manufacturer #: WB7X7183
This oven door handle end cap is used on both the left and right hand sides. Sold individually.
$27.14
  In Stock
Light Bulb - 40W – Part Number: 40A15
Light Bulb - 40W
★★★★★
★★★★★
(7)
PartSelect #: PS217532
Manufacturer #: 40A15
This 40-Watt light bulb is sold individually and is a genuine OEM replacement option for your home appliances. It is specially designed to withstand extreme temperatures, so this bulb is compatible wi...
$11.04
  In Stock
Timer Knobs - Kit of 3 – Part Number: WB3X5699
Timer Knobs - Kit of 3
★★★★★
★★★★★
(11)
PartSelect #: PS248906
Manufacturer #: WB3X5699
This set of 3 clock timer knobs let you set and change the settings on your range clock. These genuine OEM knobs are made of black plastic and measure approximately 1-inch long.
$22.23
  In Stock
Hinge with Roller - Right Side – Part Number: WB14X104
Hinge with Roller - Right Side
★★★★★
★★★★★
(11)
PartSelect #: PS231612
Manufacturer #: WB14X104
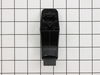
This is a hinge with roller for the oven door on your range. The roller allows you to open and close the door with ease and control. If your door is not opening easily, you may need to replace this pa...
$48.81
  In Stock
Hinge with Roller - Left Side – Part Number: WB14X103
Hinge with Roller - Left Side
★★★★★
★★★★★
(4)
PartSelect #: PS231611
Manufacturer #: WB14X103
This is known as a hinge with roller and it is for the oven door of your range. The hinge with roller allows you to easily open and close your oven door without much effort. Take note that your applia...
$57.38
  In Stock
Door Handle – Part Number: WB15K5076
Door Handle
★★★★★
★★★★★
(4)
PartSelect #: PS231857
Manufacturer #: WB15K5076
This is the replacement door handle for your range. It is made of black plastic and measures approximately 22 inches by 1 inch. The door handle connects to the range door and allows you to open and cl...
$49.05
  In Stock
Double Drip Pan – Part Number: WB32X102
Double Drip Pan
PartSelect #: PS244692
Manufacturer #: WB32X102
This double drip pan can be used for either the left or right hand side of the stove top.
  No Longer Available
Screw – Part Number: WB1M1
Screw
★★★★★
★★★★★
(1)
PartSelect #: PS234320
Manufacturer #: WB1M1
Sold Individually.
$7.77
  In Stock
Screw – Part Number: WB1X1130
Screw
★★★★★
★★★★★
(2)
PartSelect #: PS234427
Manufacturer #: WB1X1130
Sold Individually.
$8.32
  In Stock
Outer Oven Door Glass - Black – Part Number: WB57T10110
Outer Oven Door Glass - Black
PartSelect #: PS253236
Manufacturer #: WB57T10110
  No Longer Available
SCREW-BLACK – Part Number: WB1K5165
SCREW-BLACK
PartSelect #: PS234233
Manufacturer #: WB1K5165
$8.71
  In Stock
Oven Rack – Part Number: WB48M4
Oven Rack
★★★★★
★★★★★
(2)
PartSelect #: PS249568
Manufacturer #: WB48M4
  No Longer Available

Questions And Answers for JGSC12GEV1BG

We're sorry, but our Q&A experts are temporarily unavailable.
Please check back later if you still haven't found the answer you need.

Common Symptoms of the JGSC12GEV1BG

[Viewing 3 of 3]
Door won’t close
Fixed by
these parts
Fixing Fixing Fixing
Show All
Timer will not advance
Fixed by
these parts
Fixing
Show All
Door won’t open after self cleaning cycle
Fixed by
these parts
Fixing
Show All
Keep searches simple. Use keywords, e.g. "leaking", "pump", "broken" or "fit".
The end caps broke on my oven door handle.
1st I opened the oven door and removed the 2 screws that hold the outside and inside of the door together. With the door separated I removed the 2 screws that hold the end caps in place, then removed the old end caps. I put the new end caps on the oven door handle, aligned the holes for the end cap screws and reinstalled the screws,then reinstalled the oven door screws,closed the oven door and started cooking.
Parts Used:
Door Handle End Cap
  • Harry from Thomasville, GA
  • Difficulty Level:
    Easy
  • Total Repair Time:
    15 - 30 mins
  • Tools:
    Screw drivers
45 of 46 people found this instruction helpful.
Was this instruction helpful to you?
Thank you for voting!
The right side hinge assembly broke. Replaced both sides
First I removed the door by lifting it off the hinge assemblies.

Then I removed the drawer to access the spring.

Removed the spring, noting which attachment hole was used.

Removed the hinge assembly with a Phillips screwdriver.

Replacef the unit.

Repeated for the other hinge assembly.

Note: it took longer to find the correct parts in the parts diagrams than it did to replace them.
Parts Used:
Hinge with Roller - Right Side Hinge with Roller - Left Side
  • Frank from Pebble Beach, CA
  • Difficulty Level:
    Really Easy
  • Total Repair Time:
    15 - 30 mins
  • Tools:
    Screw drivers
43 of 45 people found this instruction helpful.
Was this instruction helpful to you?
Thank you for voting!
Oven door hinge rollers broke, hard to open door
Before removing screws, I reached in and felt for where the upper end of the spring attached to the hinge. There are three holes in the end of the hinge arm, so I wanted to be sure of which hole to use. (The holes are very close together, so if the spring falls out before you determine which hole it was in, it probably won't matter so long as you are sure to use the same hole on both new hinges.) I then removed three Phillips screws per hinge. Once the hinge was loose, I could wiggle it around and release enough of the spring tension to slip the top end of the spring out of the hole on the hinge arm. Then I pulled out the old hinge and inserted the new one and replaced the three screws. Without the tension, the lower end of the spring fell out of the little hole in the oven bottom where it normally attaches. Our gas oven has a broiler rather than a storage drawer, so it was a little difficult to get the lower tip of the spring back into that hole. It actually ended up being easier to get the lower tip of the spring back into that hole first, before trying to reattach it to the hinge arm. Once I got the lower end into that hole, I pulled up on the spring and maintained upward pressure on the spring while I fiddled around to get the upper end into the hinge arm hole. Took about 20 minutes, door works perfectly now. Lots of sharp edges inside the oven, so had to be careful.
Parts Used:
Hinge with Roller - Right Side Hinge with Roller - Left Side
  • Peter from Framingham, MA
  • Difficulty Level:
    Easy
  • Total Repair Time:
    15 - 30 mins
  • Tools:
    Screw drivers
16 of 18 people found this instruction helpful.
Was this instruction helpful to you?
Thank you for voting!