


Everything You Need to Know About Washing Machine Hoses
You've just bought a new washing machine but now comes the task of setting it up. When it comes to hoses, inlet hoses supply fresh water to your washing machine for washing clothes, while the drain hose removes used water from the tub and directs it to the drainage system for disposal. Can you use the ones from your old machine, or is it a trip to the store again?
Let's get all of your hose-related questions answered right away so you can find the perfect fit for your machine.
What Do Washing Machine Hoses Do?
The hoses work together to bring in fresh, clean water and efficiently remove the used, soiled water, so that your washing machine functions effectively.
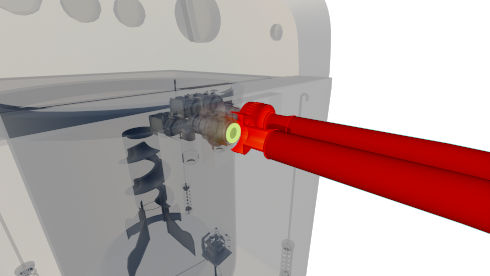
What Does the Inlet Hose Do on Your Washer?
Inlet hoses supply fresh water to the washing machine so that the tub fills up to wash your clothes. These hoses connect your washing machine to the water taps or valves. You can find them attached at the back of your washing machine. Take a look at the illustration below for a clearer visual:
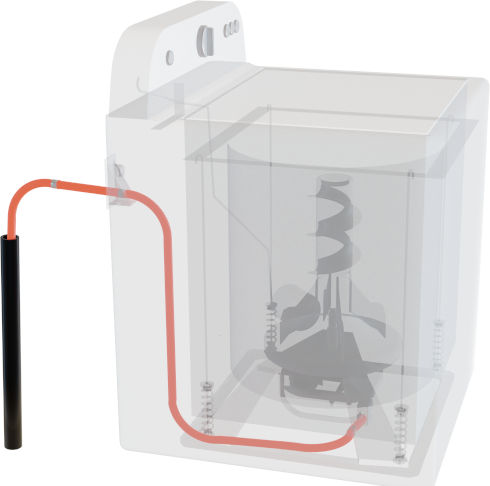
What Does the Drain Hose Do on Your Washer?
Once your laundry is cleaned, the drain hose guides the wastewater out of the machine and into the drainage system or a designated disposal area. It extends from the machine and connects to a standpipe, drain, or tub. To get a better idea of how it all fits together, refer to the illustration below:
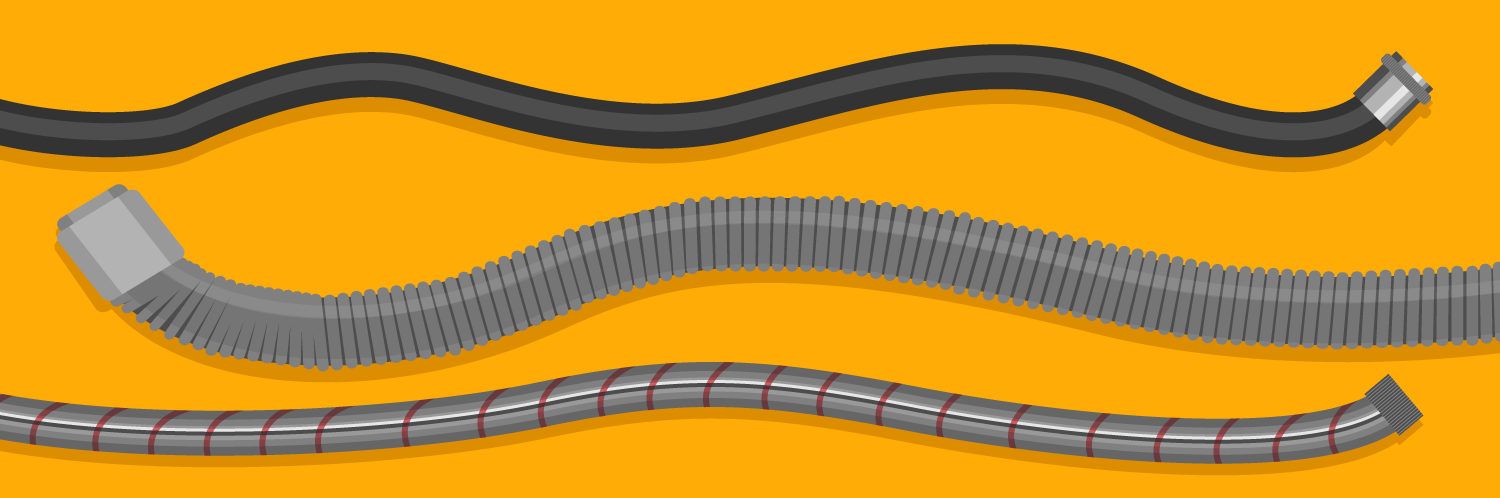
Are Washing Machines Hoses Universal?
In short, yes, but there are some important details to consider. While the industry follows certain standardized features, it's not entirely a "one-size-fits-all" scenario. Washing machine hoses can vary in terms of length, shape, and material. Some hoses have straight ends, while others have a 90-degree elbow on one end so that the hose fits snugly against your laundry room wall. But they have one thing in common: they all sport ¾-inch female threaded fittings on both ends.
Here's what you'll typically find with most washing machine hoses:
Female Threaded Ends
These are the same type of female fittings or couplings you find on garden hoses, making it simple to connect the hose to a wide range of washing machines without needing special tools or adapters.
¾-Inch Fittings
Most washing machines and home water connections in the U.S. use this size, ensuring compatibility. This fitting size also allows for a higher water flow capacity and better water pressure compared to smaller fittings.
Red and Blue Markings
These are color codes to distinguish between hot and cold water connections for inlet hoses. Red is for hot, and blue is for cold. This way, you can quickly figure out which hose goes where to avoid any mix-ups.
However, there are several important factors to keep in mind:
Hose Length
Hoses come in various lengths, from short ones of 4 feet to longer ones stretching up to 12 feet. The best length for you depends on how far your washer is from the water taps. You'll want a hose length that comfortably reaches your washer from the taps without being pulled tight or too long to avoid tangling.
Material
When it comes to the material of washing machine hoses, three types stand out: plastic, rubber, and stainless steel.
Plastic Hoses
Some drain hoses are made from corrugated plastic or PVC. These hoses tend to be more flexible than rubber ones, making them suitable for navigating tight or curved spaces. However, they might not offer the same durability, especially when exposed to extreme temperatures or conditions.
Rubber Hoses
Rubber washer hoses are made primarily of synthetic rubber, known for their flexibility, making them easy to maneuver during installation. However, this flexibility comes with a trade-off. Rubber hoses don't last as long as their stainless steel counterparts. Over time, they might show signs of wear like kinks, bulges, or other weak spots, which can potentially lead to unfortunate leaks. Additionally, rubber hoses can suffer damage due to minerals present in the water or from exposure to certain chemicals.
Braided Stainless Steel Hoses
On the other hand, braided stainless steel hoses combine the flexibility of rubber with an added layer of protection. These hoses are essentially rubber hoses reinforced with a woven stainless steel outer layer. This protective layer ensures that the hose can withstand even high-pressure conditions without easily bursting. It's worth noting that the steel's corrosion-resistant nature means these hoses are more resilient against water quality issues or any chemicals found in the water. That's why they're a popular choice for inlet hoses.
Auto Shut-off Features
Some washing machine hoses come equipped with auto shut-off valves, a safety feature that kicks in to stop the water supply to your washing machine in the event of a hose malfunction or failure, minimizing the risk of water damage.
Elbows
Sometimes, washing machines are tucked into tight corners or recesses. This is where hoses with 'elbows' come in handy. Instead of a straight connection, these hoses have a bent or elbow design, allowing for a more compact and space-efficient connection between your washing machine and the water taps. They help prevent kinking and reduce strain on the hose connections.
So when choosing washing machine hoses, you will need to consider various factors. Drain hoses are typically crafted from plastic or PVC due to their need for flexibility and lightness to fit into tight spaces. On the other hand, when it comes to inlet hoses, braided stainless steel options tend to outshine rubber hoses in terms of durability and damage resistance.
To make the right choice, consider the distance between your machine and the tap when picking the hose length. If leak prevention is a concern, opt for hoses equipped with auto shut-off valves. And if you're dealing with tight spaces, think about using hoses with elbows, but be sure they match your machine's setup for a hassle-free installation.
Can I Reuse a Washing Machine Hose?
Your washing machine works hard, and so do its hoses. Over time, and depending on how often you use your machine and what your hoses are made of, they'll naturally wear out. It might seem like a good idea to reuse an old hose if it looks okay, but that's taking a chance. Why? Because hoses can weaken and break down due to:
- Wear and Tear: Washing machine hoses move during the machine's cycles, and this constant bending and flexing can lead to wear and tear over time.
- Water Quality: If the water in your area has high mineral content, sediments, or chemicals, it can accelerate hose deterioration, particularly hard water, which leaves deposits in the hose.
- Water Pressure: If there's too much water pressure, it can strain the hose, causing it to stretch out, twist, or even pop. This is especially risky with rubber hoses that are less robust.
- Incorrect Installation: Setting up the hose wrong, like making it too tight or causing it to kink, can put undue stress on the hoses.
So even if an old hose looks fine, it's best not to reuse it. It's safer to get a new one and avoid any unexpected leaks or damages. Remember, it's more cost-effective to purchase a high-quality hose than to deal with the consequences of potential flooding in your home.
How to Replace Your Washing Machine Hoses
Once you’ve your replacement inlet hoses or drain hose, gather your tools, like pliers or vice grips, and keep a towel or bucket close by in case of water spills.
For safety, unplug your washing machine. Then, find the valves near the hoses that bring water to your machine, and turn them off by twisting to the right. Now, turn your washing machine around to reach the hoses at the back. With these steps, you're all set to replace your hoses.
How to Replace the Inlet Hoses on Your Washer
- Step One: Find the hoses at the back of your washing machine; they connect to both the machine and the water valves. They're usually color-coded, with red for hot water and blue for cold water.
- Step Two: Use your tool to gently grip the nut or connector on one of the hoses where it connects to the washer. Turn it to the left to loosen it.
- Step Three: Hold the removed hoses over buckets or pans to let any remaining water drain out.
- Step Four: Take the cold water hose (blue) and connect it to the cold water tap. Twist it onto the tap's connector by turning it clockwise to secure it. Repeat this step with the hot water hose (red) and the hot water tap. Be careful not to overtighten and damage the threads.
How to Replace the Drain Hose on Your Washer
Before you begin, check your user manual. You might need to remove the back access panel to reach the drain hose connected to the tub, and your user manual will have specific instructions for your machine. Once you've got that covered, follow these steps:
- Step One: Locate the drain hose. It's typically a thicker, flexible hose connected to the back of your washing machine, leading to a drain, standpipe, or tub.
- Step Two: Gently pull the hose out from its drain or standpipe. Always support the hose to prevent sudden water release.
- Step Three: The drain hose is usually held onto the machine's outlet with a clamp or connector. If it's a spring clamp, squeeze it with pliers and slide it up the hose. If it's a screw-type clamp, loosen the screw until you can slide the hose off.
- Step Four: Carefully wiggle and pull the drain hose off the washing machine's outlet. If it's snug, take your time and use gentle force to avoid damaging the outlet.
- Step Five: Hold the removed drain hose over your bucket or pan to let any trapped water drain out.
- Step Six: Before attaching the new hose, slide the clamp around the elbow to allow the connector to fit onto the outlet on the back of the washer. Ensure the hose is fully inserted onto the outlet. Slide the clamp into position, making sure it sits between the two ridges on the elbow.
- Step Seven: When installing the outlet of the drain hose into your standpipe, make sure not to insert it too tightly. It's important not to block any airflow around the hose to prevent a siphoning effect. Keep the preformed bend of the hose in place.
- Step Eight: The drain hose may come with a zip tie. Use it to attach the hose to the side of the standpipe or any suitable nearby spot. Now you've successfully replaced your drain hose while following the necessary precautions from your user manual.
When Should I Replace a Washing Machine Hose?
It’s smart to replace those hoses every 3-5 years, but in between, they need a bit of TLC too. Here are a few tips to keep the in tip-top shape:
- Regular Checks: Give your hoses a once-over now and then. This means checking for obvious signs like bulges or cracks, but also feeling around for any unexpected dampness or spotting any telltale water stains or puddles nearby.
- Keep Track of Hose Age: If you're scratching your head trying to recall when you last changed yours, it might be a sign to get new ones.
- Ensure a Tight Connection: A little wiggle here and there might not seem like much, but make sure those hoses and inlets are snugly connected to your water source. Loose connections could lead to unwanted leaks.
- Give Them a Break: Not using your washing machine? It's a good habit to turn off the water supply. This little act can decrease the pressure on those hoses, giving them a longer, stress-free life.
While many washing machine hoses seem universally adaptable at first glance, some nuances can make or break your laundry setup. Paying a bit of attention to details like hose type and extra features can save you a whole lot of waterlogged headaches down the line.


Use these simple step-by-step instructions to reset your Whirlpool washer a...
Spring is here, and we are cleaning up all our appliances! A washer is supp...

Don't let unbalanced laundry damage your machine. Keep things smooth and st...