


How To Fix A Refrigerator That's Running Too Long

Click a Part Below to Start Your Repair:
Defrost Timer Defrost Heater Defrost Termination Thermostat Fresh & Freezer Door Gaskets Condenser Fan Motor Evaporator Fan Motor Sealed SystemAbout this repair:
- Rated as EASY
- 2772 repair stories
- 50 step by step videos
Defrost Timer
The defrost timer can be either a mechanical timer or an electronic "adaptive defrost control". Both are used to initiate the defrost cycle by turning on the defrost heater at specific intervals and for a specific amount of time. Mechanical timers are more common and usually activate a defrost cycle every 8-10 hours of compressor run time. This normally occurs about once every day or two. The defrost cycle will normally terminate after 20 to 30 minutes and the compressor and fans will start again. Adaptive defrost controls will monitor ambient conditions and previous defrost cycles and adapt the defrost cycle frequency and length to be more efficient.
How to test a refrigerator defrost timer with a multi-meter:
- Unplug your refrigerator before beginning.
- Locate & remove the defrost timer from the appliance in order to test it. It can be found behind the refrigerator's lower kickplate, in the refrigerator's control panel, or even behind the refrigerator on its back wall.
- Set your multi-meter to the Rx1 setting and touch one probe to the common terminal (it should be labeled "3" or "C"). One at a time, touch the other lead to the other three remaining terminals. Testing the first pair should produce a reading of zero, or near zero, denoting continuity. The second pair may also result in a reading of zero or near zero. Testing the third pair of terminals should produce a reading of infinity.
- If you receive different readings, you will need a replacement defrost timer.


Defrost Heater
The defrost heater is controlled by the defrost timer or adaptive defrost control and the defrost termination thermostat. The heater is normally a glass encased heater wire with well insulated wire leads.
How to test a refrigerator defrost heater with a multi-meter:
- Unplug your refrigerator before starting, you will be inspecting electrical components.
- Remove your defrost heater. Defrost heaters are commonly located beneath a refrigerator's evaporator coils. You will have to remove any objects that are in your way such as shelves, icemaker parts, and the inside rear, back, or bottom panel(s). The defrost heater will have two wires connected to it, carefully grasp the metal connectors to remove them, do not pull the wires themselves.
- With your multi-meter set onto Rx1 mode, place the probes onto the terminals of the defrost heater. You are testing for continuity and you should receive a reading between zero and infinity.
- If you receive a reading of zero or infinity, you will need a replacement defrost heater.


Defrost Termination Thermostat
The defrost termination thermostat is used as a safety device to turn off the defrost heater when the temperature reaches a specific limit. The thermostat is normally wired in series with the defrost element and is normally open circuit above 35°- 47° Fahrenheit. For this reason it is sometimes difficult to check the continuity of the thermostat unless you are sure that the temperature is low enough to close the circuit. Newer style thermostats may have an internal bias resistor to aid in testing both the thermostat and the heater. The wiring diagram will normally indicate this.
How to test a refrigerator’s defrost thermostat with a multi-meter:
- Because you will be testing electrical components, ensure you have disconnected your appliance from the power source before beginning.
- Locate and remove the defrost thermostat in order to test it. In freezer-on-top models, it may be located under the floor of the unit, or it could be found at the back of the freezer. If you have a side-by-side refrigerator, the defrost thermostat is found at the back of the freezer side. You will have to remove any objects that are in your way, such as the contents of the freezer, freezer shelves, icemaker parts, and the inside rear, back, or bottom panel.
- With your multi-meter on the Rx1 setting, touch the probes to a thermostat wire. When your thermostat is cold, it should produce a reading of zero on your multi-meter. If it is warm (anywhere from forty to ninety degrees Fahrenheit), then this test should produce a reading of infinity.
- If your tests produce different results, then you will need a replacement defrost thermostat.


Fresh & Freezer Door Gaskets
Leaky or damaged door seals can create long run times but normally will just create excess moisture that is visible near the air outlet ducts or on shelves in the freezer. Moisture along the edge of the door is also a good indication that the gaskets are not sealing properly and should be replaced.
How to inspect refrigerator door gaskets:
- At various points around the fridge, place a piece of paper on the seal and close the door normally.
- With the door closed, slide the paper out.
- If you can slide the paper out without any resistance, then you will need a replacement fresh food & freezer door gasket(s).


Condenser Fan Motor
If your fridge sounds like it’s running more often than normal, the condenser fan motor could be to blame. If the condenser cannot expel heat efficiently, then the compressor and sealed system work harder to keep the refrigerator cold. Check for higher than normal surface temperatures on the cabinet between the fresh food and freezer doors as this area contains tubing attached to the condenser and will heat up if the condenser cannot be cooled fast enough.
How to inspect a refrigerator condenser fan motor:
- Before beginning, ensure that you have disconnected your appliance from the power source, and then locate the condenser fan motor. You will need to remove the rear access panel to find it, it should be near the compressor.
- If the fan motor is seized or worn, you will need a replacement condenser fan motor.
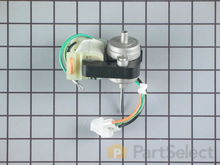


Evaporator Fan Motor
The evaporator fan is used to draw air over the evaporator coil and circulate the cold air throughout the fresh food and freezer compartments. If the evaporator fan does not work then the control thermostat or sensor may not correctly sense the temperature and the compressor will continue to run longer than normal. The fresh food and freezer compartment temperatures will increase as well.
How to inspect a refrigerator evaporator fan motor:
- Because you will be inspecting electrical components, ensure you have unplugged your appliance before beginning.
- Locate the evaporator fan motor, it will be behind the evaporator fan cover, inside the freezer compartment.
- If you notice a large amount of ice has built up on or around the motor, allow your freezer to defrost and see if that resolves the issue.
- Attempt to manually turn the motor shaft, it should turn freely with minimal resistance. You should also inspect the fan and motor for any signs of wear or damage, removing any foreign objects in the area.
- If it is noticeably worn, or if it is seized, you need a replacement evaporator fan motor.


Sealed System
The sealed system in a refrigerator is comprised of the evaporator, the condenser and the compressor and the associated tubing. A defect in any of these components can cause a symptom of running too long or not cooling enough, and would have to be tested and/or serviced by a qualified refrigeration technician as it involves live voltage tests.


More Repair Parts
Still not sure which part is broken? We can offer you custom troubleshooting help if you search with your model number.