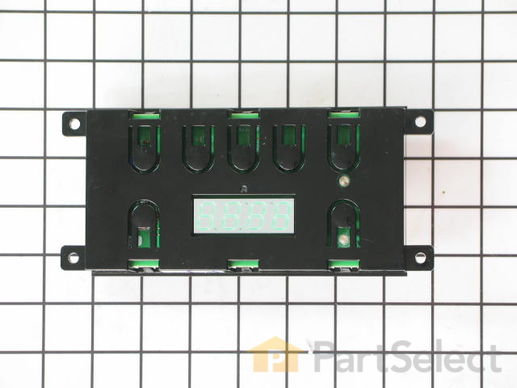
This is the electronic clock timer mechanism only. The overlay or touch pad is NOT included. To get the overlay, please use the model# of your appliance to search.
How Buying OEM Parts Can Save You Time and Money
Part Videos
Replacing your Frigidaire Range Electronic Clock Assembly
Troubleshooting
This part fixes the following symptoms:
Little to no heat when baking | Element will not heat | Will Not Start | Touchpad does not respond
Keep searches simple. Use keywords, e.g. "leaking", "pump", "broken" or "fit".
Sorry, we couldn't find any existing reviews that matched. Try using some different or simpler keywords.
★★★★★
★★★★★
Tammy D - March 23, 2023
Verified Purchase
Easy Switchout Repair
This was an East repair. Videos that assist in guiding the repair help a great deal.
★★★★★
★★★★★
Thomas B - August 11, 2021
Verified Purchase
Easy to replace - saved $170
With the video guide for installation I did it myself and saved the $170 the appliance repair company wanted. From start to finish, about 25 minutes. Works as promised.
★★★★★
★★★★★
Alan D. J - May 29, 2021
Verified Purchase
Couldn't have been easier
Don't hire a repair guy to come out and do this.
If you have a screwdriver and half a brain, you can do this repair yourself. Part is $115 dollars... a repairman would charge you $300 for the part and $100 labor to instill it.
★★★★★
★★★★★
MARK C - December 15, 2020
Verified Purchase
Correct part first time
Call support helped to identify correct part needed. Arrived 1 day early. Install was fast and easy. Thanks. Will recommend you to everyone
★★★★★
★★★★★
Lily V - November 9, 2020
Verified Purchase
Easy repair. Took me 10 minutes.
The part was brand new,good condition.
★★★★★
★★★★★
Beach Dreams O - July 10, 2020
Verified Purchase
Clock
The part was fine but no one told you you need to Purchase the front of the clock, also OR the cover peels off?
★★★★★
★★★★★
James W - April 2, 2020
Verified Purchase
Easy repair.
The part came well packaged and in perfect condition. It took less than half an hour to remove the faulty Electronic Clock Timer, which controls the bake and broil elements, and install the new one. PartSelect had a video to watch which made the repair very simple. Kudos!
★★★★★
★★★★★
Kathy S - August 29, 2019
Verified Purchase
Great and quick delivery and the repair was just as great and quick thank you so much saved us hundreds
Depart was in perfect condition when it was received it has been working great I could not have found a better place for replacement parts
★★★★★
★★★★★
Kimberly C - August 17, 2019
Verified Purchase
Just the part we needed! Easy fix, too.
The part was exactly what we needed to fix our oven. The repair was easy and fast. Timely shipping. Glad we found this site!
★★★★★
★★★★★
Michael P - February 6, 2019
Verified Purchase
Easy repair
The part was 90 percent identical. Same boards, same function keys in the right locations. The plastic holder that fits into the stove panel had different tabs which prevented it from fitting without cutting off the tabs, which I did. Then it worked fine. Fast repair. Saved at least 200 dollars by not having a repair person come out. The troubleshooting guides are helpful. Not much can go wrong on an oven. It's an insulated box with a control panel, temperature probe, broil element, bake element, wires and knobs. 15 minute repair. Part took a while to arrive though. Wasn't 2 to 6 days as indicated when ordered.
< Prev
1
2
3
Next >
Customer Repair Stories
Average Repair Rating: 4.3 / 5.0, 30 reviews.
What's this?
Sort by:
< Prev
1
2
3
Next >
Search filter:
Clear Filter
Your search term must have 3 or more characters.
Keep searches simple. Use keywords, e.g. "leaking", "pump", "broken" or "fit".
Sorry, we couldn't find any existing installation instruction that matched.
Oven was not working
I changed the clock , it was very easy ! I changed wire for wire then put the clock in . Simple task but, make sure power if off. You can take a picture of wires with your phone, if you like .
I have to say Parts Select is one of the best companies that I've ever done business with . They help troubleshoot the problem send you
... Read morethe parts on time and make refunds as easy as 123.
I am not easy to please because, of so much incompetence where ever you go these days. That's the reason I took the time to write all this .These folks are the real deal. Kenny G . In Louisiana !
Read less
kenneth from GRETNA, LA
Difficulty Level:
Very Easy
Total Repair Time:
Less than 15 mins
Tools:
Nutdriver, Pliers
2 of 2 peoplefound this instruction helpful.
Was this instruction helpful to you?
Thank you for voting!
The oven and broiler element would not heat.
The elements tested good. Figured it was the electronic clock timer/control using the sites repair guidance and ordered the part. The remove and replace was very easy. Pulled the stove out, removed back panel and removal and replacement of the part is pretty basic. Be sure and unplug the appliance first. Everything works fine now.
donald from SACRAMENTO, CA
Difficulty Level:
Very Easy
Total Repair Time:
Less than 15 mins
Tools:
Nutdriver, Screw drivers
3 of 3 peoplefound this instruction helpful.
Was this instruction helpful to you?
Thank you for voting!
oven wouldn't bake or broil. Top burners worked fine.
1. turn off power to stove and pull out from wall. 2. Remove 4 screws holding rear upper panel in place, pull panel up and out to remove. 3. Remove 4 screws holding clock timer to back of raised panel. Let it dangle from attached wires. Gently peel overlay from face of old timer(if reusing). or peel off adhesive backing from new overlay a
... Read morend apply to face new clock timer. 4. Attach new timer to back of stove raised panel where the old one was, using the 4 screws originally removed. 5. remove each wire one at a time from old clock timer and plug into the corresponding terminal on the new one. (careful they are tight). 6. Set upper rear panel in place and fasten using the 4 screws originally removed. 7. Slide stove into place and restore power. 8. Reward yourself with fresh baked cookies!
The repair was very easy take the back off, pull the wires from the old and put on the new that's it. Carefully peel the old face plate off and stick on the new one your done out the cover back on and cook.
Mark from LE ROY, NY
Difficulty Level:
Really Easy
Total Repair Time:
30 - 60 mins
Tools:
Nutdriver
2 of 2 peoplefound this instruction helpful.
Was this instruction helpful to you?
Thank you for voting!
Control shorted out
Removed back panel made note of all connections, remove 4corner screws and connections and re-install in reverse order.
David from ELLIJAY, GA
Difficulty Level:
Really Easy
Total Repair Time:
30 - 60 mins
2 of 2 peoplefound this instruction helpful.
Was this instruction helpful to you?
Thank you for voting!
No problems.
I followed the instructions I remembered from the video when I ordered the clock timer. Had no problem at all. I am enjoying my oven again.
silas from CARTHAGE, MS
Difficulty Level:
Really Easy
Total Repair Time:
30 - 60 mins
Tools:
Nutdriver
2 of 2 peoplefound this instruction helpful.
Was this instruction helpful to you?
Thank you for voting!
Oven and broiler didn't work.
I followed the video instruction. It was super easy and quick. It took no more than 10 minutes.
Dennis from NEW PRT RCHY, FL
Difficulty Level:
Very Easy
Total Repair Time:
Less than 15 mins
Tools:
Pliers, Socket set
2 of 2 peoplefound this instruction helpful.
Was this instruction helpful to you?
Thank you for voting!
Clock/Timer
The Clock/Timer had no juice coming thru for the stove to come on for cooking.So once I receive my parts to fix it, I had no problem getting the job done.
Linda from Fort Washington, MD
Difficulty Level:
Really Easy
Total Repair Time:
15 - 30 mins
Tools:
Pliers, Wrench set
1 of 2 peoplefound this instruction helpful.
Was this instruction helpful to you?
Thank you for voting!
clock/timer didnt work
unplugged appliance.removed back panel.removed old clock/timer by backing out 4 screws holding it in place.took of each wire one at a time as not to confuseplacement on new part. peeled front plate of old timer very carefully, placed on new part.put back in place.very easy, less than half hour.if I can do,anybody can
jack from chambersburg, PA
Difficulty Level:
Really Easy
Total Repair Time:
15 - 30 mins
Tools:
Pliers, Screw drivers
7 of 9 peoplefound this instruction helpful.
Was this instruction helpful to you?
Thank you for voting!
The LR surface burner and the oven were inoperable.
After receiving the parts in only two days, I first turned off the circuit breaker. Then I pulled the stove out from the wall. I used the nutdriver to remove the upper rear panel. Using the screw driver I removed the defective clock timer and used a pocket knife to carefully remove the clock timer face. I positioned the clock timer fa
... Read morece on the new clock timer and installed same in the stove panel. (I had made a list of the wires and their colors to insure the proper placement on the new clock timer). Installed the four screws and on to the burner switch. Two front panel screws removed and the defective burner switch was out. Installed the new burner switch, connected the wires, installed the two screws, pushed on the knob and I was ready to go. Re-installed the reap panel, pushed stove back in, turned on the circuit breaker and tested the burner and oven. All worked correctly. A very easy repair!
We're sorry, but our Q&A experts are temporarily unavailable.
Please check back later if you still haven't found the answer you need.
6 questions answered by our experts.
Sort by:
< Prev
1
Next >
Search filter:
Clear Filter
Your search term must have 3 or more characters.
Keep searches simple. Use keywords, e.g. "leaking", "pump", "broken" or "fit".
Sorry, we couldn't find any existing answers that matched.Try using some different or simpler keywords, or submit your new question by using the "Ask a Question" button above!
Bill
February 10, 2020
Does this part cross reference to part number 316455500
For model number FEF326FSA
Hello Bill, Thank you for the question. Very sorry but the 316455500 is not coming up a valid number. Checking the model number provided the Clock listed is PartSelect Number PS12728848. We hope this helps.
3 people found this helpful.
Was this helpful?
Thank you for voting!
Dale
December 27, 2021
Good day. My mother's oven does not seem to come up to temperature or maintain temperature. The TC seems to read fine. I hear the relay click on/off during the cycle, she just cannot bake a cake or cook a roast. It takes upwards of 10-15 min to come to temperature (say 375), but will not maintain afterwards. Any assistance would be greatly appreciated. I'm leaning towards the control board
For model number CFEF3007
Hello Dale, Thank you for the question. We suggest testing the Oven Temperature Sensor. Testing the temperature sensor probe on your oven is easy. With the sensor at room temperature, measure the resistance between the two prongs at the end of the sensor connector. The resistance of the sensor should read approximately 1080 – 1090 ohms at room temperature. We hope this helps!
3 people found this helpful.
Was this helpful?
Thank you for voting!
Jamie
February 25, 2022
Will this fix F10 error?
For model number Model : LFEF3011LWD with Serial: VF31758085
Hello Jamie, Thank you for your inquiry. The F10 error indicates that the control detects a runaway temperature in the oven. If the oven is overheating, this can be caused by a stuck relay or contact on the oven electronic control board, or could indicate a failed oven sensor. We would recommend checking the oven temperature sensor with a multimeter to see if it is faulty, and check the wiring going from the sensor to the control board for any visible damage. If the sensor tests good for continuity, then we would recommend replacing the control board. We hope this helps and if you need help placing an order, customer service is open 7 days a week. Please feel free to give us a call. We look forward to hearing from you!
Hi Krystal, thank you for the question. The F11 error code is a short-key error. It means when a key on the keypad has been detected as being pressed in for a long time, the F11 error is reported, and all oven commands are terminated. First, simply press the cancel key to clear the code. The error may have been caused by just holding down a key too long by mistake. If the error persists, you will need to replace the keypad, part number PS12728848, or the keyboard membrane, part number PS2581726. Customer service is available 7 days a week if you require assistance placing an order. Thanks again for reaching out!
Hi Stanley, thank you for reaching out. Yes, part number PS12728848, is the replacement number of the manufacturer part number 3164555. We hope this information is useful!
1 person found this helpful.
Was this helpful?
Thank you for voting!
Jaden
January 12, 2024
I changed the control panel but now it is throwing a F30 code and I have assured everything is connected correctly. How do I fix this? Everything worked on the stove before the control panel was broken!
For model number FFEF3043LSD
Hi Jaden, thank you for getting in touch. Based on our research, the F30 error code indicates that there is a problem with the oven temperature sensor, part number PS11731754. You may need to replace it to fix the issue. We hope this solves your problem!