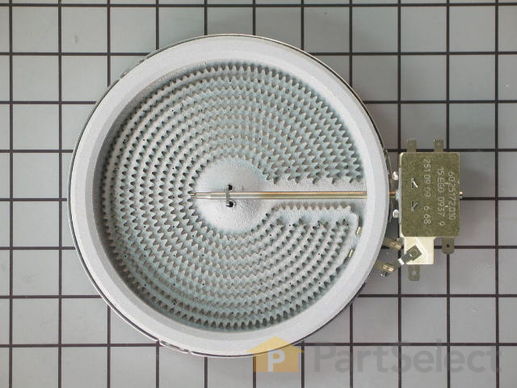
Replacing your Whirlpool Range 6" Surface Element, 1200 W
Troubleshooting
This part fixes the following symptoms:
Element will not heat
This part works with the following products:
Range, Cooktop.
Part# W11171119 replaces these:
8273994, W10248261, WP8273994
Customer Reviews
Average Rating:
★★★★★
★★★★★
11 Reviews
4.7
Filter By Rating:
5 Stars
8
4 Stars
3
3 Stars
0
2 Stars
0
1 Star
0
Sort by:
< Prev
1
2
Next >
Search filter:
Clear Filter
Your search term must have 3 or more characters.
Keep searches simple. Use keywords, e.g. "leaking", "pump", "broken" or "fit".
Sorry, we couldn't find any existing reviews that matched. Try using some different or simpler keywords.
★★★★★
★★★★★
JEANNE F - September 3, 2020
Verified Purchase
EASY REPAIR
THE PART WAS IN GOOD CONDITION AND STOVE IS WORKING.
★★★★★
★★★★★
Thomas P - October 16, 2018
Verified Purchase
Surface Element
All is good so far
★★★★★
★★★★★
Donald S - October 13, 2018
Verified Purchase
Very easy repair
I really like the videos! My elderly neighbor widow needed a new element. I watched the video, and after that it was a snap to repair. Great job!!!
★★★★★
★★★★★
Gary A - September 6, 2018
Verified Purchase
Right Part - Easy to Install
Ordered this part and received it surprisingly fast! Video direction on sight was accurate and very helpful. Part worked was easy to install.
★★★★★
★★★★★
Aston H - August 28, 2018
Verified Purchase
Easy to install
The part came on time and was in good condition. It fit well and was met my expectations.
★★★★★
★★★★★
Harry H - August 8, 2018
Verified Purchase
Burner replaced
No problem replacing element,worked ok.
★★★★★
★★★★★
Linda P - July 31, 2018
Verified Purchase
Video on the installation was very help.
The part fitted good and had no trouble install it. Just wish it did not cost so much. I know that sometime in the future I will need to order other ones.
★★★★★
★★★★★
ALLAN G - July 14, 2018
Verified Purchase
Easy repair
Fit perfectly.
★★★★★
★★★★★
Alejandro B - July 6, 2018
Verified Purchase
Easy repair. I do by my self
It works good.
★★★★★
★★★★★
Leontia C - May 8, 2018
Verified Purchase
Surface element easy fix
Part arrived sooner than expected. Install was simple. Watched the videos which were very helpful.
< Prev
1
2
Next >
Customer Repair Stories
Average Repair Rating: 3.6 / 5.0, 10 reviews.
What's this?
Sort by:
< Prev
1
Next >
Search filter:
Clear Filter
Your search term must have 3 or more characters.
Keep searches simple. Use keywords, e.g. "leaking", "pump", "broken" or "fit".
Sorry, we couldn't find any existing installation instruction that matched.
Burner didn’t work
I shut off the breaker to the stove. I removed 2 screws from the underside of the cooktop at the front of the unit. I raised the cooktop and had my helper hold the top at an angle to access the burner. I removed 2 screws attached to the burner and then loosened the 2 clips and moved them to release the burner. I transferred the electrical
... Read more connections from the old to the new. Reinstalled the burner and cooktop. Turned the breaker on, tested the new burner and I was fone
Read less
Marc from MIDDLETOWN, CT
Difficulty Level:
Easy
Total Repair Time:
15 - 30 mins
Tools:
Nutdriver, Screw drivers
1 personfound this instruction helpful.
Was this instruction helpful to you?
Thank you for voting!
Electric burner element not working
Video said to remove screws and lift stove top off, remove contacts and ground. My stove top was hinged and required me to lift and pivot stovetop up. The burners were anchored to the stove base not the top. I secured the topso that it would not drop down and proceeded with repair
Ronald from The Villages, FL
Difficulty Level:
A Bit Difficult
Total Repair Time:
30 - 60 mins
Tools:
Pliers, Screw drivers
1 personfound this instruction helpful.
Was this instruction helpful to you?
Thank you for voting!
surface element not working
Ordered new element from PartSelect. It arrived shortly. It did not match the original. Guy at appliance store explained how I could connect the wires on the new one. It still did not fix the problem. A repair man tried for 2.5 hours to fix it with no success. Now I will return the replacement element in the return envelope provided
... Read more.
I watched the video you provide and it answered all my questions. You estimate repair at 10 minutes. My wife said I waz done in under 10 minutes Watch the video, it explained every step and all the little tricks to the snap connections.
Kenneth from AUBURNDALE, FL
Difficulty Level:
Very Easy
Total Repair Time:
Less than 15 mins
Tools:
Pliers, Screw drivers
3 of 3 peoplefound this instruction helpful.
Was this instruction helpful to you?
Thank you for voting!
Burner went out
Two screws to remove glass top. 2 connectors to remove. Removed glass top and put it upside down. Remove 4 wires and 2 Phillips screws. Reverse steps.
Ronald from DEFIANCE, OH
Difficulty Level:
Easy
Total Repair Time:
30 - 60 mins
Tools:
Pliers, Screw drivers
2 of 4 peoplefound this instruction helpful.
Was this instruction helpful to you?
Thank you for voting!
Bad Element
Remove top by opening oven and taking out two screws in the front. Lift up top and unplug wire connectors on bad element, writing down where they are landed. Take out screw on element bracket and replace. That easy. Be sure to unplug appliance for your safety. :-) Also just wanted to add that PartSelect was great. Ordered it on saturda
... Read morey and was cooking with it on tuesday. Great job.
Read less
Dean from Farmington, NY
Difficulty Level:
Easy
Total Repair Time:
Less than 15 mins
Tools:
Screw drivers
13 of 20 peoplefound this instruction helpful.
Was this instruction helpful to you?
Thank you for voting!
Glass top stove element stopped working
really easy! Removed 2 screws under the glass top at the front, access from the open oven door, then removed the ground wire, removed the stove top, took the element holder off,( 2 screws)and replaced with new element, 30 minutes. I ordered the part and came within 18 hrs of ordering it, fantastic experience.
Robert from Fruitland Park, FL
Difficulty Level:
Easy
Total Repair Time:
15 - 30 mins
Tools:
Screw drivers
19 of 27 peoplefound this instruction helpful.
Was this instruction helpful to you?
Thank you for voting!
Bad element replacement
Took off top and pulled out old element and plugged in the new one
Thomas from Warren, CT
Difficulty Level:
Easy
Total Repair Time:
30 - 60 mins
Tools:
Pliers, Screw drivers, Socket set
9 of 16 peoplefound this instruction helpful.
Was this instruction helpful to you?
Thank you for voting!
Surface Element Out
Took 2 screws under front edge of smooth top. Unscrewed ground wire from back of smooth top unit. Unplugged 2 wire bundles, from back. Took bad element out , put in new one. Put back together. About 10 min's tops. Easy peasy.
Terry from Rockwall, TX
Difficulty Level:
Really Easy
Total Repair Time:
Less than 15 mins
Tools:
Screw drivers
58 of 73 peoplefound this instruction helpful.
Was this instruction helpful to you?
Thank you for voting!
< Prev
1
Next >
Questions and Answers
We're sorry, but our Q&A experts are temporarily unavailable.
Please check back later if you still haven't found the answer you need.
3 questions answered by our experts.
Sort by:
< Prev
1
Next >
Search filter:
Clear Filter
Your search term must have 3 or more characters.
Keep searches simple. Use keywords, e.g. "leaking", "pump", "broken" or "fit".
Sorry, we couldn't find any existing answers that matched.Try using some different or simpler keywords, or submit your new question by using the "Ask a Question" button above!
Anne
September 7, 2022
My 6” element goes straight to high and stays there no matter where I set the knob. How can we correct that?
For model number MES8880DS0
Hi Anne, thank you for your question. We have researched your model and found that the issue is probably with the Right Rear Burner Switch, part number PS11769788. If you require assistance to place an order, please contact customer service. We hope that helps!
My glass range top does not come off like I’m the video. Is there something that I’m missing? It will not slide towards me and up. It seems to be attached with a hinge.
For model number GFE461LVQ0
Hello Sara, thank you for your inquiry. According to our research, you need to unscrew the screws at the bottom of the range top which you can access by opening the oven door. After that, you need to unscrew the hinge from the range top. The hinge is located at the back of the range top. We hope this information helps!
1 person found this helpful.
Was this helpful?
Thank you for voting!
Kinting
September 14, 2023
What size is for right front element radiant
How many inches
For model number WFE525SOJZO
Hi Kinting, thank you for getting in touch. We have found that the size of the right front surface element, part number PS11775308, is 10 inches. Glad to be of assistance!