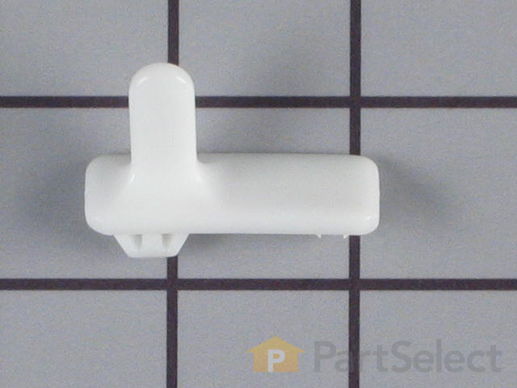
Lid Strike WP358684
$
11.06
In Stock
Get this part fast! Average delivery time for in-stock parts via standard shipping: 1.8 days.
PartSelect Number PS11741871
Manufacturer Part Number WP358684
Manufactured by
Whirlpool

Check if this fits your product and find model diagrams
Need help finding your model number?
Product Description
Lid Strike Specifications
This part is used to activate the lid switch when the lid opens/closes.

How Buying OEM Parts Can Save You Time and Money
Part Videos
Replacing your Whirlpool Washer Lid Strike

Troubleshooting
This part fixes the following symptoms:
Will not drain | Will Not Start | Will not agitate
This part works with the following products:
Washer, Washer Dryer Combo.
This part works with the following products:
Whirlpool, Kenmore, KitchenAid, Roper.
Part# WP358684 replaces these:
AP6008731, 357913, 358684
Customer Reviews
Filter By Rating:
- < Prev
- 1
- Next >
Sort by:
Search filter:
Clear Filter
Your search term must have 3 or more characters.
Keep searches simple. Use keywords, e.g. "leaking", "pump", "broken" or "fit".
Sorry, we couldn't find any existing reviews that matched. Try using some different or simpler keywords.
Geary S - June 8, 2022
Verified Purchase
Washer stopped running mid cycle
The part was exactly correct for the resolution of the issue. Washer filled with water and then stopped mid-cycle. PartSelect website diagnosed as lid strike/switch replacement. Part came timely; installed easily; resolved issue quickly. Great customer service.
Joseph L - October 16, 2019
Verified Purchase
Great timing
Great timing
Michele H - February 18, 2019
Verified Purchase
Easy Peasy
The Lid Strike along with the Lid Switch assembly were relatively easy to install in most part thanks to the great "how to" videos provided on the site. If this old lady can do it, anyone can.
The parts were shipped within an hour of ordering.
Stan M - October 19, 2018
Verified Purchase
Great job
Part worked great, I actually ordered 2 parts had 1st part overnighted and then ordered part mentioned above and received both at the same time, was impressed and grateful, thanks for the extra work on your part, could not be happier with your performance.thanks again, keep up the great work.
Sincerely, Stan Manha
Stephen S - October 15, 2018
Verified Purchase
New part-Same Problem
This new replacement to the broken part it is replacing is still not long. This part is necessary to trigger the machine operation through the cycles. The old one had broken so the machine would shut off and not cycle to drain/spin mode. New part is not long enough either and needs to by jury-rigged to make it long enough to keep the machine running from cycle to cycle.
MARYANN E - July 24, 2018
Verified Purchase
Easy Repair
Part was smaller than original. Had to extend with a piece of a popsicle stick.
BRYONN L - March 17, 2018
Verified Purchase
Great Part
The part was fine. I was disappointed with the speed of delivery (USPS), but that's not something you can be faulted for.
- < Prev
- 1
- Next >
Customer Repair Stories
Average Repair Rating: 3.3 / 5.0, 5 reviews.
What's this?
- < Prev
- 1
- Next >
Sort by:
Search filter:
Clear Filter
Your search term must have 3 or more characters.
Keep searches simple. Use keywords, e.g. "leaking", "pump", "broken" or "fit".
Sorry, we couldn't find any existing installation instruction that matched.
Washer would not start, when started wouldn't stay running.
I found the problem when I leaned on the lid while it started and that pressure kept it running. By placing detergent bottles on the right side of the lid I was able to walk away. I then bought the lid switch and lid strike after seeing it is a common problem. I watched the video and followed it almost step by step. First I unplugged the washer but didn't unhook the hose (only because I didn't have to move the washer) then I unscrewed the two screws holding the control panel, flipped it over, unplugged the lid switch connector, removed the clips holding the washer body on and tilted the body far enough forward to work on it. I replaced the switch as was done in the video and put the washer back together opposite the way I took it apart.
Other Parts Used:
-
Anthony from PITTSTON, PA
-
Difficulty Level:Very Easy
-
Total Repair Time:15 - 30 mins
-
Tools:Nutdriver, Pliers, Screw drivers
2 of 2 people
found this instruction helpful.
Was this instruction helpful to you?
Thank you for voting!
Machine would stop when finished rinse cycle and wouldn't spin or drain.
I replaced the Lid Switch and the unit works fine. I also cleaned up some other issues in the unit which took about half the time.
Other Parts Used:
-
Kenneth from El Paso, TX
-
Difficulty Level:Easy
-
Total Repair Time:1- 2 hours
-
Tools:Nutdriver, Pliers, Screw drivers, Wrench (Adjustable), Wrench set
56 of 104 people
found this instruction helpful.
Was this instruction helpful to you?
Thank you for voting!
shut off before finished
i knew the lid sw. must be bad and had a new one in hand, but when i remove the sw. ( near the lid ) i found the wires going back to where i could not reach. was not sure how to get at them so i repaired the sw. with tape untill i could find how to get at the wire end. after reading more in this repair area i know that i need to remove the control panel which is easy to do. next time i will read all i can on repairs in this section!!
Other Parts Used:
-
LARRY from LUCERNE, CA
-
Difficulty Level:Easy
-
Total Repair Time:15 - 30 mins
-
Tools:Screw drivers
17 of 22 people
found this instruction helpful.
Was this instruction helpful to you?
Thank you for voting!
Washer did not spin.
First I removed the two screws on the back side of the switch panel and tilted it back to expose the controls. I then pryed up the top of the washer to expose the lid switch. This was a mistake because I damaged the clips and bent the metal frame. Anyway after that I unlatched the lid switch on the top side, pulled it through the bottom, removed two screws holding the lid switch in place and replaced the switch and lid switch strike. Because I wrecked the machine top I had no alternative but to drill two holes from the top and put two screws in to hold the top down. It's ugly but it works.
The best part of all this is I received the part so fast that I was able to keep up the pace of doing laundry with no interruption. Thanks for being so reliable and quick to deliver. I already told many people about your service!
Other Parts Used:
-
Matt from Sussex, WI
-
Difficulty Level:Easy
-
Total Repair Time:1- 2 hours
-
Tools:Screw drivers, Socket set
15 of 18 people
found this instruction helpful.
Was this instruction helpful to you?
Thank you for voting!
Washing Machine kept cutting off mid-cycle
I had to remove the washing machine from the laundry room (our laundry room is pretty small).
I read the do-it-yourself explanation posted by Paul From Glendale CA and followed his instructions.
1. Unplugged the Washer and disconnected the hoses, so I could slide the washer into the kitchen.
2- Unfastened the two screws in the front lower corners of the controls panel and tilted is back. Unfastened the old lid-switch wiring from the control panel.
3. Remove the clips at the two corners under the control panel. I rotated the cover forward to clear it from the back and lifted it off and set it off to the side.
4. While I had the Washer disassembled I vacuumed out all the accumulation of dust, etc.
5. Removed the lid switch and unfastened the ground wire.
6. Installed the new switch and reassembled the Washer.
7. I did not read Paul's reassembly instructions closely enough. The front flange of the cover goes UNDER the steel frame on the washer. I spent 30 minutes trying to get the cover on, then finally figured that out on my own. Once I got the flange under the frame, it took about five minutes to get the cover on, the clips in and the control panel back into positions and reassembled.
The entire process is not particularly difficult. Had I read the "UNDER the frame" part earlier, the entire repair would have taken no more than 45 minutes.
Having another person to help reinstall the cover would be helpful. The cover is not heavy but it is a little awkward to handle and having another person to help line up the back cover, etc. will make the reassembly even easier.
Other Parts Used:
-
Fred from Midlothian, VA
-
Difficulty Level:Easy
-
Total Repair Time:30 - 60 mins
-
Tools:Pliers, Screw drivers, Wrench (Adjustable)
152 of 175 people
found this instruction helpful.
Was this instruction helpful to you?
Thank you for voting!
- < Prev
- 1
- Next >
Questions and Answers
Ask our experts a question about this part and we'll get back to you as soon as possible!
- < Prev
- 1
- Next >
Sort by:
Search filter:
Clear Filter
Your search term must have 3 or more characters.
Keep searches simple. Use keywords, e.g. "leaking", "pump", "broken" or "fit".
Sorry, we couldn't find any existing answers that matched.Try using some different or simpler keywords, or submit your new question by using the "Ask a Question" button above!
SARAH
December 2, 2017
The lid on my used washer has always been warped but never seemed to effect the washer cycles until now. The lid switch (number 20) on the diagram stops working after it does the agitating of the clothes. The switch does not show visible wear at the tip but refuses to advance the cycles to drain and spin. If i push down on the lid it automatically advances to drain and spin. I don't know if i need a new lid or a new switch. I have to place several gallons of bleach on the lid to make the washer cycles keep moving! it was used when i bought but performed perfectly for a year. have you ever heard of this malfunction?
For model number TAWS800JQ1
Hi Sarah,
Thank you for your question. It sounds like if your lid is warped that is what is causing the issue. If it does not sit properly into place the strike will not activate the lid switch. Having to put something heavy on your lid makes sense because you would need to level it out so that the strike activates the switch. I have linked to the proper lid for your model down below. Good luck with your repair.
6 people found this helpful.
Was this helpful?
Thank you for voting!
Related Parts:
Gary
March 26, 2018
I replaced the switch and the lid strike and will only work if you push down on the lid and hear the switch "click" then will work just fine. Goes through all the cycles and works as it should. Is replacing the lid for a $143 the only way to fix this problem? Is there no way to adjust the lid strike a 1/16 or 1/32 of an inch to make it activate the switch? Thanks.
For model number LXR9445JQ0
Hi Gary, Thank you for the question. The switch is not adjustable but I suggest checking the hinges to see if they are bent and need to be replaced. If they are bent they will not allow the lid to fully close and the switch will not engage. Hope this helps!
3 people found this helpful.
Was this helpful?
Thank you for voting!
- < Prev
- 1
- Next >
✖
Ask a Question
Ask our experts a question on this part and we'll respond as soon as we can.
Something went wrong. Please try again later.
Your Question Has Been Submitted!
Our experts will send you an email as soon as your question has been answered.
You May Also Need?
Model Cross Reference
This part works with the following models:
PartSelect Number: PS11741871
Manufacturer Part Number: WP358684
Brand
Model Number
Description
Kenmore
11026058590
Washer
- Kenmore Washing Machine Model 110.26058590 (11026058590, 110 26058590) Parts
Kenmore
1104812791
Washer
- Kenmore Washing Machine Model 110.4812791 (1104812791, 110 4812791) Parts