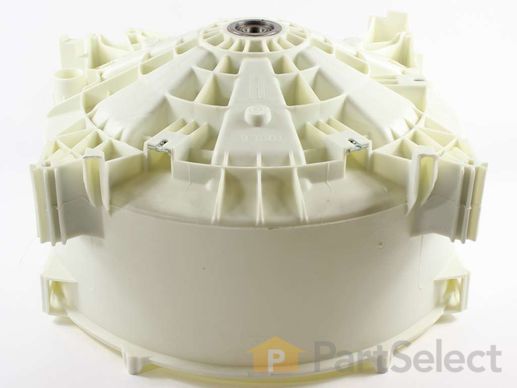
Part Location Diagram of W10772617 Whirlpool TUB-OUTER
See part 8 in the diagram
( Grid squares measure 1x1 inch )
Customer Service Representative

Get in touch, we're here to help!

Daily 8am - 9pm EST

customerservice@partselect.com

TUB-OUTER W10772617

 Fits your WFW9200SQ02 Washer!

Rated by 2 customers 

A Bit Difficult 

More than 2 hours 

Ratings submitted by customers like you who bought this part.

$ 461.33
  Special Order
 Fits your WFW9200SQ02 Washer!
PartSelect Number PS11703208
Manufacturer Part Number W10772617
Manufactured by Whirlpool
Product Description

TUB-OUTER Specifications

The shaft is not included with this part, but with the wash basket.
How Buying OEM Parts Can Save You Time and Money

How Buying OEM Parts Can Save You Time and Money

Troubleshooting
This part works with the following products:
Washer.
This part works with the following products:
Kenmore, Whirlpool, Maytag, Amana.
Part# W10772617 replaces these:
280132, 285984, 8181912, 8182284, W10253855, W10253864
Back to Top
Customer Repair Stories
 Average Repair Rating: 2.0 / 5.0, 2 reviews. What's this?
Sort by:
  • 1
Sorry, we couldn't find any existing installation instruction that matched.
Washer made excessive noise during spin
This repair involved basically completely disassembling the washer. I found a reasonably usable set of step-by-step directions that got me most of the way through the process. Where there were gaps or steps missing, I was able to improvise.

The problem with my washer was that the bearings for the inner tub were shot. The only way to repair this problem is by replacing the rear outer tub. This is because the bearings and the water seal are pressed in place on the rear outer tub assembly and cannot be removed and replaced separately. It makes for a very expensive part.

Here are the steps I found elsewhere on the PartSelect forum:

*******************************
Remove the washer top.

Disconnect the touch pad/led assembly ribbon connector from the left side of the central control unit and release if from the wiring harness brackets on the right side of the washer top.

Remove the detergent dispenser drawer by pressing down on the release tab at the back of the drawer and pulling it completely out to the washer.

Once the drawer is removed, remove the screw in the recessed hole next to the drawer opening.

Release the tab securing the right side of the console to the washer and remove the console. Be sure the ribbon cable clears the cabinet frame.

Removing the washer front panel will require that the door switch be removed and the boot be separated completely from the front panel opening.

Access to the door switch requires that the water seal boot be removed from the front of the washer.

Use a flat bladed screwdriver at the location of the retainer spring and pull the retainer forward and then off the perimeter of the boot.

Ease the edge of the boot off of the lip of the washer front.

The door switch is secured to the washer front panel with three screws. Once these screws are removed, the door switch will remain in place until it is lifted slightly and pulled back from the washer front panel.

Remove the two screws securing the bottom of the front panel to the washer, and the two screws securing the top of the front panel to the washer.

Remove th detergent dispenser assembly.

Separate the water inlet and window washer tube from the boot.

Pull the water inlet tube from the outlet connector of the detergent dispenser.

When reinstalling the water inlet tube, wet the water inlet gasket on the detergent dispenser with water only. Do Not Use any other lubricant.

Remove the screw securing the front of the detergent dispenser assemble to the top front frame.

Disconnect the vent tube from the detergent dispenser assembly.

Remove the screw securing the detergent dispenser assembly to the top left frame member.

Slide the assembly back sightly and lift the assembly out.

To remove the detergent dispenser motor assembly, disconnect the cam follower spring and lift the cam follower from the diverter locate the diverter cam clockwise to access the motor mounting screws.

Disconnect the wiring harness from the heating element.

There are three concrete weights attached to the tub assembly. All three must be removed for safe removal of the tub assembly.

Access to the weight on the top front of the tub requires removing the six screws securing the top front frame member from the washer and removing the frame member.

Access to the weight on the top back of the tub requires removing the two screws securing the upper transport brace to the washer and removing the brace.

Each weight is secured to the tub by three bolts.

Remove the three bolts and lift the weight from the tub.

Remove the flat nuts from the tub for safekeeping.

At the back of the tub assembly, remove the belt.

To remove the pulley from the basket, Place the handle of a crescent wrench through the pulley and into the steel bearing hub to keep the pulley from turning.

Use a socket wrench to remove the nut securing the pulley to the basket.

Disconnect the ground wire from the bearing hub.

Remove the screw securing the left end of the pressure tube connector tot
  • Dan from Collinsville, OK
  • Difficulty Level:
    A Bit Difficult
  • Total Repair Time:
    More than 2 hours
  • Tools:
    Pliers, Screw drivers, Socket set
30 of 41 people found this instruction helpful.
Was this instruction helpful to you?
Thank you for voting!
The rear bearing went bad on a front-load washer (Duet)
First I took the top, front, and back off of the washer. There were about a gazillion wires and tubes so I went slow and took pictures. I had to get the old tub out so that I could replace its back half. The new outer tub contained the replacement bearing. Taking the tub out took about two hours because I went slow so that I could document the process. Once the tub was out, I split the tub in half and found a real mess of a bearing. I couldn't get the old bearing race off of the shaft, so I went to the store to get some sand paper. With sand paper I was able to smooth the shaft down enough to get the old race off. The inner tub and the outer rear tub went together pretty easy with a couple swats with a hammer. Putting the clips back on was a trick. My oldest son figured it out. This was actually a family event. I am the father of ten children so you can imagine how important a washing machine is. After another couple of hours, we had all of the wires attached and the hoses hooked up. There is a metal band that holds the plastic shroud in the front to the outer tub. It took my daughter-in-laws long piano fingers to get that put on right. When we had it working finally, the bottom drain hose was leaking. The little clamp that came with the machine wasn't doing its job. Then the metal band came back off. Well, I went back to the store and bought a 10 inch metal band clamp for the bottom hose. That did the trick. I tightened the big band real tight and everything is wonderful. My wife is happy again! No more trips to wash clothes! I saved some money and some time and it wasn't that bad.
  • Patrick from Snellville, GA
  • Difficulty Level:
    A Bit Difficult
  • Total Repair Time:
    More than 2 hours
  • Tools:
    Pliers, Screw drivers, Socket set, Wrench (Adjustable), Wrench set
24 of 30 people found this instruction helpful.
Was this instruction helpful to you?
Thank you for voting!
  • 1
Questions and Answers

Be the first to ask our experts a question about this part!

Model Cross Reference
This part works with the following models:
PartSelect Number: PS11703208
Manufacturer Part Number: W10772617
Brand
Model Number
Description
Kenmore
11042822201
Washer
Kenmore
11042822202
Washer
Kenmore
11042822203
Washer
Kenmore
11042824201
Washer
Kenmore
11042824202
Washer
Kenmore
11042824203
Washer
Kenmore
11042826201
Washer
Kenmore
11042832201
Washer - Kenmore Washing Machine
Kenmore
11042834201
Washer
Kenmore
11042836201
Washer
Kenmore
11044826300
Washer
Kenmore
11044826301
Washer
Kenmore
11044832200
Washer
Kenmore
11044832201
Washer
Kenmore
11044832202
Washer
Kenmore
11044834200
Washer
Kenmore
11044834201
Washer
Kenmore
11044834202
Washer
Kenmore
11044836200
Washer
Kenmore
11044836300
Washer
Kenmore
11044836301
Washer
Kenmore
11045862400
Washer
Kenmore
11045962400
Washer
Kenmore
11045962401
Washer
Kenmore
11045962402
Washer
Kenmore
11045962403
Washer
Kenmore
11045962404
Washer
Kenmore
11045966400
Washer
Kenmore
11045966401
Washer
Kenmore
11045966402
Washer
Customer Service Representative

Get in touch, we're here to help!

Daily 8am - 9pm EST

Contact Customer Service