Enter the code DIYDAD10 at checkout to apply your discount. Discount will be applied at checkout when the code is entered & applies to all parts. Cannot be combined with any other coupon or special offer & cannot be applied to a previously placed order. Not valid toward tax or shipping & handling. Discount has no cash value. Discount expires on June 17 at 11:59pm EST.
You've Got 10% Off Your First Order!Save 10% with code at checkout *click to copy coupon code
This surface element kit includes an 8 inch element, two wire, 2350 watt surface element, and a terminal block with all three-wire units. These high rise elements do not come with an attached trim ring.
This tilt lock hinge mounted surface element kit includes a 6 inch, three wire, 1350 watt surface element, and a terminal block with all three-wire units. These high rise elements do not come with an attached trim ring.
This large broiler pan is found in the bottom of your oven and is used to catch drippings from broiling foods. This part includes the grate and bottom pan and is made of porcelain. The grate measures ...
These are replacement screws designed to fit your range. They are made of metal and are approximately ¼ inch long. They come in a package of 12. These are OEM parts sourced directly from the manufacturer.
First I removed the two screws that hold the element in place. I then pulled the element out about 3 inches and disconnected the two wires, reconnected the wires to the new element, reattached it to the oven and voila!
It worked. What was really cool, once I ordered the part, I received it in only two work days!
Repair was simple (just lift off the old and put on the new). What was pleasantly surprising was how quickly I received the parts (amazing)!
Lastly, I've been looking for the correct parts/sizes in stores for years (yes, I should have tried this sooner). I was delighted to finally find a place that actually had the correct
... Read moreparts.
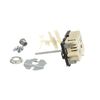
1. Removed the back panel. 2. Disconnected the wires from the old switch while connecting wires to the new switch one at a time. 3. Installed the new switch and broke off the excess metal on the post which fits into the burner knob on front of the range. 4. Replaced the burner knob and replaced the back panel.