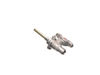
This is a leveling leg for your oven, range, or stove. The leveling legs on your oven allow your appliance to sit perfectly flat. The new one may be longer in length than your original, but will work...
$21.18
In Stock
Order within the next 3 hrs and your part ships today!
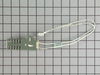
This bake or broil igniter ignites the gas for the oven burner by glowing white. If any of the following symptoms occur, it is best to replace this part: little to no heat when baking, oven will not t...
$58.78
In Stock
Order within the next 3 hrs and your part ships today!
This is a multi-use and multi-appliance screw. It can be used on a microwave, refrigerator, range/oven, air conditioner, dehumidifier, washer, or dryer. The measurements of this screw are 8 x 1/2 inch...
$20.79
In Stock
Order within the next 3 hrs and your part ships today!
This touch-up paint can be used on a wide variety of household appliances. It is most often used on washers, dryer, refrigerators, dishwashers, ranges, freezers, trash compactors, or microwaves. It is...
$8.00
In Stock
Order within the next 3 hrs and your part ships today!
This is cookware designed for use in your range or oven. It is a two-piece dish that is used to grill or cook food while the broil function is on, meaning it can withstand high temperatures. This set ...
$37.51
In Stock
Order within the next 3 hrs and your part ships today!
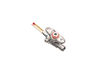
This is a surface burner valve for the left front and right front of your range. Burner valves are attached to the main gas line. When the switch is turned the gas then flows into a tube that mixes wi...
$96.08
In Stock
Order within the next 3 hrs and your part ships today!
The light socket on your electric range connects the power source to the light bulb. If your oven light is malfunctioning, you may need to replace the light socket. The light socket is located in the ...
$59.64
In Stock
Order within the next 3 hrs and your part ships today!
Appliance spray paint is a great way to cover up any chips and scratches that have appeared on your appliances. Instead of replacing the part entirely, this is an easy fix. This is also a great way to...
$22.68
In Stock
Order within the next 3 hrs and your part ships today!
Order within the next 3 hrs and your part ships today!
Questions And Answers for KGRS505XSS04
Ask our experts a question about this model and we'll get back to you as soon as possible!
1 question answered by our experts.
Sort by:
< Prev
1
Next >
Search filter:
Clear Filter
Your search term must have 3 or more characters.
Keep searches simple. Use keywords, e.g. "leaking", "pump", "broken" or "fit".
Sorry, we couldn't find any existing answers that matched.Try using some different or simpler keywords, or submit your new question by using the "Ask a Question" button above!
Charles
September 18, 2022
Lower stove trips electrical breaker. Glow plug starts , gas goes NOT come on and breaker trips.
For model number KGRS505XSS04
Hi Charles,
Thank you for your question. If the oven is not on its own dedicated breaker, then this may be the reason why it is tripping the breaker. The issue may be with the outlet it is plugged into. Also it may be due to defective wiring or a faulty part in the oven. You will need to inspect the oven to see where the issue is. If you have any questions, please let us know. We are open 7 days a week. We look forward to hearing from you!
Was this helpful?
Thank you for voting!
< Prev
1
Next >
✖
Ask a Question
Ask our experts a question on this model and we'll respond as soon as we can.
Lock the oven/stove controls by holding the START button for five seconds. This shuts off gas to the valve. Remove the knobs from the front of the stove using philips screwdriver. Undo the six screws that hold on the front bezel and remove to find the valve. Unscrew the top bracket using philps screwdriver. disconnect the valve using
... Read more a wrench (I think it was 12mm). Compare the valve to the new one. Installation is reverse. Press the START button for five seconds to unlock the oven/stove. Test fire the burner. Cook a batch of chili.
First I removed the lower tray and all parts covering the ignitor on the upper oven. 2. Then I removed the screws holding down the ignitor and flame distributor. 3. I then had to pull out the oven from the wall and remove the back panel to expose the wires connecting the ignitor. This required the removal of about six screws but they
... Read morewere fairly easy to get to. 4. I disconnected the ignitor from the back panel then went around to the front of the oven and pulled out the ignitor and all of the attached parts. 5. Here's the tricky part. The screws holding the ignitor in place had fused from the heat and then the threads stripped when I tried to remove them. I had to use a dremel tool and cutting wheel to carefully cut the screws off and then went to buy some replacement screws from the hardware store. 6. I replaced them with a nut and a bolt, to hopefully avoid the same problem for later replacement if necessary. 7. I then replaced everything the same way it came out and all is working like new!
Socket Lite come with clips attached to the outside of the housing. After you unhook the 3 lead wires that are attached to the unit. All you have to do is push in on the clips and release the unit. Then you snap in the new unit. Attach the 3 wire leads, put a oven bulb in the socket end, and the install the light cove
... Read morer


 Diagram and Parts List for KitchenAid Range")