Easy
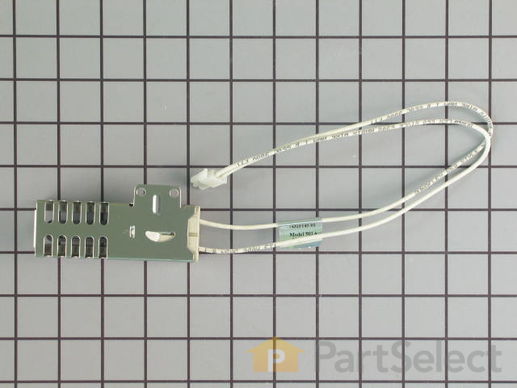
Part Location Diagram of W11596211 Whirlpool IGNTR-OVEN
See part 17 in the diagram
( Grid squares measure 1x1 inch )
Customer Service Representative

Get in touch, we're here to help!

1-866-319-8402 Monday to Saturday
8am - 9pm EST

customerservice@partselect.com

IGNTR-OVEN W11596211

★★★★★
★★★★★
34 Reviews

Rated by 21 customers 

Easy 

30 - 60 mins 

Ratings submitted by customers like you who bought this part.

Easy 

30 - 60 mins 

?
$ 57.55
  In Stock

Get this part fast! Average delivery time for in-stock parts via standard shipping: 1.8 days.

Does this part fit my model?

Need help finding your model number?
PartSelect Number PS16744717
Manufacturer Part Number W11596211
Manufactured by Whirlpool for Maytag, Whirlpool, KitchenAid, Jenn-Air
Product Description

IGNTR-OVEN Specifications

This bake or broil igniter ignites the gas for the oven burner by glowing white. If any of the following symptoms occur, it is best to replace this part: little to no heat when baking, oven will not turn on, gas igniter glows, but does not light up or element will not heat. *Tip: Match up the connecter with the old part. Refer to the manual provided by the manufacturer for installation instructions and accurate guidance. As a safety precaution, remember to unplug your appliance from the power source.
How Buying OEM Parts Can Save You Time and Money

How Buying OEM Parts Can Save You Time and Money

You May Also Need ?
Troubleshooting
This part fixes the following symptoms:
Little to no heat when baking | Will Not Start | Element will not heat | Gas igniter glows
This part works with the following products:
Range.
Part# W11596211 replaces these:
74007965, 7432P143-60, W11532055, WP7432P143-60
Back to Top
Customer Reviews
Average Rating:
★★★★★
★★★★★
34 Reviews
4.9
Filter By Rating:
  • 5 Stars
    32
  • 4 Stars
    2
  • 3 Stars
    0
  • 2 Stars
    0
  • 1 Star
    0
Sort by:
  • 1
  • 2
  • 3
Sorry, we couldn't find any existing reviews that matched. Try using some different or simpler keywords.
  • 1
  • 2
  • 3
Customer Repair Stories
 Average Repair Rating: 3.5 / 5.0, 21 reviews. What's this?
Sort by:
  • 1
  • 2
  • 3
Sorry, we couldn't find any existing installation instruction that matched.
igniter bad - top oven's lower flame won't light
unplugged from electric; turned gas off behind range & removed back panel; removed rack & door (optional) of upper oven; slid & removed drip cover; removed flame guard; carefully unscrewed igniter bracket to keep from dropping fasteners; located and unplugged old igniter from range back; removed old igniter through front of oven, go slow as it gets caught along the way; fed new igniter through same path; reverse steps - plug in new igniter, secure in oven, replace guard & cover & door if removed; back panel installed; gas knob turned to align with gas line; range plugged back into electric wall socket
  • Kathy from HOPE, AR
  • Difficulty Level:
    Really Easy
  • Total Repair Time:
    30 - 60 mins
  • Tools:
    Screw drivers, Socket set
1 person found this instruction helpful.
Was this instruction helpful to you?
Thank you for voting!
Bottom gas oven will not fire up
Did the diagnostic tests from the literature provided in a bag on the back of my stove I had no idea it was on the back of my stove because I had this stove installed when it was brand new
The final test indicated the igniter was bad and this is a common cause due to age wear and tear and just use of the oven
So I ordered one. It came extremely fast
It was a an OEM part
I had the oven back in operation in 15 minutes that includes R&R of the stove back and oven racks and inside fire tube covers and fire tube
I then replaced the bad igniter with the new one on the fire tube then reinstalled the fire tube
Then I did the Prefire test with the Gas turned off and the igniter lit beautifully
Then the final test was I turned on the gas and did the Prefire test again AND the fire tube lit up and beautiful blue flames came out the fire tubes tiny holes
Then I finished putting the back and inboard fire tube covers back on
Then I put the racks back in
This is what I did from start to finish and the Most important thing was I made my wife extremely happy
  • Michael from DES MOINES, WA
  • Difficulty Level:
    Very Easy
  • Total Repair Time:
    Less than 15 mins
  • Tools:
    Nutdriver, Screw drivers
2 of 2 people found this instruction helpful.
Was this instruction helpful to you?
Thank you for voting!
Top Oven Not Heating Up (Igniter Issue)
Pull out unit from wall in order to access back panel.
Unplug and turn off gas.
Remove the entire back panel (there is no small access panel like there is on other units. You must remove the whole back panel.)
Open the top oven door and remove rack, then remove the bottom heat shield, unscrew igniter.
Unplug the igniter from the back of the range. If you don't what wire it is have someone jiggle the wire from inside the top over while you look from the back of the range.
Pull out igniter.
Perform all steps again in reverse.
  • Robin from COATESVILLE, PA
  • Difficulty Level:
    Easy
  • Total Repair Time:
    30 - 60 mins
  • Tools:
    Screw drivers, Socket set
3 of 3 people found this instruction helpful.
Was this instruction helpful to you?
Thank you for voting!
Oven was taking a long time to reach temperature
Removed door, oven racks, and cover at the bottom. Very easy to get to the actual ignitor. The more challenging part is getting to the back of the oven where the igniter plugs in. Once we got the oven pulled out enough to access the bottom of the back panel, we removed the back panel....just a couple screws and it slides up. Unclipping and removing the old igniter was easy. It's a bit of a challenge to feed the new igniter's wires under the insulation and up over a small ledge and out a small hole that's smaller than a quarter. Small hands help. You can avoid the whole part of attaching it in the back of you clip the wires of your old igniter and new one. Then use ceramic wire nuts to connect the new igniter the the old one's wires. We decided not to do that since it was already done once that way and figured it would be good to have fresh wires clipped in at the back. Overall, fairly easy repair especially if you decide to connect the igniter with ceramic wire nuts.
  • Allison from VANCOUVER, WA
  • Difficulty Level:
    A Bit Difficult
  • Total Repair Time:
    30 - 60 mins
  • Tools:
    Screw drivers
1 person found this instruction helpful.
Was this instruction helpful to you?
Thank you for voting!
Upper oven igniter did not work.
Turned off the gas line & unplugged the oven. Pulled oven away from the wall to access the back of the oven. Removed the back panel (screws) on the oven & the few inner oven parts covering the broken igniter. Sprayed WD 40 on the threads of screws holding the old igniter in place. Removed old igniter screws with a nutdriver & unplugged it from the back of the oven. Installed the PartSelect replacement igniter & plugged it into the wiring receptacle. Reassembled the parts covering the new igniter & screwed the back panel back onto the oven. Plugged oven in, turned the gas back on & pushed the oven back into place. Tested the new igniter. Woohoo, oven works again & wife if happy!
  • Roger from SULLIVAN, IN
  • Difficulty Level:
    Really Easy
  • Total Repair Time:
    30 - 60 mins
  • Tools:
    Nutdriver
2 of 2 people found this instruction helpful.
Was this instruction helpful to you?
Thank you for voting!
Not hot enough
I had to wait week for parts that were supposedly in stock No notice about delay I had to call to find out you really dropped the ball on this one
  • Bruce from CHICAGO RIDGE, IL
  • Difficulty Level:
    Really Easy
  • Total Repair Time:
    30 - 60 mins
1 person found this instruction helpful.
Was this instruction helpful to you?
Thank you for voting!
Lower oven would not ignite, upper oven heat was inconsistent
To replace the igniter, I removed the oven door, all racks, the cover for the burner element and the shield over the burner element. I also removed the back panel to access the wiring. Removal of these elements was easy and took only a couple of minutes. When I tried to remove the old igniter from the bracket supporting it, one of the screws was stripped. Unfortunately I had to drill this screw out and replace it. If I didn't have to do this, both jobs would have taken about 20 minutes combined. After removing the igniter from the bracket, I replaced it, ran the electrical to the back where the wiring harness was and reassembled the components.

As for the upper oven temperature sensor, it took 5 minutes. I removed the two screws holding the sensor in place and pulled it out which exposed the electrical connection. I simply unplugged it, and screwed the new one in its place. I then connected the wiring harness.
Other Parts Used:
IGNTR-OVEN Short Oven Sensor Kit
  • Richard from ORTONVILLE, MI
  • Difficulty Level:
    Really Easy
  • Total Repair Time:
    30 - 60 mins
  • Tools:
    Nutdriver, Screw drivers
2 of 2 people found this instruction helpful.
Was this instruction helpful to you?
Thank you for voting!
Igniters were working very slowly.
This is a double oven unit. Both the upper and lower igniters are easy to get to, with just a few screws to remove. However in order to reach the quick disconnects, the back of the oven needs to be removed. So there are a bunch of screws to take off and the oven needs to be moved away from the wall. Pulling out the igniter wires and putting the new ones back in, is easy. Then put all the screws back on and move the oven back to the wall. Don't forget to disconnect the power when you do all this.
  • Stephen G from KEANSBURG, NJ
  • Difficulty Level:
    Really Easy
  • Total Repair Time:
    30 - 60 mins
  • Tools:
    Screw drivers
1 person found this instruction helpful.
Was this instruction helpful to you?
Thank you for voting!
Upper oven won't light
Just removed the shield (2 wing nuts) than the burner (1 Screw). THe back needs to be removed to unplug the igniter. I than reversed the process until I got to the plug and found that I had 2 male ends. I than had to remove everything and go back to square one until I find the part with the correct end (which should be Female) I'd check this before getting too deep into the repair.
  • Ronald from SPRINGFIELD, PA
  • Difficulty Level:
    Really Easy
  • Total Repair Time:
    1- 2 hours
  • Tools:
    Nutdriver
3 of 3 people found this instruction helpful.
Was this instruction helpful to you?
Thank you for voting!
Upper oven bake igniter went bad
You Tube!!! Didn’t find my exact oven, but watching a couple of videos was extremely helpful. Replacing the igniter was basically simple, but since it was a first for me, I took my time. Probably saved $200. The part was just over $100.
  • Robert from KNOXVILLE, TN
  • Difficulty Level:
    Really Easy
  • Total Repair Time:
    1- 2 hours
  • Tools:
    Screw drivers
4 of 4 people found this instruction helpful.
Was this instruction helpful to you?
Thank you for voting!
  • 1
  • 2
  • 3
Questions and Answers

We're sorry, but our Q&A experts are temporarily unavailable.
Please check back later if you still haven't found the answer you need.

5 questions answered by our experts.
Sort by:
  • 1
Sorry, we couldn't find any existing answers that matched.Try using some different or simpler keywords, or submit your new question by using the "Ask a Question" button above!
Robert
November 18, 2023
I purchased your igniter for my Jen air range jgs9900cds01. It arrived and I installed it tuned on the oven and nothing. The igniter I ordered is PS16744717 is this the correct igniter? I am reading resistance through the igniter of 99 ohms.
For model number jgs9900cds01
PartSelect logo
Hi Robert, thank you for the question. The ignitor, part number PS16744717, that you have already purchased, is compatible with your model. If it shows resistance, that means it has continuity. The resistance for a working ignitor is between 80 and 175 ohms. We would suggest checking the wire connection of the ignitor to solve the problem. We hope that helps!

2 people found this helpful.

Was this helpful?
Thank you for voting!
Timothy
December 27, 2024
I replaced the oven ignitor for the upper oven and it now lights ok but not keeping a constant temperature to the desired setting. The lower oven will light but also doesn’t come up to desired temperature setting and or hold temperature settings.
For model number KFGD500ESS04
PartSelect logo
Hello Timothy, thank you for your question. We recommend testing or replacing the Gas Valve PS11756148 and checking all fittings PS3407541.

1 person found this helpful.

Was this helpful?
Thank you for voting!
Related Parts:
Wea
November 15, 2024
Hello I need both the upper oven bake igniter and lower oven bake igniter. Are they the same part?
For model number WGG555S0BS00
PartSelect logo
Hello Wea, Thank you for reaching out. The Bottom Bake Igniter is listed as PartSelect #: PS16744717 and the Top Broil Igniter is PartSelect Number PS11752880. We hope this information helps!

Was this helpful?
Thank you for voting!
Related Parts:
Josh
February 3, 2025
Need the igniter part number for the bottom oven is it the same part number top and bottom oven?
For model number MGR6772BDW
PartSelect logo
Hi Josh, Thank you for writing. The Bake Igniter for the upper and lower oven is listed as PartSelect Number PS11744176. Thank you for the inquiry, good luck with the repair!

Was this helpful?
Thank you for voting!
Related Parts:
Sergio
August 17, 2023
Convect oven set at 400. It's on up to less then 300, then it shuts off. Is the igniter the same as the lower baking igniter ? Can it be changed without pulling out the stove ? The lower oven also takes a long time to reach the set temperature but, after one or two reset, it will get there. I allready changed the temperature sensor.
For model number JGS9900CDS01
PartSelect logo
Hello Sergio, thank you for getting in touch. Since you have already replaced the temperature sensor, we would recommend you replace the oven control board. It monitors the temperature and controls the oven heat. The oven control board that will work with your model is PS11745986. Please submit a new question if you have any follow-ups!

Was this helpful?
Thank you for voting!
Related Parts:
  • 1
Model Cross Reference
This part works with the following models:
PartSelect Number: PS16744717
Manufacturer Part Number: W11596211
Brand
Model Number
Description
Kenmore
66578002800
Range
Kenmore
66578002801
Range
Kenmore
66578002802
Range
Kenmore
66578002803
Range
Kenmore
66578003800
Range
Kenmore
66578003801
Range
Kenmore
66578003802
Range
Kenmore
66578003803
Range
Kenmore
66578003804
Range
Kenmore
66578009800
Range
Kenmore
66578009801
Range
Kenmore
66578009802
Range
Kenmore
66578009803
Range
Kenmore
66578009804
Range
Whirlpool
GGG388LXB00
Range - Freestanding, Gas
Whirlpool
GGG388LXB01
Range - Freestanding 30" Gas
Whirlpool
GGG388LXB02
Range - Freestanding 30" Gas
Whirlpool
GGG388LXB03
Range
Whirlpool
GGG388LXB04
Range
Whirlpool
GGG388LXB05
Range
Whirlpool
GGG388LXQ00
Range - Freestanding, Gas
Whirlpool
GGG388LXQ01
Range - Freestanding 30" Gas
Whirlpool
GGG388LXQ02
Range - Freestanding 30" Gas
Whirlpool
GGG388LXQ03
Range
Whirlpool
GGG388LXQ04
Range
Whirlpool
GGG388LXQ05
Range
Whirlpool
GGG388LXS00
Range - Freestanding, Gas
Whirlpool
GGG388LXS01
Range - Freestanding 30" Gas
Whirlpool
GGG388LXS02
Range - Freestanding 30" Gas
Whirlpool
GGG388LXS03
Range
Customer Service Representative

Get in touch, we're here to help!

1-866-319-8402 Monday to Saturday
8am - 9pm EST

Contact Customer Service