This authentic, white Drum Bearing Slide, also known as the bearing drum slide, glide, or pad, is a plastic, easy-to-install part for your dryer. It replaces the dryer's front drum slide to allow for ...
This original equipment manufacturer Drum Bearing Slide is a plastic, green, easy-to-install part for your dryer. It replaces the dryer's front drum slide to allow for easier movement. You'll know if...
This OEM Timer Knob is a white plastic knob which can be easily installed onto your machine's timer rod, in order to control the timer. If the part breaks off, it should be replaced. Refer to your use...
This rear drum bearing kit includes a shaft, ground strap, bearing, seven screws, and installation instructions. The bearing plate comes with a slot in it for the ground strap. This part helps keep yo...
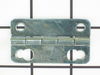
This door latch is designed for your dryer, and is mounted to the dryer frame. The door latch holds the door of your dryer closed while the machine is operating. If your dryer door is not catching on ...
TThe door strike for your dryer is mounted on the dryer frame that the door shuts onto. It fits into the door catch on the door and keeps the door closed. If the door strike is damaged or missing, the...
The adjustable leveling screws on the bottom of your dryer can be screwed in or out to lower or raise the leg level. If one of the leveling screws is stripped, damaged, or missing, you may not be able...
This part is the replacement high-limit thermostat or safety thermostat for your dryer. The high-limit thermostat is found on the upper right-hand side of the heater housing, and it cuts off power to ...
$87.83
In Stock
Questions And Answers for 65198438
Be the first to ask our experts a question about this model!
✖
Ask a Question
Ask our experts a question on this model and we'll respond as soon as we can.
first I took the dryer apart 1st thing i did was unplug the power supply (safety first) then I removed the top of the unit then removed the front cleaned all the lint from the inside of the cabinet I found the proper belt size on part select.com the next day I had my dryer belt delivered (which cost 1/3 the price of the local repair shop
... Read moreprice) then I placed the belt over the dryer drum and made sure it was in the general location it should be I then replaced the front cover and the top. then I removed the rear cover which was held on by six 5/16 sheet metal screws which gave me access to the drive pulley and belt tensioner the belt goes on by going under the tensioner then around the drive pulley Then i rotated the drum by hand to make sure everything had clearance I then buttend everything up plugged it and started it up it workd fine and I figure Ill get another 8 years out of it Thank you partselect.com
The end repair was very simple and took minimal effort. The time and difficulty was all in the testing. I disassembled the dryer and removed the drum and then hard wired each thermo-fuse to determine where the fault was. After test all of those I was stumped. When I opened the door the light would not come on so I assumed it was a pow
... Read moreer fault closer to the source. However after all of my testing I couldn't find anything wrong. I then removed the light bulb and realized it was burned out which led me to the door switch being the fault. I removed the switch and soldered the three wire together and the dryer started right up! All I had to do was order a new $15 part, unsolder the wires and plug them in. Would have been so much simpler if that light bulb hadn't of been burned out causing me to over think my diagnosis. This was my first major appliance repair and I did it with only the help of the parts diagram provided on the website.
I confirmed the dryer wasn't making any heat by running it for a few minutes, then opening the door. The air was cool, so I knew it wasn't making heat. I searched on Google and discovered that it could be the thermostat control or heating element. I began by unplugging the dryer from the 220 plug and moving it into the garage. I then
... Read moreunscrewed the top four Torx screws that hold the control panel in place. I immediately started to take lots of pictures of the wiring with my digital camera because I have no idea how to read a wiring diagram and knew I would never be able to remember which wire plugged into the appropriate control. Trust me, this is the smartest thing I've ever done. I unplugged all connections and draped the wires out of the way. Then removed the control panel completely and put it on my workbench. Then I unscrewed the top panel which exposes the drum. I was really surprised to learn how simple a dryer really is. I then unscrewed the front panel with the door. There are 3 or 4 wires that you will need to disconnect on the left side of the door. You can then remove the front door panel and set it up against a wall or whatever. At this point the front of the drum is NOT supported so it will rest on the small bottom panel in the front. Then you have to release the tension of the belt around the drum, which is easy enough to do. Just reach through the front, under the drum and pull the tension toward the right side of the dryer. This will release the tension and you should be able to slide the belt off of the roller. You may also have to unscrew the sides of the dryer panels in the front so that you can pull the drum out. It's fairly lightweight, just big and awkward. Once the drum was out, I could clearly see that both heating coils were burnt in two. There are some wires you'll need to disconnect on the element housing then there are 4 screws that hold the housing to the back of the dryer. Unscrew these and pull the element out. From there, I just followed the directions that came with the heating coil parts and reinstalled new coils. Once the coils are in place, just work backward putting things back together. Now, when you take the dryer apart, it's a GREAT idea use compressed air or a vacuum to blow or suck out all of the lint inside. I also blew out the electric motor and got everything all nice and clean inside. I also vented my dryer directly into my garage. It's an electric dryer so no dangerous fumes. Plus side to this is that I'll have heat in my garage during the winter months. Also, instead of the dryer venting 50+ feet out the side of the house, it now vents 3 feet to the garage. The dryer will now dry a full load of clothes on MEDIUM heat in 50 minutes. It used to take 80 minutes on high heat. This is a difficult fix, but if you take your time and lots of pictures, you can do it and save yourself a ton of money.


 – Part Number: WE1M504")
 – Part Number: WE1M1067")


")
")


