Part Location Diagram of WR23X10783 GE Micro Switch
See part 72 in the diagram
Replacing your General Electric Refrigerator Micro Switch
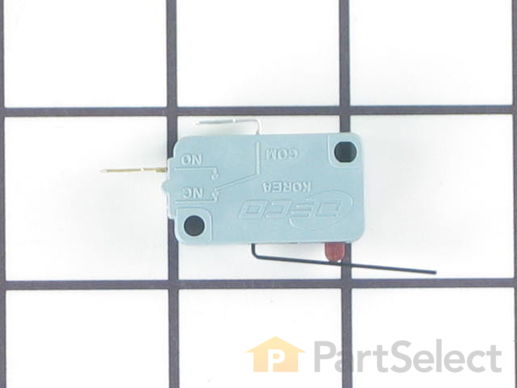
( Grid squares measure 1x1 inch )
Customer Service Representative

Get in touch, we're here to help!

Open until 12am EST

customerservice@partselect.com

Micro Switch

 Fits your PSHS6PGZBESS!
★★★★★
★★★★★
6 Reviews

Rated by 13 customers 

Easy 

30 - 60 mins 

Ratings submitted by customers like you who bought this part.

$ 55.21
  In Stock

Get this part fast! Average delivery time for in-stock parts via standard shipping: 1.8 days.

 Fits your PSHS6PGZBESS!
PartSelect Number PS8259956
Manufacturer Part Number WR23X10783
Manufactured by GE
Customer Service Representative

Get in touch, we're here to help!

Open until 12am EST

customerservice@partselect.com

Check if this fits your product and find model diagrams

Need help finding your model number?
Product Description

Micro Switch Specifications

This is the replacement micro switch, or dispenser switch for your refrigerator. It is gray in color and measures approximately 1 inch by half an inch. The dispenser switch is what tells your refrigerator that it is ok to dispense ice or water. If your refrigerator is not dispensing ice or water, you may have a faulty or damaged switch. Be sure to disconnect the power to your refrigerator before you begin this repair. This switch is sold individually and is a genuine OEM replacement part sourced directly from the manufacturer.
How Buying OEM Parts Can Save You Time and Money

How Buying OEM Parts Can Save You Time and Money

Troubleshooting
This part fixes the following symptoms:
Not dispensing water | Leaking | Ice maker won’t dispense ice
This part works with the following products:
Refrigerator.
This part works with the following products:
General Electric, Hotpoint.
Part# WR23X10783 replaces these:
AP5688654, WR23X10171, WR23X10224
Back to Top
Questions and Answers

Ask our experts a question about this part and we'll get back to you as soon as possible!

37 questions answered by our experts.
  • 1
  • 2
  • 3
Sort by:
Sorry, we couldn't find any existing answers that matched.Try using some different or simpler keywords, or submit your new question by using the "Ask a Question" button above!
Gary
August 8, 2017
Does the micro switch turn on / off both the water and ice dispenser.?
For model number GSS25WGPHBB
PartSelect logo
Hi Gary, Thank you for your inquiry. Yes, your micro switch does have a hand in controlling both your water and ice dispensers. I hope this helps!

11 people found this helpful.

Was this helpful?
Thank you for voting!
Es
October 24, 2017
My water dispenser fails to shut off after I remove the glass being filled.What part is responsible for returning the dispenser to the off position.Is there an easy test to figure this out?
For model number GSS23WGTACC
PartSelect logo
Hi Es, Thank you for the question.If you are able to take the dispenser apart and check the parts for any physical damage or defects and everything looks good, I suggest replacing the Micro Switch. This switch controls the on and off function of the dispenser. Hope this helps!

8 people found this helpful.

Was this helpful?
Thank you for voting!
Patrick
September 22, 2017
Dispenses cubed and crushed ice but no water, water line is clear, filter properly installed, has been operating fine until it suddenly stopped. Is the solenoid separate for water and ice dispensers? Thanks
For model number GE Profile PSCS3RGXGFSS
PartSelect logo
Hi Patrick, Thank you for your question. Yes, your water inlet valve has two solenoids. One for the water and one for the ice. It is likely that the water side has failed. I would suggest testing it with a multimeter to be sure. Good luck with your repair.

6 people found this helpful.

Was this helpful?
Thank you for voting!
Ryan
February 25, 2019
How do you take apart the water dispenser on this model of refrigerator? I need to replace the micro switch. Thanks.
For model number ZISS480DXASS
PartSelect logo
Hi Ryan, thank you for your question. We actually have an installation video listed underneath this part. Here is the direct link: https://youtu.be/Faq27bnmoY8. Good luck with your repair.

2 people found this helpful.

Was this helpful?
Thank you for voting!
Brendan
February 12, 2020
Water/Ice dispenser not working. I have established that if I take the micro switch out of the housing and activate it myself that the water dispenser will work but that when it is in its housing there is nothing coming into contact with the switch to activate it when pressed. What part should be activating the micro switch?
For model number GSHS5KGXBCSS
PartSelect logo
Hello Brendan, Thank you for the question. There should be a Arm on the Dispenser Housing, PartSelect Number PS3487939 that will activate the Switch. We hope this helps.

2 people found this helpful.

Was this helpful?
Thank you for voting!
Related Parts:
Bruce
February 11, 2019
The water dispenser works intermittantely.. it will often stop during dispensing . i have previously replaced the dispenser door solenoid, water valve, filter assembly and interface dispenser assembly. i am now considering the micro switch am i going the right direction or is there another possible cause? thank you
For model number CSHS5UGXCSS
PartSelect logo
Hello Bruce, Thank you for contacting us. I suggest checking the switch, PS8259956 with a multimeter as this is likely the cause of the issue based on the ground work you have already done. If you are unfamiliar with how a multimeter functions, we have videos available to assist you.

1 person found this helpful.

Was this helpful?
Thank you for voting!
Josh
October 6, 2017
My fridge is not dispensing water, getting ice without issue. If i unhook the water line coupler right before the line enters the freezer door and hit the dispenser lever water will move thru the line to that point without issue. Could the switch or solenoid cause this issue? Could the switch still activate water movement without allowing it to exit the dispenser?
For model number GSH25JSDBSS
PartSelect logo
Hi Josh, Thank you for your question. It could be your dispenser solenoid that is the issue. However your water inlet valve has two solenoids on it. One for the ice maker and one for the water dispenser. I would also suggest checking this part. More times than not, this is the part causing an issue like that. You can test your valve with a multi meter to be sure. Good luck with your repair.

1 person found this helpful.

Was this helpful?
Thank you for voting!
Joan
February 16, 2018
The flapper door does not close to the ice maker. What parts do i need to fix this?
For model number PSC23MGSAWW
PartSelect logo
Hi Joan, Thank you for your question. That honestly depends on what is actually broken in your dispenser area. I would suggest checking the door spring, that part can just wear down over time and eventually needs to be replaced. You should also test your micro switch to see if it is functioning correctly. You may also want to test your door solenoid as well. You can test both of those electrical parts with a multi meter. Good luck with your repair.

1 person found this helpful.

Was this helpful?
Thank you for voting!
Jayanti
February 19, 2018
I did not get water at dispeser, water up to bottom of the door.So what is the problem ?
For model number GSH25JFXJCC
PartSelect logo
Hello Jayanti, thank you for your question. I would suggest checking the Dispenser Door Solenoid Assembly WR62X10055, as well as the micro switch part number WR23X10783. The dispenser micro switch is a momentary contact switch that when actuated will supply power to the solenoid on the water inlet valve. So if the switch is not functioning, the solenoid won't bring water to the dispenser area. I hope this helps!

1 person found this helpful.

Was this helpful?
Thank you for voting!
Kenneth
August 5, 2018
Can i return dispenser switch if it doesn’t solve my problem?
For model number Gsl22fspdbs
PartSelect logo
Hi Kenneth, Thank you for your question. For your peace of mind, we offer a 30-day return period. You can complete your return by contacting us at 1-888-738-4871 or CustomerService@PartSelect.com. Please be sure your return meets the following conditions: Parts must be in resaleable condition to qualify: “Resaleable” means that the part must not have incurred damage, such as signs of installation by the customer, marks, or scuffing. Part must also be in its original packaging to be considered resaleable. Please inspect part before removing from its packaging, as this can cause return to be rejected. Electrical parts are subject to additional scrutiny. Rejected returns cannot be shipped back to customers. Returning Parts to PartSelect: Please have your model number and serial number ready when contacting our customer service to begin the return process. After contacting us, you will receive an email with return shipping details (remember to check your junk mail). Returns must be received within 30 days of the date the items were originally shipped. Customers are responsible for the cost of return shipping. If the return is a result of our error, or the part was lost in shipping, contact us within 10 business days to arrange a refund. We will refund your return shipping cost after your return has been processed, or provide you with a pre-paid shipping label. Additional information such as photos of the part may be required to complete a return of this nature. Receiving Your Refund: Please allow 7-10 business days after your return has been successfully processed for your refund to appear. If your refund is taking longer than expected, or you would like to check its status, please contact our customer service desk for an update on your return. I hope this helps. Thank you and have a great day!

1 person found this helpful.

Was this helpful?
Thank you for voting!
  • 1
  • 2
  • 3
Part Videos

Replacing your General Electric Refrigerator Micro Switch

Replacing your General Electric Refrigerator Micro Switch
Customer Repair Stories
 Average Repair Rating: 3.3 / 5.0, 13 reviews. What's this?
  • 1
  • 2
Sort by:
Sorry, we couldn't find any existing installation instruction that matched.
flap to ice dispenser would not close
The flap to the ice dispenser would not close, which allowed the ice dispenser to frost up, freezing the water dispenser.

This was a simple fix. The solenoid had stopped working, so it would not automatically close the door flap. I read some posts on this site that suggest that you had to remove the trim around the entire dispenser to get at the solenoid. My fridge may be a newer model, but in any event it was much easier than that. Just below the touch pad for choosing water, ice, or crushed ice (above where the ice/water dispenses) there are three very small holes spaced about an inch a part. After unplugging the fridge, I stuck a small philips-head screw driver in each, freeing spring clips. That allowed the touch pad to come off. I then removed four screws to remove a plastic piece covering the chute, giving me access to the flap and solenoid. I just unplugged the solenoid from the circuit board on the back of the touch pad and then removed three screws to remove the old solenoid. I replaced it with the new solenoid and plugged it into the circuit board. The touch pad then snapped back into place.

The hardest part was figuring out how to get at the solenoid. After I found that pushing the clips in those three holes allowed me to remove the touch pad, it could not be any easier.
Other Parts Used:
Dispenser Door Solenoid Assembly Dispenser Crusher Cover Recess Door Spring
  • Bill from Cleveland Heights, OH
  • Difficulty Level:
    Easy
  • Total Repair Time:
    15 - 30 mins
  • Tools:
    Screw drivers
415 of 479 people found this instruction helpful.
Was this instruction helpful to you?
Thank you for voting!
Flapper Door Stuck Open Allowing Ice Tube To Frost Shut
I read in a previous post how to do the job from outside fridge which saved me lots of time. No need to remove inner door lining. Here is my procedure:
1.Turned off power. 2.Snapped off outside trim ring. 3.Located three small holes inside lip just above ice tube. The center hole was not used. 4.Pushed rather firmly up through two remaining holes with small Allen wrench to release front control panel. 5.Removed (3) wire connectors from printed circuit board. Firmly pull/pry them straight out as lifting on retaining clip will break it off. I broke one & had to elect. tape it back in place later although I doubt it would have ever come off. 6.Release secondary panel by removing (4) screws. The problem was obvious as the solenoid had broken the crank arm off the flapper rod & trapped it open 7.Replaced solenoid, crank arm with flapper attached, spring & micro switch. Switch was okay but I changed anyway. 8.Cleaned all areas with 1/10 bleach water to sanitize. 9.Re-installed evrything in reverse order & all is okay. Thanks to someone for telling about those two small holes. Made job easy versus a very hard one.
Other Parts Used:
Dispenser Door Solenoid Assembly Dispenser Door Assembly or Flapper Recess Door Spring
  • Joe from Maryville, TN
  • Difficulty Level:
    Easy
  • Total Repair Time:
    30 - 60 mins
  • Tools:
    Screw drivers, Wrench set
164 of 217 people found this instruction helpful.
Was this instruction helpful to you?
Thank you for voting!
ice and water would not dispense at door
first I snapped out control face plate on outside of door. removed the screws for each part,and unplugged the wires at the connectors, replaced new parts and plugged in connectors to new circuit board.I decided to replace the board,switch and solenoid all at the same time, not knowing which part was bad.I have to say it was well worth it! it works better than when it was new!!!! It was a lot easier than I thought it was going to be.
Other Parts Used:
Dispenser Door Solenoid Assembly Dispenser Board Door Recess Retainer Dispenser Door Recess Crank Recess Door Spring Torsion-Fit Spring
  • carl from vacaville, CA
  • Difficulty Level:
    Really Easy
  • Total Repair Time:
    15 - 30 mins
  • Tools:
    Screw drivers
95 of 144 people found this instruction helpful.
Was this instruction helpful to you?
Thank you for voting!
Ice door would not open far enough, ice would get stuck in chute
First remove about 30 screws w/nutdriver that are hidden under door seal then inside of freezer door will come off. Second remove about 10 screws that hold dispenser assy to the inside of door, then support the unit with tape so you don't damage the wires that connect it. Third, pop touchpad loose, then remove three sets of wires plugged into the circuit board. Fourth, remove four screws that hold the ice chute and light assy. Fifth, now remove the 3 screws that hold solenoid. These three screws that hold the solenoid will be very rusty, you may want to replace these also. I went ahead and replaced all the related parts because they are so hard to get to. Also took the opportunity to clean in here with bleach to remove all the black mold and rust.
NOTE: when reassembling the inside of the freezer door to the outside of the door you must loosely attach the door on both sides in the middle first, then the top and bottom. Add some more screws on each side and tighten them all. Now you must check to be sure that the door is not racked. If the door is not sealed at the top or bottom, loosen the screws and twist the door a little and tighten screws and check door again for proper seal. Spent more time adjusting door to seal right than doing the actual repair.
Other Parts Used:
Dispenser Door Solenoid Assembly Dispenser Door Assembly or Flapper Dispenser Door Recess Crank Recess Door Spring
  • ERIC from MADISON, AL
  • Difficulty Level:
    A Bit Difficult
  • Total Repair Time:
    1- 2 hours
  • Tools:
    Nutdriver, Screw drivers
73 of 133 people found this instruction helpful.
Was this instruction helpful to you?
Thank you for voting!
Ice cube production stopped; ice cube chute door is seized.
Problem: I have a black colored GE 24.9 cubic inch side-by-side refrigerator, model #GSH25KGMCBB that I purchased new in 2002. The ice cube maker stopped supplying ice cubes and the ice dispenser door stopped operating.

Repair: Unplugged refrigerator first and shut off the house water supply valve. Removed the lower rear access cover and replaced the double solenoid water valve. Icemaker and water dispenser tubing are easily removed by pushing in and holding down the white plastic collar where the tubing is inserted into each port on the valve body; no tools required to release the tubing. Hint: When reconnecting the water outlet tubing, ensure the tube diameter matches the port on the valve body. Insert each tube by hand back into the ports of the valve until they firmly seated.

Removed the control panel by inserting a small screwdriver into the three holes located on the bottom of the control panel body. Removed all of the ice dispenser door hardware and the door solenoid. The door solenoid armature was seized by corrosion. Cleaned off all of the accumulated dirt and mold with a 1:10 ratio solution of bleach and water. Replaced all of the door recess and solenoid valve fasteners with my own stainless steel #4-40 thread, 0.25" long socket head screws for longer life. The installation of the remaining hardware is the reverse of how it was removed.

The installation looks very clean now and $150 later, the ice maker still doesn't produce ice!

Root-cause analysis: I disconnected the ice cube maker water supply line from the double solenoid valve at the rear of the refrigerator and was able to blow air with my mouth straight through the outlet of the water tubing located inside of the freezer compartment; to ensure it wasn't blocked. Verified the water supply valve is not being energized! Turns out that the blinking green LED indicator on the ice cube maker is indicating more than the troubleshooting guide does about that because the white colored insulated conductor in the electrical harness for the ice cube maker is not energizing the solenoid on the water supply valve!

Conclusion: the ice cube maker assembly is next on the list of replacement parts!!
Other Parts Used:
Torsion-Fit Spring Dispenser Door Solenoid Assembly Dispenser Door Assembly or Flapper WATER VALVE WITH GUARD Door Recess Retainer SCREW-PKG 12 Dispenser Door Recess Crank Recess Door Spring SCREW
  • Bruce from Mebane, NC
  • Difficulty Level:
    Really Easy
  • Total Repair Time:
    30 - 60 mins
  • Tools:
    Screw drivers, Socket set
41 of 59 people found this instruction helpful.
Was this instruction helpful to you?
Thank you for voting!
Frost in ice chut, flapper hanging partially open.
Removed control panel, snapped out pretty easy. Removed flapper assembly (4 small screws). My spring was broke but it ended up being the solenoid assembly after I replaced the spring, door crank, micro switch and flapper it was obvious the solenoid was hanging up. I had to go back an order it but it was at my door 2nd day (quickly). I took the time to clean the area with Tylex (some mold), and everything went in easily. I didn't really need the new flapper, crank, and micro switch but they were fairly cheap and then all is new. We use our ice dispenser a great deal so I didn't want to have to go back in and fix a part I "should have" replaced. I used Part Select for my washer motor as well. Doing both repairs myself probably saved 3 or 4 hundred dollars easily.
Other Parts Used:
Dispenser Door Assembly or Flapper Lamp Socket Dispenser Door Recess Crank Recess Door Spring
  • John from Oxford, IA
  • Difficulty Level:
    Easy
  • Total Repair Time:
    15 - 30 mins
  • Tools:
    Screw drivers
36 of 74 people found this instruction helpful.
Was this instruction helpful to you?
Thank you for voting!
Water dispensor would not shut off
Actually this was a two part repair of which I purchased both parts. The micro switch Pt # PS296176 and also a double outlet water valve Pt # PS304374 from Parts Select as well.

The difficult part was accessing the area to get to the micro switch.

The trim had to be removed, then the cover.

Then one unplugs the board and removed the face plate which also contains the micro switch.

Once removed the two electrical terminals had to be disconnected, the micro switch installed and terminal reconnected.

Then reverse the removal procedure.

Then on to the double outlet replacement.

Suggest watching the installation video for the replacement although it was really a straight forward repair.

Two things to remember.

1. Unplug the fridge

2. Shut off the water to the dispenser

Overall it was not bad at all.

This was my first attempt at refrigerator repair and it went well.

Good luck on yours.

John
  • John from Mason, OH
  • Difficulty Level:
    Easy
  • Total Repair Time:
    15 - 30 mins
  • Tools:
    Nutdriver, Pliers, Screw drivers, Wrench (Adjustable)
32 of 46 people found this instruction helpful.
Was this instruction helpful to you?
Thank you for voting!
Water dispenser won't always dispense water
I followed the instructions found on this website. I removed the control panel by inserting a small Phillips screwdriver in the three holes at its bottom. I used the same screwdriver to pull the dispenser assembly down but could have used a larger one. The microswitch could be seen in the assembly at that point and was easily removed by opening the "fingers" that held it in place. I attempted to pull one of the terminals off without using a pair of needle-nosed pliers and ripped the wires right out of the terminal(I was able to find a replacement at Radio Shack). Low and behold after reinstalling the new part, it did not take care of the problem.

My problem is the water dispenser does work intermittently. When we place the glass in position and hit the lever, the lights in the control panel go off and no water is dispensed. My next guess may be the water valve or the control panel. The icemaker makes ice but I have had problems with it dispensing for nearly a year now.
  • Curtis from Corona, CA
  • Difficulty Level:
    Easy
  • Total Repair Time:
    15 - 30 mins
  • Tools:
    Pliers, Screw drivers
25 of 43 people found this instruction helpful.
Was this instruction helpful to you?
Thank you for voting!
Ice & water dispenser wouldn't shut off
Took the trim piece off, took 4 screws out & replaced the part. Problem solved!
Other Parts Used:
Ice Funnel - White Dispenser Housing Shield
  • eve from carrollton, GA
  • Difficulty Level:
    Really Easy
  • Total Repair Time:
    15 - 30 mins
  • Tools:
    Screw drivers
23 of 38 people found this instruction helpful.
Was this instruction helpful to you?
Thank you for voting!
This Model is a LEMON (on-line for compliants). Numerous Problems
Removed 4 screws & replace parts.
Other Parts Used:
Dispenser Housing Shield Assembly Dispenser Door Assembly or Flapper Ice Funnel - White Dispenser Door Recess Crank Recess Door Spring
  • OLESTER from SAN DIEGO, CA
  • Difficulty Level:
    A Bit Difficult
  • Total Repair Time:
    More than 2 hours
  • Tools:
    Pliers, Screw drivers
7 of 15 people found this instruction helpful.
Was this instruction helpful to you?
Thank you for voting!
  • 1
  • 2
Customer Reviews
Average Rating:
★★★★★
★★★★★
6 Reviews
4.8
Filter By Rating:
  • 5 Stars
    5
  • 4 Stars
    1
  • 3 Stars
    0
  • 2 Stars
    0
  • 1 Star
    0
  • 1
Sort by:
Sorry, we couldn't find any existing reviews that matched. Try using some different or simpler keywords.
  • 1
You May Also Need?
Model Cross Reference
This part works with the following models:
PartSelect Number: PS8259956
Manufacturer Part Number: WR23X10783
Brand
Model Number
Description
General Electric
A4425GDTABB
Refrigerator
General Electric
A4425GDTAWW
Refrigerator
General Electric
A4425GDTBBB
Refrigerator
General Electric
A4425GDTBWW
Refrigerator
General Electric
A4425GDTW
Refrigerator - GE Refrigerator Model A4425GDTW Parts
General Electric
BSS25GFPACC
Refrigerator
General Electric
BSS25GFPAWW
Refrigerator
General Electric
BSS25GFPCCC
Refrigerator
General Electric
BSS25GFPCWW
Refrigerator
General Electric
BSS25GFPDCC
Refrigerator
General Electric
BSS25GFPDWW
Refrigerator
General Electric
BSS25GFPECC
Refrigerator
General Electric
BSS25GFPEWW
Refrigerator
General Electric
BSS25GFPHCC
Refrigerator
General Electric
BSS25GFPHWW
Refrigerator
General Electric
BSS25JFRFWW
Refrigerator
General Electric
BSS25JFRJWW
Refrigerator
General Electric
BSS25JFTAWW
Refrigerator
General Electric
BSS25JFTBWW
Refrigerator - T Series
General Electric
BSS25JFTCWW
Refrigerator - T Series
General Electric
BSS25JFTDWW
Refrigerator
General Electric
BSS25JFTEWW
Refrigerator - T Series
General Electric
BSS25JFTGWW
Refrigerator
General Electric
BSS25JFTHWW
Refrigerator
General Electric
BSS25JFTIWW
Refrigerator
General Electric
BSS25JFTJWW
Refrigerator
General Electric
BSS25JFTNWW
Refrigerator
General Electric
BSS25JFTPWW
Refrigerator
General Electric
BSS25JSRFSS
Refrigerator
General Electric
BSS25JSRJSS
Refrigerator
Customer Service Representative

Get in touch, we're here to help!

Open until 1am EST

Contact Customer Service