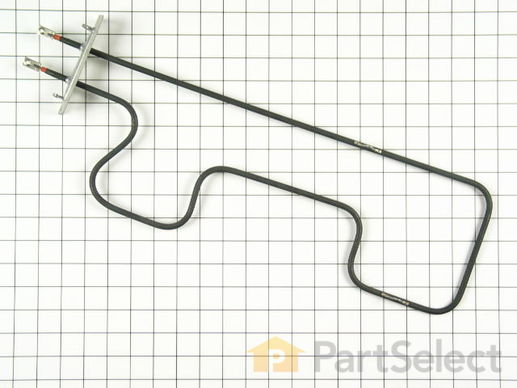
Part Location Diagram of WB44X195 GE Upper Bake Element
See part 80 in the diagram
( Grid squares measure 1x1 inch )
Customer Service Representative

Get in touch, we're here to help!

Daily 8am - 9pm EST

customerservice@partselect.com

Upper Bake Element WB44X195

★★★★★
★★★★★
4 Reviews

Rated by 7 customers 

Easy 

15 - 30 mins 

Ratings submitted by customers like you who bought this part.

$ 96.31
  In Stock

Get this part fast! Average delivery time for in-stock parts via standard shipping: 1.8 days.

PartSelect Number PS249421
Manufacturer Part Number WB44X195
Manufactured by GE
Product Description

Upper Bake Element Specifications

The depth of the terminals is 2.5 inches, and the screw-in terminals are 1.5 inches apart.
How Buying OEM Parts Can Save You Time and Money

How Buying OEM Parts Can Save You Time and Money

Troubleshooting
This part fixes the following symptoms:
Little to no heat when baking | Element will not heat
This part works with the following products:
Range, Microwave Oven Combo.
This part works with the following products:
General Electric, Hotpoint, Kenmore.
Part# WB44X195 replaces these:
AP2031028, 1973, 340636, WB44X0140, WB44X0141, WB44X0195, WB44X140, WB44X141
Back to Top
Customer Reviews
Average Rating:
★★★★★
★★★★★
4 Reviews
5.0
Filter By Rating:
  • 5 Stars
    4
  • 4 Stars
    0
  • 3 Stars
    0
  • 2 Stars
    0
  • 1 Star
    0
Sort by:
  • 1
Sorry, we couldn't find any existing reviews that matched. Try using some different or simpler keywords.
  • 1
Customer Repair Stories
 Average Repair Rating: 4.1 / 5.0, 7 reviews. What's this?
Sort by:
  • 1
Sorry, we couldn't find any existing installation instruction that matched.
Original cooking element was starting to fail. It was bending and changing form and would have broken over a short period of time.
I had purchased a partselect heating element for my larger lower oven previously so I knew what to expect on replacement.

I shut off the power to the stove from the electrical box. Next I removed both the cooking racks from the oven. Then the side removable panels and bottom as this is a P7 removeable panel oven. This gave ne easy access to the nuts/screws holding the element in place. Once the screws were removed I pulled out the element and disconnected the leads. I replaced the new piece reversing the process.
  • John from NAPERVILLE, IL
  • Difficulty Level:
    Really Easy
  • Total Repair Time:
    15 - 30 mins
  • Tools:
    Pliers, Screw drivers, Socket set
2 of 2 people found this instruction helpful.
Was this instruction helpful to you?
Thank you for voting!
Lower bake element
Wire connection from the oven was too small and I had to make it larger with a flat head screwdriver and pliers. I used a head flashlight for I could see better. I would suggest not having a glass of wine before starting the repair. It would have only taken me 15 Minutes instead of 30.
  • Jeanne from ARCHER, FL
  • Difficulty Level:
    A Bit Difficult
  • Total Repair Time:
    30 - 60 mins
  • Tools:
    Pliers, Screw drivers, Socket set
1 person found this instruction helpful.
Was this instruction helpful to you?
Thank you for voting!
The bake element started to crack and open in several areas.It was just a matter of time before it would of broken in half.
Turn the power of to the stove used a 5/16 socked and unscrewed the element from the stove. Used the socket to remove the wires from the element. Installation was easy make sure you hold the end of the elements where the wires attach so they do not bend when tightening. Everything is working and back to normal. Make sure you use the model number to get the correct part needed.Part select was the best and delivery was with in 5 days.
  • Jon from Killeen, TX
  • Difficulty Level:
    Really Easy
  • Total Repair Time:
    Less than 15 mins
  • Tools:
    Socket set
0 of 3 people found this instruction helpful.
Was this instruction helpful to you?
Thank you for voting!
Baking element broken in two
The baking element burned through, in my really old double oven. (It was in our home when we bought it 16 years ago.) It was the top oven element that broke. I wasn't sure it could be repaired. I looked on line and I found it. It took my husband less than 30 min. to fix it. I have my oven back but it would have nice to get a new one.
  • Diana from Galion, OH
  • Difficulty Level:
    Really Easy
  • Total Repair Time:
    15 - 30 mins
  • Tools:
    Nutdriver
2 of 5 people found this instruction helpful.
Was this instruction helpful to you?
Thank you for voting!
Element burned out and started to deform
disconnected power
remove oven racks and oven bake shields
removed two bolts from end bracket plate on element
carefully pull bake element partly out until the electrical wires are visible, remove two small screws, remember the side of element each wire
attaches, red is power black is ground.
, replaced new element in reverse order, reattach wires to element and snug tighten , not over tighten. Element worked
like new.
  • Kurt from Cortez, CO
  • Difficulty Level:
    Easy
  • Total Repair Time:
    15 - 30 mins
  • Tools:
    Socket set
0 of 3 people found this instruction helpful.
Was this instruction helpful to you?
Thank you for voting!
The bake elment was over 25 years old when it cracked and burned out.
Turned off the electricity to the ovens. Unscrewed the two screws holding the old bake element. Removed the old one by disconnecting the two wires and replaced the new element in it's place.
  • Rita from Buda, TX
  • Difficulty Level:
    Really Easy
  • Total Repair Time:
    Less than 15 mins
  • Tools:
    Screw drivers
5 of 7 people found this instruction helpful.
Was this instruction helpful to you?
Thank you for voting!
The lower bake element in the upper oven burnt out.
In order to determine what was wrong with the oven I used a voltage meter to determine if power was coming to the element in the first place. Be careful to set your meter at least 500 ACV, as the oven is operating at 240V. Remove the two screws that hold the element in place and carefully pull it out of the side of the oven. Turn on the bake element in the upper oven and place your test leads to either side of the connection leads. If you get a reading of 240Volts plus or minus you will know for sure the element is bad.
Turn off the oven, or even better turn off the circuit breaker to your stove.
There are two leads to the element that are held in place by self taping screws. If you have the same luck I have they will be corroded together. Carefully use long nose pliers to hold steady while gently applying pressure. If necessary use liquid wrench. When separated put together in the reverse order as how you took it apart.
  • John D. from Thousand Oaks, CA
  • Difficulty Level:
    Easy
  • Total Repair Time:
    15 - 30 mins
  • Tools:
    Nutdriver, Pliers
11 of 13 people found this instruction helpful.
Was this instruction helpful to you?
Thank you for voting!
  • 1
Questions and Answers

Ask our experts a question about this part and we'll get back to you as soon as possible!

1 question answered by our experts.
Sort by:
  • 1
Sorry, we couldn't find any existing answers that matched.Try using some different or simpler keywords, or submit your new question by using the "Ask a Question" button above!
Jim
February 5, 2018
My old GE double oven upper oven bake element broke i think the part number is wb44x195. It looks like the replacement part does not come with the 2 small feet that are on the original part which hold it up from the bottom of the oven about 3/4 inch and keeps the element level. Will this be a problem? Can i buy the support bracets?
For model number JHP56V*K2
PartSelect logo
Hello Jim, thank you for your question. The element part number WB44X195 is correct for your unit. The supports have been discontinued, by the manufacturer. The new element will be able to used as a replacement without those supports. Good Luck with your repair!

2 people found this helpful.

Was this helpful?
Thank you for voting!
  • 1
Model Cross Reference
This part works with the following models:
PartSelect Number: PS249421
Manufacturer Part Number: WB44X195
Brand
Model Number
Description
Hotpoint
107RHV755J
Range - Hotpoint Range/Stove/Oven Model 107RHV755J Parts
General Electric
107RHV786J
Range
Hotpoint
207RHV786J
Range - Hotpoint Range/Stove/Oven Model 207RHV786J Parts
Kenmore
3639858810
Range
Kenmore
3639858911
Range
Kenmore
3639868810
Range
Kenmore
9119851190
Range
Kenmore
9119851191
Range
General Electric
J715*01
Range - GE Range/Stove/Oven Model J715*01 Parts
General Electric
J715*02
Range - GE Range/Stove/Oven Model J715*02 Parts
General Electric
J722*01
Range - GE Range/Stove/Oven Model J722*01 Parts
General Electric
J722*02
Range - GE Range/Stove/Oven Model J722*02 Parts
General Electric
J722*03
Range - GE Range/Stove/Oven Model J722*03 Parts
General Electric
J730*01
Range - GE Range/Stove/Oven Model J730*01 Parts
General Electric
J730*02
Range - GE Range/Stove/Oven Model J730*02 Parts
General Electric
J732*01
Range - GE Range/Stove/Oven Model J732*01 Parts
General Electric
J735*01
Range - GE Range/Stove/Oven Model J735*01 Parts
General Electric
J736*01
Range - GE Range/Stove/Oven Model J736*01 Parts
General Electric
J736*02
Range - GE Range/Stove/Oven Model J736*02 Parts
General Electric
J736*03
Range - GE Range/Stove/Oven Model J736*03 Parts
General Electric
J760W1
Range - GE Range/Stove/Oven Model J760W1 Parts
General Electric
J760W2
Range - GE Range/Stove/Oven Model J760W2 Parts
General Electric
J760X3
Range - GE Range/Stove/Oven Model J760X3 Parts
General Electric
J760X30C
Range - GE Range/Stove/Oven Model J760X30C Parts
General Electric
J764Y1
Range - GE Range/Stove/Oven Model J764Y1 Parts
General Electric
J765*01
Range
General Electric
J765*02
Range - GE Range/Stove/Oven Model J765*02 Parts
General Electric
J765*03
Range
General Electric
J765001
Range - GE Range/Stove/Oven Model J765001 Parts
General Electric
J765003
Range - GE Range/Stove/Oven Model J765003 Parts
Customer Service Representative

Get in touch, we're here to help!

Daily 8am - 9pm EST

Contact Customer Service