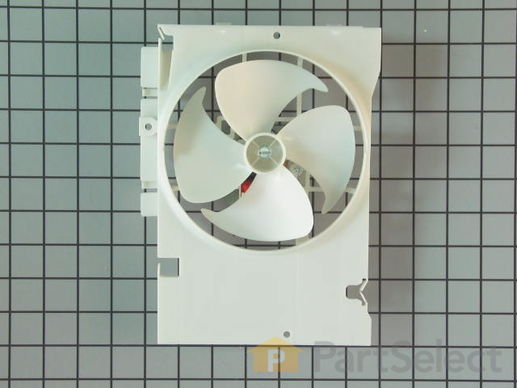
Part Location Diagram of WB26X10105 GE Magnetron Fan Motor
See part 79 in the diagram
( Grid squares measure 1x1 inch )
Customer Service Representative

Get in touch, we're here to help!

Daily 8am - 9pm EST

customerservice@partselect.com

Magnetron Fan Motor WB26X10105

Rated by 3 customers 

Really Easy 

30 - 60 mins 

Ratings submitted by customers like you who bought this part.

$ 172.57
  Special Order
PartSelect Number PS237836
Manufacturer Part Number WB26X10105
Manufactured by GE
Troubleshooting
This part works with the following products:
Microwave.
This part works with the following products:
General Electric, Hotpoint, Kenmore.
Part# WB26X10105 replaces these:
AP3188574, 911080, WB26X10051
Back to Top
Customer Repair Stories
 Average Repair Rating: 3.6 / 5.0, 3 reviews. What's this?
Sort by:
  • 1
Sorry, we couldn't find any existing installation instruction that matched.
Microwave was making terrible squealing noise; replacing turntable motor didn't fix it but replacing fan assembly did!
My microwave was squealing horribly and replacing the turntable motor (SUPER easy btw) didn't fix it. So I figured it was a spun bearing or bushing in the cooling fan (spoiler alert -- it was!). Installation was simple and did NOT require removing the cabinet-mounted microwave from its position above our stove: Unplug microwave, carefully unscrew the 2 screws holding the vent grate above the door, remove the grate, then unscrew the one screw holding the top of the control panel to the case. Carefully pivot top of control panel down and unhook it from the case (at the bottom of the control panel there are two little legs or extensions that insert into slots in the case). Then disconnect the 3 or 4 wires that attach the control panel to the wiring harness (I marked them each with tape so I would remember where they go, but you can just take a picture with your phone). Set the control panel aside. Where the control panel was, you will be looking at the fan, with a bunch of wires between you and it. Take another phone picture for reference, just in case. Disconnect the various wires, starting at the top right and working your way around clockwise. I marked each wire with a piece of tape and a number, starting from 1 and working my way around an imaginary clock face. I think I got to 12 and then the last two (sort of buried in the middle) I labeled as "0" and "-1" but you can use any numbering series you like. Once the wires are all disconnected you can gently push them aside and unscrew the two screws holding the fan assembly in place, and disconnect the fan wire. Then gently maneuver the fan assembly out the front of the case. Installation is simply the reverse of this simple disassembly process. Voila! Back to a nice quiet microwave.
  • Andrew from SEATTLE, WA
  • Difficulty Level:
    Easy
  • Total Repair Time:
    30 - 60 mins
  • Tools:
    Screw drivers
3 of 3 people found this instruction helpful.
Was this instruction helpful to you?
Thank you for voting!
Microwave made squealing noise when on. Fan was worn out.
This particular microwave is the over the range type, with an exhaust fan at the top and charcoal filters over the stove. Then to the side is the control panel for the microwave oven. You have to get into this to get to the fan. To do this, you have to take off the vent trim at the top of the microwave. Two screws. Open the front door and gently wiggle once the screws are out. Care must be taken with this because over time the channels that the screws go in can break, and then once that happens there's nothing to hold the vent into the oven. (I've replaced this once when both screw openings simply crumbled). Once it's off, there is a screw under it at the top of the control panel that needs to come out. There's another screw at the bottom of the control panel. Then, you slide the panel up about a half inch and then you can pull it out. After that, you can see the fan in there. There are two screws holding it in and a bunch of wires all around it. Pull out the multipin connector on the fan. There is a second plug-in wire that you may need to use pliers to get a grip on it. Pulling out a couple other nearby wire connectors will help loosen it all up so that you can move the wiring harness out of the way and tilt the fan out and remove it. Looking at the old fan, the bearings were tight and worn out, and that was the problem. It's not a particularly well made fan. Very simple open-frame motor with moving parts exposed, so it probably through the years ingested oil vapor from cooking, etc. Tilt the new fan into position, put the two screws back in and re-insert the wire connectors. Then all you need to do once all the wiring is neatly dressed again is put the panel back on, the two screws top and bottom, and lastly reinstalling the long vent at the top, (two long screws). Do that, and you're done. The microwave sounds fine now and works great.
  • Richard from PORTER RANCH, CA
  • Difficulty Level:
    Really Easy
  • Total Repair Time:
    30 - 60 mins
  • Tools:
    Screw drivers
12 of 12 people found this instruction helpful.
Was this instruction helpful to you?
Thank you for voting!
cooling fan gremlin
Pulled micro off the wall, took side/top cover off to get at the cooling fan behind the control panel. Unplugged wires and removed control panel to ease the removal of the cooling fan. Two screws hold the fan. Pretty easy job.
  • Alvin L. from Wasilla, AK
  • Difficulty Level:
    Really Easy
  • Total Repair Time:
    30 - 60 mins
  • Tools:
    Screw drivers
17 of 27 people found this instruction helpful.
Was this instruction helpful to you?
Thank you for voting!
  • 1
Questions and Answers

Be the first to ask our experts a question about this part!

Model Cross Reference
This part works with the following models:
PartSelect Number: PS237836
Manufacturer Part Number: WB26X10105
Brand
Model Number
Description
Kenmore
36362702200
Microwave
Kenmore
36362709200
Microwave
Kenmore
36362709300
Microwave
General Electric
EMO3000CBB001
Microwave - Counter Top
General Electric
EMO3000CBB02
Microwave - Counter Top
General Electric
EMO3000CBB03
Microwave - Counter Top
General Electric
EMO3000CBB04
Microwave - Counter Top
General Electric
EMO3000CCC001
Microwave - Counter Top
General Electric
EMO3000CCC02
Microwave - Counter Top
General Electric
EMO3000CCC03
Microwave - Counter Top
General Electric
EMO3000CCC04
Microwave - Counter Top
General Electric
EMO3000CSS001
Microwave - Counter Top
General Electric
EMO3000CSS02
Microwave - Counter Top
General Electric
EMO3000CSS03
Microwave - Counter Top
General Electric
EMO3000CSS04
Microwave - Counter Top
General Electric
EMO3000CWW001
Microwave - Counter Top
General Electric
EMO3000CWW02
Microwave - Counter Top
General Electric
EMO3000CWW03
Microwave - Counter Top
General Electric
EMO3000CWW04
Microwave - Counter Top
General Electric
EMO3000HBB01
Microwave - Counter Top
General Electric
EMO3000HBB02
Microwave - Counter Top
General Electric
EMO3000HBB03
Microwave - Counter Top
General Electric
EMO3000HBB04
Microwave - Counter Top
General Electric
EMO3000HBB05
Microwave - Counter Top
General Electric
EMO3000HCC01
Microwave - Counter Top
General Electric
EMO3000HCC02
Microwave - Counter Top
General Electric
EMO3000HCC03
Microwave - Counter Top
General Electric
EMO3000HCC04
Microwave - Counter Top
General Electric
EMO3000HCC05
Microwave - Counter Top
General Electric
EMO3000HSS01
Microwave - Counter Top
Customer Service Representative

Get in touch, we're here to help!

Daily 8am - 9pm EST

Contact Customer Service