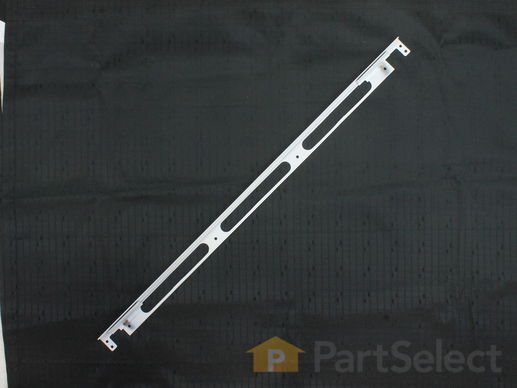
Bottom Trim - White
Fits your 10461-3!
$
22.54
In Stock
Get this part fast! Average delivery time for in-stock parts via standard shipping: 1.8 days.
Fits your 10461-3!
PartSelect Number PS2321159
Manufacturer Part Number WB07K10250
Manufactured by
GE

Check if this fits your product and find model diagrams
Need help finding your model number?
Product Description
Bottom Trim - White Specifications
Screws not included.

How Buying OEM Parts Can Save You Time and Money
Troubleshooting
This part works with the following products:
Range.
This part works with the following products:
General Electric, Hotpoint, Kenmore.
Part# WB07K10250 replaces these:
AP4343842, 1394337, WB07K0384, WB07X7190, WB07X7198, WB7K384, WB7X7190, WB7X7198
Questions and Answers
Ask our experts a question about this part and we'll get back to you as soon as possible!
- < Prev
- 1
- Next >
Sort by:
Search filter:
Clear Filter
Your search term must have 3 or more characters.
Keep searches simple. Use keywords, e.g. "leaking", "pump", "broken" or "fit".
Sorry, we couldn't find any existing answers that matched.Try using some different or simpler keywords, or submit your new question by using the "Ask a Question" button above!
Andres
February 27, 2019
Do you have this part in black

Hello Andres, Thank you for contacting us. I have researched the model you have provided and have found the part you are looking for is PartSelect Number PS2321142. Thank you for your inquiry, good luck with this repair!
Was this helpful?
Thank you for voting!
Related Parts:
Terry
February 3, 2020
I have a Kenmore gas range the outer glass door shattered can you get a replacement or is it better to just buy a new oven

Hi Terry. You can usually get a replacement much less than the cost of a new range. Please provide us with your model number and we can find the part for you. Thank you for your question and good luck with your repair.
Was this helpful?
Thank you for voting!
- < Prev
- 1
- Next >
✖
Ask a Question
Ask our experts a question on this part and we'll respond as soon as we can.
Something went wrong. Please try again later.
Your Question Has Been Submitted!
Our experts will send you an email as soon as your question has been answered.
Customer Repair Stories
Average Repair Rating: 4.4 / 5.0, 8 reviews.
What's this?
- < Prev
- 1
- Next >
Sort by:
Search filter:
Clear Filter
Your search term must have 3 or more characters.
Keep searches simple. Use keywords, e.g. "leaking", "pump", "broken" or "fit".
Sorry, we couldn't find any existing installation instruction that matched.
replaced more for cosmetic reasons
Your support team helped tremendously in ordering the parts. Parts arrived in only 2 days. Upon taking the door off the oven we had to remove several screws, then more screws. Was able to take it almost fully apart, replace old broken parts with new. Putting it back together was like a puzzle. We did it though and saved money! Thanks
Other Parts Used:
-
Glenda from Port Richey, FL
-
Difficulty Level:A Bit Difficult
-
Total Repair Time:1- 2 hours
-
Tools:Screw drivers
4 of 6 people
found this instruction helpful.
Was this instruction helpful to you?
Thank you for voting!
rusted trim strip
remove screws, re-install screws
-
Larry from Sarasota, FL
-
Difficulty Level:Really Easy
-
Total Repair Time:15 - 30 mins
-
Tools:Socket set
3 of 5 people
found this instruction helpful.
Was this instruction helpful to you?
Thank you for voting!
bottom trim had rusted out from water build-up
disassembled bottom trim on oven door.cleaned area of excess rust and installed trim piece.
-
john from buford, GA
-
Difficulty Level:Really Easy
-
Total Repair Time:Less than 15 mins
-
Tools:Socket set
3 of 6 people
found this instruction helpful.
Was this instruction helpful to you?
Thank you for voting!
bottom trim had rusted, so we needed new piece
Removed oven door (made sure hinges were locked open and stayed open). Remove part on top of trim, removed rusted trim and replaced with new trim. Replaced part on top of trim and screwed all back together. Put oven door back on and unlocked hinges. It was easier than the trial run (when I hadn't realized that the hinges weren't locked open!)
-
Robin from Apple Valley, MN
-
Difficulty Level:Really Easy
-
Total Repair Time:Less than 15 mins
-
Tools:Socket set
3 of 3 people
found this instruction helpful.
Was this instruction helpful to you?
Thank you for voting!
RUSTED TRIM PEICE
REMOVED THE DOOR, TOOK THE SCREWS OUT OF THE BOTTOM AND REPLACED THE TRIM. IT TOOK CARE TO GET THE TRIM OVER THE GLASS ON THE DOOR. IT WENT RIGHT ON AND LOOKS LIKE NEW.
Other Parts Used:
-
Katheryn from BEACON FALLS, CT
-
Difficulty Level:Very Easy
-
Total Repair Time:15 - 30 mins
-
Tools:Nutdriver
2 of 2 people
found this instruction helpful.
Was this instruction helpful to you?
Thank you for voting!
Bottom trim piece on 24 year old stove had rusted. Replace trim piece was still available.
Very simple. Lift oven door off brackets and set on floor. Remove sheet metal screws holding on existing trim piece, Clean area beneath trim.
Put new trim piece on, don't tighten any of the screws until all have been started as some adjustment is needed to align the holes for the screws.
-
Donald from FAYETTEVILLE, NY
-
Difficulty Level:Very Easy
-
Total Repair Time:Less than 15 mins
-
Tools:Socket set
2 of 2 people
found this instruction helpful.
Was this instruction helpful to you?
Thank you for voting!
Part rusted over time...22 years.
Unscrewed eight screws. Removed rusted part. Cleaned area with Windex. Replaced new part.
-
Jeannene from HUNTINGTON, TX
-
Difficulty Level:Very Easy
-
Total Repair Time:Less than 15 mins
-
Tools:Screw drivers
2 of 2 people
found this instruction helpful.
Was this instruction helpful to you?
Thank you for voting!
The trim piece on the bottom of the door was rusted making the unit look really dirty and used.
It was pretty simple. Just remove the door as the bottom piece holds all the parts together. Place on table top and remove old trim. Install new trim and install door. The only difficult part was the trim had a space for the glass door front. I opened up the space so that the glass would seat easier. Went together real easy. Stove looks like it's brand new.
-
Glenn from West Melbourne, FL
-
Difficulty Level:Really Easy
-
Total Repair Time:15 - 30 mins
-
Tools:Nutdriver
2 of 2 people
found this instruction helpful.
Was this instruction helpful to you?
Thank you for voting!
- < Prev
- 1
- Next >
Customer Reviews
Filter By Rating:
- < Prev
- 1
- 2
- Next >
Sort by:
Search filter:
Clear Filter
Your search term must have 3 or more characters.
Keep searches simple. Use keywords, e.g. "leaking", "pump", "broken" or "fit".
Sorry, we couldn't find any existing reviews that matched. Try using some different or simpler keywords.
Robert L - March 9, 2021
Verified Purchase
perfect fit
easy to remove stove door, remove rusted part. remove and clean inside of glass, place new part, replace door on hinge. Stove looks much better.
Stephen K - May 12, 2020
Verified Purchase
Easy repair, great part
great personal informed service. Came faster than expected
BARBARA S - September 6, 2019
Verified Purchase
Great part, makes the range look new!
The new part arrived very quickly. Easy taking it apart. I should have paid closer attention to how the other black part that I the original was attached to was placed. It's different than shown in the diagram I found on line. Also aligning the three layers of holes for one screw to go into to was a bit of a challenge, but I bent a paper clip open so I could easily find the holes and I also shined a light from the top so I could see it when they did line up. Too bad this doesn't take photos. The before and after is remarkable.
Brian U - July 16, 2019
Verified Purchase
Easy to fit
Part arrived within 2 days. Only took about 10 minutes to fit and looks great.
Liz D - October 26, 2018
Verified Purchase
Easy repair
Stove door looks like new.
Vicky O - October 3, 2018
Verified Purchase
Worked well with a little bit of rigging
Most of the holes matched up. Had to drill two of them to get the screws in but looks great! Took about 30 minutes from removal to replacement.
Peggy S - September 11, 2018
Verified Purchase
Super Easy!
The part was easy to identify and purchase. It arrived quickly and was easy to install. The stove looks great. Thank you!
Robert K - July 18, 2018
Verified Purchase
Fast shipping. Exactly as promised
Looks great once installed!
Walter B - June 23, 2018
Verified Purchase
Oven part replace
Part was as ordered and delivered quickly
Benjamis F - March 29, 2018
Verified Purchase
good part service
I ordered the part, paid my money, the part came, and worked correctly. What more could I ask for.
- < Prev
- 1
- 2
- Next >
Model Cross Reference
This part works with the following models:
PartSelect Number: PS2321159
Manufacturer Part Number: WB07K10250
Brand
Model Number
Description