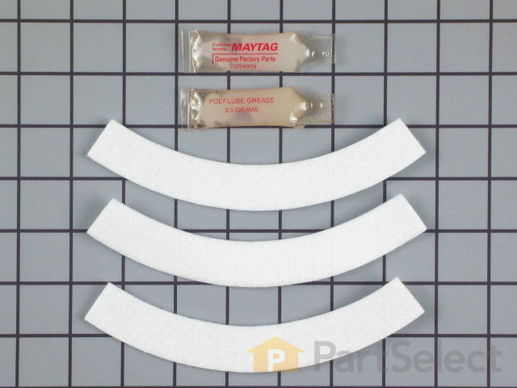
This damper pad kit is used for base support. It comes with three six inch damper pads, two little tubes of lubricant. NOTE: This part will need adhesive to stick it in place.
Keep searches simple. Use keywords, e.g. "leaking", "pump", "broken" or "fit".
Sorry, we couldn't find any existing reviews that matched. Try using some different or simpler keywords.
★★★★★
★★★★★
Frank L - May 28, 2023
Verified Purchase
It did the trick
A handy friend did the installation for me and said removing the old ones was the hard part. It took him about 1 or 1.5 hours. I can run it on high speed spin now with very minimal vibration...probably like new. Honestly it's a weird design to have these little felt pads being so important to a heavy duty washer. But hey, not the end of the world. The old ones lasted me 13 years plus however long for the previous owner. Maybe another 20?
★★★★★
★★★★★
Bob M - January 7, 2023
Verified Purchase
The damper pads worked perfect
Bought the pads and the glue and both were exactly what I needed. Watched the video and the washer works just like new, Good parts well worth the money. Saved me a couple hundred dollars or more to have a repair man do the job. Video was right on spot and made the job easy.
★★★★★
★★★★★
John F - November 16, 2022
Verified Purchase
Gave my old machine new life
This part was perfect. But I recommend cleaning the surface area with acetone to remove the old solvent. Made it so much easier and cleaner to work on. As a tip if you have a leak after you put it back together you can't figure out where it's at. Check the top seal between the tub and the balance ring. Because this can come loose if you lean the tub over. Thank you and happy washing
★★★★★
★★★★★
Robert T - March 31, 2021
Verified Purchase
Damper pads solver the problem
The damper pads solved the problem. The washing machine is back to working properly. No more wildly shaking tub. Part Select offered diagnostic advice to help determine the problem with the washing machine and great videos to help with the installation of the part. My only suggestion is to have the parts delivered faster. It took almost 2 weeks for the parts to get to me. I was without a washing machine for what seemed like an eternity.
★★★★★
★★★★★
BRIAN K - February 18, 2021
Verified Purchase
works great
The part arrived fast and works perfect
★★★★★
★★★★★
Robert S - May 22, 2019
Verified Purchase
This was not an easy fix.
The washer in the video was not the same model as mine. However, the parts I received were a close enough match to fix the problem. The washer no longer bangs or leaks during spin cycles. No longer makes grinding sounds during wash/rinse cycles. One helpful addition might be to say waterproof, vibration proof adhesive is needed to glue the pads in place. It meant a trip to the store. I used Plyobond Contact adhesive. I probably saved myself a $400.00 repair bill. Other online parts suppliers said these parts were no longer available from the manufacturer. Thanks for coming through!
★★★★★
★★★★★
Bonnie W - October 11, 2018
Verified Purchase
Not Easy repair, But in the end, all worked out well with Parts
The Parts worked perfectly. Make sure you purchase the “High Temp” adhesive
★★★★★
★★★★★
Clayton F - September 12, 2018
Verified Purchase
Worked as expected
Worked as expected
★★★★★
★★★★★
Sam B - March 16, 2018
Verified Purchase
Exact fit and fast shipping
The parts arrived and was an easy installation using the video that was provided by your website.
★★★★★
★★★★★
Trena H - February 28, 2018
Verified Purchase
Great part
The part was in great condition and got my machine up and running again.
< Prev
1
2
Next >
Customer Repair Stories
Average Repair Rating: 2.1 / 5.0, 11 reviews.
What's this?
Sort by:
< Prev
1
2
Next >
Search filter:
Clear Filter
Your search term must have 3 or more characters.
Keep searches simple. Use keywords, e.g. "leaking", "pump", "broken" or "fit".
Sorry, we couldn't find any existing installation instruction that matched.
Shaking washing machine when it went to spin mode
I watched a video on you tube repair videos and the repair went fairly easy. But I missed a part near the end of the video and placed a part too close to the shaft and it would not go into the spin mode. After watching the video again I was able to move the part 1/4" and it now works as good as new.
Like in the video! The "easy" way with the block of wood and 3 electrical boxes. A little patience and this worked fine enough. The unit was stable raised up on the block of wood so no worries with it falling. I cleaned up the old damper pad from the front and then turned the unit by rotating on the block of wood (very easy as all the
... Read more weight is supported) and accessed the back from the "port" hole in the back of the machine. There was enough room to work. The old damper pads were not in bad shape for 30+ years old. I cleaned it all up and applied the adhesive to one pad at a time and positioned in place. I probably placed them a bit to high but it worked out fine in the end. I let dry overnight and then greased them up and lowered the tub onto them. One of the electrical boxes popped off the spring but it went right back on using the tub for leverage as in the beginning. That was a relief. In the 30+ years that I've heavily used this washer this past month saw the only repairs to the machine - a plastic valve last month and the damper pads now. The Maytag repair man is a lonely fella. The repair and diagnostic information and parts on this site are invaluable. And, they are correct and a good value. Thanks PartSelect!
in reassembly, agitation cylce disappeared and went into a slow spin
I put everything back together like video and then did a small wash. The agitation cycle was gone! haha.....it was in a slow rotation and no agitation at all. The video guy seems to turn pulley wheel all the way clockwise till it bottoms out on brake and then he says to put the lug stop washer and screw it in 1/4" to 3/8" behind the tab o
... Read moren pulley and put screw in w/ lock washer. I watched other videos and figured out that was way too much turning on the pulley. I then unscrewed pulley and hand rotated it back on to the point where it barely start to make contact with brake and then I put the lug stop about almost 1/2" back, attached screw and lock washer and gave it a test and wallah! all good!.
This repair may seem daunting to your average non-professional repairman (certainly did for me) but, it's really not too bad. Additional items that you will find useful are a 4"x4"x12" block of wood, Acetone, Wire Brush, Sturdy Cloth, Gloves. First step is to disconnect the water and power and move washer to a suitable work area. Remove t
... Read morehe front panel by removing the two screws located on the underside of the unit. Lift the front panel up and towards you from the bottom to free the top two clips, set panel aside. Once inside you will see that the tub is centered by three springs connected to eyelets that are bolted to the washer base. Mark the threads, then remove all three springs by removing the nuts from the underside of the washer, the tub is now free to move independent of the washer. Next you'll need to remove the two screws holding the top panel/Lid to the sides (be careful as this will greatly affect the washers overall rigidity). Once removed, carefully tilt the washer back just enough to slide the 4x4x12 block of wood underneath the main drive pulley connected to the bottom of the tub. Set the washer back down and the tub will now be propped up on the wood, exposing the damper pads on the washer base. Tear off the old pads and clean ALL residual glue using the acetone, wire brush and cloth. It's key to have a clean, smooth, and dry surface for the new pads to work properly. Once clean apply the new pads using the high temp glue and supplied instructions. I recommend applying one pad at a time as it requires a bit of dexterity. Don't slather the glue all around like I did or you'll be in a race against the clock to adjust them before the glue sets. I waited 4hrs for the glue to set, then applied the provided lube to each pad and re-assembled the washer in reverse order using the new springs. Be sure to check that your belts are still properly attached as the block of wood may have affected them. Finally, I checked and adjusted the leveling legs, Re-conneted water and power and gave it a test run. Washer runs great! 15+ loads with smooth operation and no more shakes or wobbles.
After removing the two screws that hold the front panel in place , I could easily see the areas I needed to work in .Also , I removed the two screws securing the top panel and raised it a few inches . I saw how the damper pads were worn away . I removed the 3 dampering springs by removing the eyebolts and the base mounting nuts . After th
... Read moree dampering springs are removed , the washing drum can be lifted up off the bottom .Just lean the machine towards the rear and place a 4x4 lumber under the big pulley on the bottom and allow the machine to slowly come forward again resting on the lumber .I followed the instructions supplied and cleaned the excess dirt and debris away from the pad mounting areas . I applied the glue as instructed and allowed it to dry . A little dexterity was needed but the new pads easily went into position . After allowing a little more glue time ,I removed the 4x4 lumber from the bottom and lowered the machine .I installed new centering springs and tightened the eyebolts to thier original positions .I secured the top and the front panels and performed a couple test cycles . perfect , no vibration at all. like new . I replaced the two drive belts on the bottom because they had never been replaced and they definitely showed wear . Another test and I was completed in around 2 hours .
Wish there was a video. I am above average handy but this one- I might just pay someone next time...The tape on the threads was a great tip but took a while to understand what they meant by putting tape on the threads. Scraping off the old pads is easy for the front one but the back pad and a half is so hard to reach to really get it clea
... Read morened. Bruised and cut knuckles on that one. Then not having the glue for the pads was a surprise and you have to get a good contact type cement that sets in 10-15 minutes or you will be waiting hours to put it back together. It was easy to put the first spring on, then the second and third got harder and harder.
Read less
John from Chesapeake, VA
Difficulty Level:
Difficult
Total Repair Time:
More than 2 hours
Tools:
Nutdriver, Pliers, Screw drivers, Wrench set
11 of 12 peoplefound this instruction helpful.
Was this instruction helpful to you?
Thank you for voting!
Washer on spin cycle would shake, rattle, and roll. Walking accross the floor.
Damper kit and Springs corrected the problem. Follow the instrutions listed on this web site and all went well..The only problem was with the damper kit. The "kit" did not include the glue needed to replace the damper pads. This cost a delay on a day and trip to a local parts store that I did not want to make. So be sure to order glue
... Read more for the damper pads.
One of the pads was missing resulting in metal to metal squeeks during drain cycle
The instructions that came with the damper pads were pretty clear. I moved the washer to the garage so I had room to work and lay it over on it's back when I needed to. Of course, some water came out of the washer so have some towels.
There was a bit of a problem with unscrewing the nuts on the eyebolts. I expected a nut and
... Read more a backing nut, but in fact the "backing" nut is attached. Took me a little while to figure that out.
The hint about the electrical tape was useful to be able to screw the nut back to the original position.
The only real problem was in putting the adhesive on the metal. It was too messy and hard to see, so I put the adhesive on the pad and when the glue was tacky, I placed the pad carefully on the metal. Getting the back pad properly placed required a mirror inside the cabinet. I let things dry for 2 hours before I put on the silicon grease.
Make sure all the electrical connections are in place before screwing the top back on. The hot water electrical connection came off during the work and I did not notice it until i was checking the operation of the washer...had to take the top off again and use long handled needle nose pliers to put it back on.
The washer works fine now....no squeaks.
The job is a little bit of a hassle, but just follow the instructions. It is within the capability of anyone who can turn a socket and poke a hole in the cap of the glue.
The instructions were clear. Did every step. Did 2 loads so far and everything works like new.
Dean from New Lenox, IL
Difficulty Level:
A Bit Difficult
Total Repair Time:
More than 2 hours
Tools:
Nutdriver, Pliers, Screw drivers, Socket set, Wrench set
7 of 11 peoplefound this instruction helpful.
Was this instruction helpful to you?
Thank you for voting!
Damper pads wore-out and had metal to metal contact which caused the washer to spin out of balance.
1: Disconnected all water and electrical connections. 2: Removed front panel. 3: Disconnected all wires leading from the control panel and removed the top of the washer. 4: Removed the springs that holds the drum down on the damper pads. 5: Flipped washer upside-down so the drum would hang from the bottom of the wash.
... Read more This made it easy to clean the area since it was full of dirt and ground metal dust. 6: Glued new pads (per the instructions) to the cone that protrudes up from the bottom of the washer and allowed to dry. 7: Lubricated the pads with the provided grease and added additional silicon grease to insure smooth operation. 8: Replaced drive belt. 9: Flipped the washer back up-right and installed the drum springs. 10: Reconnected all wires and attached the top of the washer. 11: Reconnected all electrical and water lines and tested operation. 12: Replaced the front panel.
Washer now runs as quite and smooth as it did when it was new.
We're sorry, but our Q&A experts are temporarily unavailable.
Please check back later if you still haven't found the answer you need.
7 questions answered by our experts.
Sort by:
< Prev
1
Next >
Search filter:
Clear Filter
Your search term must have 3 or more characters.
Keep searches simple. Use keywords, e.g. "leaking", "pump", "broken" or "fit".
Sorry, we couldn't find any existing answers that matched.Try using some different or simpler keywords, or submit your new question by using the "Ask a Question" button above!
Gail
December 4, 2017
Even though i have used a level to make sure the washer is on bubble, the washer still shakes and walks across the laundry room. It's only been doing this the last few months. The shaking and walking gets really intense at times.
For model number LAT9605AAE
Hi Gail,
Thank you for your question. I would suggest taking a look at your damper pads to see if they have worn down at all and also looking at your suspension springs. It could be that the spring has worn out and needs to be replaced. I hope that helps. Good luck with your repair.
9 people found this helpful.
Was this helpful?
Thank you for voting!
Mike
February 18, 2018
When i open the lid on my top load Maytag washer i can easily move the tub back and forth. When it is in rinse cycle it bangs and clatters. Also i took off the front and everything looks ok, but it rocks very easily pivoting on the damper housing. Is it likely to be caused by the damper pads? Thanks.
For model number LAT8804AAE
Hi Mike,
Thank you for your question. It could be your damper pads but I would also suggest checking your springs as well. I hope that helps. Good luck with your repair.
3 people found this helpful.
Was this helpful?
Thank you for voting!
Paul
November 8, 2018
When removing the tub to install the snubber pads do you leave the springs attached to the tub until you get the tub bearings released to free up the tub.
For model number Lat8714aae
Hi Paul, thank you for your question. It looks like we have an installation video on this part that can help you with the installation. Here is the direct link: https://youtu.be/YdL4c-0m1ow. I hope that helps. Good luck with your repair.
2 people found this helpful.
Was this helpful?
Thank you for voting!
John
August 9, 2019
Any special tools needed or and any toos in damper pad kit
For model number LAT9635AAE
Hello John, thank you for your question. You should only need, at most, Pliers, Screw drivers, and a Socket set. I hope this helps!
2 people found this helpful.
Was this helpful?
Thank you for voting!
Doug
September 13, 2017
I have a squealing noise when my washer starts its spin/drain cycle. Changed the bearing and belts. It is not coming from the pump. Any other thoughts?
For model number LAT2600AAE
Hello Doug, thank you for contacting us. That sounds like the drain pump. If you remove the belt and spin the pulley on the drain pump there should be very little resistance. These are known to cause squealing noises when they go bad. Hope this helps!
#1: Washer select dial stops after wash cycle completed and have to turn dial to start rinse cycle and again for 2nd rinse cycle. #2: Drum easily gets out of balance and will shake violently.
For model number LAT9824AAE
Hi Don,
Thank you for your inquiry. Where your timer is not advancing there are some parts you will to check to see what is causing the issue. You will need to check the lid check switch, the lid switch assembly, the timer, the knob cap and the timer knob spring. Where your washer shaking you may need to replace the damper pad kit, the belts, the levelling legs, the springs, the foot pads, the tub bearing and the mounting stem and tub seal. I hope this helps. Thank you and have a great day!
2 people found this helpful.
Was this helpful?
Thank you for voting!
Lois
April 5, 2023
after replacing balance ring and tightening one balance spring, the washer still vibrates all over the place and does not stay balanced
For model number LAT9416AAE
Hi Lois, thank you for reaching out. We have researched the model, and it seems that the issue is with the Damper Pad Kit, part number PS2017036. It attaches to the washer tub brace to minimize tub vibration in the spin mode. We hope this information helps!
Item is in stock and will ship today if your order is placed before 4:00 PM Eastern Standard Time.
If your order is placed after 4:00 PM EST, the in stock items will ship on the next business day.
On Order
Item is not in stock and usually ships 3-5 business days from the time you place your order.
Special Order
Item is not in stock and usually ships 10-15 business days from the time you place your order.
NLA - No Longer Available
This item is no longer being made by the manufacturer, and cannot be added to your shopping cart.
[{"position":0,"name":"Home","title":"Home","url":"/"},{"position":1,"name":"Washer","title":"Washer","url":"/Washer-Parts.htm"},{"position":2,"name":"Spring or Shock Absorber","title":"Spring or Shock Absorber","url":"/Washer-Springs-and-Shock-Absorbers.htm"},{"position":3,"name":"203956","title":"203956","url":""}]
You added 1 item to your cart
✖
$
Qty:
Total item(s) in cart:
Order Subtotal
$
*Taxes and shipping will be applied during checkout