Keep searches simple. Use keywords, e.g. "leaking", "pump", "broken" or "fit".
Sorry, we couldn't find any existing answers that matched.Try using some different or simpler keywords, or submit your new question by using the "Ask a Question" button above!
Maurice
April 4, 2022
What is the replacement part number Florence the top burner infinite WB21X226 l know it’s and old unit but so am I?
For model number JBS03G
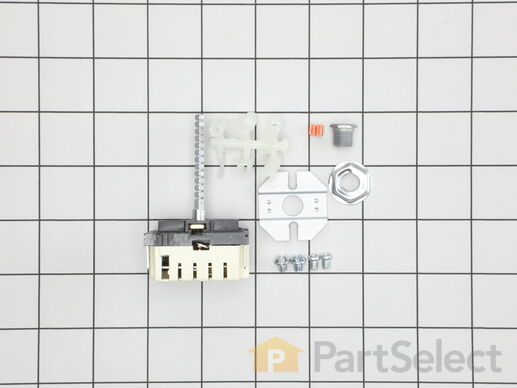
Hello Maurice, Thank you for contacting us. We have researched the model you have provided and have found the part you are looking for is Fix Number: FIX16216966. If you need help placing an order, customer service is open 7 days a week. Please feel free to give us a call. We look forward to hearing from you!
1 person found this helpful.
Was this helpful?
Thank you for voting!
Ray
May 11, 2022
Does this switch good for all the burners or just for the big burner?
For model number JBSO7V6WW
Hello Ray, Thank you for the question. This switch will work for all burners. If you need help placing an order, customer service is open 7 days a week. Please feel free to give us a call. We look forward to hearing from you!
1 person found this helpful.
Was this helpful?
Thank you for voting!
Nels
June 24, 2022
Will my existing knob fit this switch? The existing switch has a D shaped shaft.
For model number JBP24DY2
Hello Nels, thank you for your question. Yes, this kit is compatible with the existing knob. If you need help placing an order, customer service is open 7 days a week. Please feel free to give us a call. We look forward to hearing from you.
Was this helpful?
Thank you for voting!
Charles
October 5, 2021
Is this part on stock
For model number 704652826w
Hi Charles,
Thank you for your question. Yes, we do have this part in stock. If you would like to place an order for it, you may order it either online or by calling our customer service line and anyone will be happy to assist you. We hope this helps! If you have any questions, please let us know.
Was this helpful?
Thank you for voting!
Customer Repair Stories
Average Repair Rating: 3.7 / 5.0, 19 reviews.
What's this?
Keep searches simple. Use keywords, e.g. "leaking", "pump", "broken" or "fit".
Sorry, we couldn't find any existing installation instruction that matched.
Front burner would not heat up
1. Pull out range and unplug from socket. 2. Lift range lid. 3. Remove back panel. Loosen the 6 - 1/4" nuts, then lift up slightly, which compresses the "latch" at the top middle. Let down and panel comes off easily. (Note: Do not remove wires yet) 4. Remove control knob from front panel by pulling gently, exposing 2 small tap screws 5. unscrew the 2 small tap screws, freeing the switch. 6. NOTE THE EXISTING WIRING! Each terminal has a letter. Take a photo or drawing for reference, because the new switch's post locations were not the same as the old. 7. In my case I had to replace the terminal block kit with a new one. (don't try the aftermarket one's at Home Depot...bad idea event though they say Hotpoint) so I ran those wires first. Easy removal of old, only one wire clip, then fish the wires through. Secure with tap screw at burner location. 8. Hook up the wires. The ones coming from the burner don't seem to matter which one goes to which post but make sure you're replacing them on the posts that the original were on. What I did was just unhook the old posts one at a time and find the corresponding letter on the new one. 9. Break off stem at length of old switch with pliers. make sure you find where off and on are on the switch. Orient the off at the top, then push through from back of range. 10. Screw the 2 tap screws in, securing the switch. 11. Place the orange retainer oriented with flat side the same as the knob, and push the knob back in place. 12. Close lid, replace back panel 13. Insert drip pan/burner into terminal block and secure in drip pan. If your burner plugs are corroded or exposed, replace the burner as it will short out. 14. Plug in to socket and test before pushing range back into place.
First I made sure the power was off then I removed the back cover. I took the new switch in hand and took one wire at a time from the old switch and put them on the new switch. I removed the old switch and replaced it with the new one. Made test to be sure it worked. Replaced back cover, job finished.
Control switch did not function and one burner worked only occasionally
First, I used the PatrSelect website, which has great prices, and has helpful diagrams. Once I had all the parts, I worked with my wife to turn off the power at our home junction box. Next, I lifted off the cover over the control area of this range. I removed four nuts to lift out the panel that holds the four controls and the fan switch. I removed the wires from the broken controls, removed the two screws holding each control in place, then screwed the new ones in place. I would recommend trimming the posts on the controls to the correct size before screwing them in place, because it is easier to grip them and not bend them when they are not mounted. I reconnected the wires and replaced the panel. For the "receptacle", I followed the instructions provided regarding cutting the wire and placing the wire nut and heat shrink tubing. I opened the unit that houses the burners to get easy access.
1. Removed the back panel. 2. Disconnected the wires from the old switch while connecting wires to the new switch one at a time. 3. Installed the new switch and broke off the excess metal on the post which fits into the burner knob on front of the range. 4. Replaced the burner knob and replaced the back panel.
Ernest from Bellevue, NE
Difficulty Level:
Really Easy
Total Repair Time:
15 - 30 mins
Tools:
Pliers, Socket set
19 of 22 peoplefound this instruction helpful.
Was this instruction helpful to you?
Thank you for voting!
Burners Heated Irratically
1. Pulled out drawer 2. Vacuumed dust, etc. under stove 3. Reached under stove to rear and pulled plug 4. Pulled the stove out away from wall so I could get to back 5. Removed 5 screws that retained the back of the control panel 6. One by one, I removed each wire from an old control and pushed it onto the same pin on the new control - did same for all 4 burner controls 7. Removed the knobs 8. Removed 2 screws from the front panel for each old control and removed the old controls 9. Pushed each of the new controls into place on the panel and reused screws to secure them in place 10. Cut the long control stems using 2 pliers per instructions to match length of old controls. 11. Used knob adapters provided to mate the old knobs to the new control stems 12. Plugged the stove in and tested the burners 13. Unplugged and replace the panel back with original screws 14. Moved stove back into place 15. The right front burner was the one most used, so I replaced the connector for that burner. 16. That connector came with instructions that I followed - cut the wires to the old connector, splice the wires to the new connector wires using supplied wire nuts and shrink tubing. 17. Plugged the stove back in 18. Replaced drawer - job complete - stove like new
Disconnect power. . . Remove control panel, pull wire connectors,[note location] remove old switch, install new, install wires, snip stem to length, set knob . . . Turn on power - works. [Note this is a live part even when not connected]
FRANK from COPAKE, NY
Difficulty Level:
Easy
Total Repair Time:
30 - 60 mins
Tools:
Screw drivers
6 of 10 peoplefound this instruction helpful.
Was this instruction helpful to you?
Thank you for voting!
Right front burner out.
Ever the optimist, I'd replaced the burner on this relic of another time to no effect. That left the switch. You guys should know that when a burner element goes bad it can take out the switch. I should have put a meter on it. Wehn I looked for a replacement a few months ago there were still factory parts available, but they were $80 or so and I wasn't inclined to risk that on a 40 year old range. I offered to replace the raange for my daughter as a Christmas present but she like this old thing. It was an unusual size with a pan storage compartment on the left. I went on line and found this universal replacement for about $25 delivered. What the heck. I ordered it and it arrived within a week. I pulled the stove out, killed the breaker, pulled the knob off, used a nut driver to take ther rear panel off, two phillips screws under the knob hold the switch in. The terminals on the old switch are in a slightly different order but are clearly marked L1, L2, H1, H2 and P. The P is the power and has a smaller terminal so you can't put it on the wrong one. Just examine the old switch ( it was marked the same way) take off the L1 and put in on the L1 of the new switch and so on, make sure you use the correct knob adapter to fit your old knob and break the switch stem to the correct length. It will break easilly if you hold it with one pliers and break it with another. Screw the new switch in place with he old screws. At this point, I closed the breakers and tested it. It worked fine. I turned the breakers off again. Buttoned it up and slid the stove back into place. 20 minutes tops. Great product. Good for another forty years.
Larry from Prairie Village, KS
Difficulty Level:
Really Easy
Total Repair Time:
15 - 30 mins
Tools:
Nutdriver, Pliers, Screw drivers
5 of 9 peoplefound this instruction helpful.
Was this instruction helpful to you?
Thank you for voting!
infinite switch would not shut off at times.
First shut the power to the stove,then had to slide the stove out so I could get at the back to remove the panel screws.Once you have the back off remove the knob on the front.Under the knob is 2 phillips screws that you need to remove.Next I took the new switch and matched up the wires to the old switch.Reinstall is the reverse.Once the switch is in place you must remove the excess shaft to match the length of the old one.This is done with the use of 2 pliers,you grasp the shaft with both pliers and snap it off where you need it.The kit comes with spacers so you have got to match up the right one so the switch is solid on the shaft.This finishes the project,next turn the power back on and check that all is working ok.Job finished.
Ervin from Milford, DE
Difficulty Level:
Really Easy
Total Repair Time:
30 - 60 mins
Tools:
Screw drivers
4 of 9 peoplefound this instruction helpful.
Was this instruction helpful to you?
Thank you for voting!
The control knob stem broke off when I moved the stove.
I located and removed 2 sets of hex-head screws under the front lip of the cooktop, then lifted the entire cooktop to access the burner controls. Removed the wires and taped them, and took out the old control after removing 2 phillips head screws. Installed replacement part easily. Only tricky part is that the various shaft adapters don't quite work with my knob. I'll fix it completely with a bit of epoxy and the adapters they sent.
Jonathan from Harvard, MA
Difficulty Level:
Easy
Total Repair Time:
15 - 30 mins
Tools:
Nutdriver, Pliers, Screw drivers
3 of 10 peoplefound this instruction helpful.
Was this instruction helpful to you?
Thank you for voting!
Burner wouldn't operate
Took Switch panel off range. Disconnected Infinite switch. Reinstalled infinite switch.. Replaced panel. Repair was very simple and self explainatory. Knott County Housing Authority Maintenance Personnel
Keep searches simple. Use keywords, e.g. "leaking", "pump", "broken" or "fit".
Sorry, we couldn't find any existing reviews that matched. Try using some different or simpler keywords.
★★★★★
★★★★★
Alan R - May 21, 2021
Verified Purchase
Easy repair
Receivid the psrt in a couple days and by reading instructions made it a easy fix.
★★★★★
★★★★★
Martha R - May 16, 2020
Verified Purchase
Wrong part
The part I received didn’t match the one on your website. Had to call an electrician to put it in. Cost me more money. Not happy.
★★★★★
★★★★★
Richard W - April 14, 2020
Verified Purchase
Worked but ...
Got things figured out but the directions were terrible. The connections for the new switch are not in the same location as the old switch.
★★★★★
★★★★★
Robert C - November 15, 2018
Verified Purchase
Good Part, Works fine, hard to Install.
Paperwork provided was unreadable and confusing. Diagrams and color coded wires didn't match. A number of adapters was provided for mounting and knob installation. Had to try the various options one at a time till I found one that actually worked and fit. 20 minute job took
all afternoon. Next time, I think I'll just skip the aggravation and buy a new stove !
★★★★★
★★★★★
Gaston G - November 12, 2018
Verified Purchase
The switch was for a GE stove
The part was easy to connect for the electrical aspect, but the knob was not perfectly fitting, I install it as recommended and so far it is working, even if it is loose on the shaft. In case of problem I can manage to solidi it.
I'm pleased with the stove back in good condition.
Regards
Gaston Gagnon
★★★★★
★★★★★
Claire K - October 19, 2018
Verified Purchase
Instructions did not match part
Instruction did no match part so we had to guess on how to put it together.
★★★★★
★★★★★
Henry H - September 22, 2018
Verified Purchase
Lousy directions
Couldn’t figure out how to wire since directions didn’t match the new part. Winged it and blew out the breaker switch and ruined our transfer switch! Total repair for that will be $1500+! Should have bought a new stove!
★★★★★
★★★★★
Nancy W - September 4, 2018
Verified Purchase
Exactly the correct part!
My stove is back in business!
★★★★★
★★★★★
Keidth M - September 1, 2018
Verified Purchase
Not easy to install
The part was not what I expected. The connection points of the broken switch did not match and the instructions included were not clear. Part points of contact to be attached based on the instructions included did not match, I.e., P1 to be placed on H2. Some of the points in the instructions had to be researched and tested. I had to contact a professional who was even unclear as to the connection points. Finally, he resolved the confusion and it works fine. Had to pay for the repairman, but wanted to be safe.
★★★★★
★★★★★
Dave S - July 31, 2018
Verified Purchase
wrong part
The part that was in the package was not the part described in the instruction sheet. I ordered an OEM part from the manufacturer.
With our Fix app model plate image recognition technology, we'll recommend the parts guaranteed to fit your appliance. Simply snap a photo, and we'll take care of the rest.
"I love love love this app. It's so nice to have useful information (receipts, manuals, parts lists, warranty info, pictures, etc.) on all of my household appliances and devices in one place."
You added to your cart
✖
$
Qty:
Total item(s) in cart:
Order Subtotal
$
*Taxes and shipping will be applied during checkout