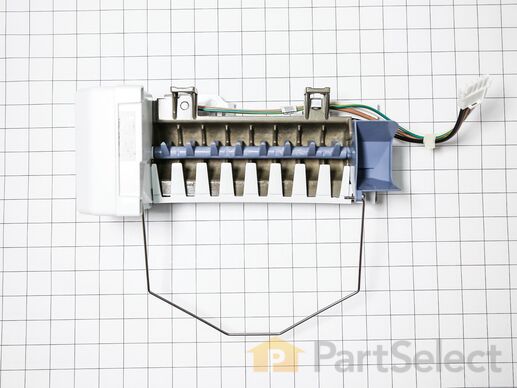
This is an ice maker assembly for various models of refrigerator. This ice maker assembly is used to freeze and eject ice into the ice bucket, then dispense the ice. This ice maker comes with the necessary shut-off arm, as well as a wire harness to properly install it into the freezer compartment of your refrigerator. If your current ice maker is either not producing ice or not breaking the ice up properly, it will need to be replaced. This ice maker assembly is an OEM part and is sold on its own, without any other parts or accessories.
How Buying OEM Parts Can Save You Time and Money
Troubleshooting
This part fixes the following symptoms:
Ice maker not making ice | Ice maker won’t dispense ice | Ice maker dispenses too much ice | Leaking
Keep searches simple. Use keywords, e.g. "leaking", "pump", "broken" or "fit".
Sorry, we couldn't find any existing reviews that matched. Try using some different or simpler keywords.
★★★★★
★★★★★
Ann Hope E - July 5, 2024
Verified Purchase
Easy repair!
The part was perfect and shipping was super.fast! Ice maker is working again!
★★★★★
★★★★★
Dareld R - November 19, 2023
Verified Purchase
Easy Repair
Easy fix working like new
★★★★★
★★★★★
Linda K - November 13, 2022
Verified Purchase
Easy Repair
This was a perfect replacement. Once I had the freezer for off it only took 5 minutes to change out the old ice maker.
★★★★★
★★★★★
Edwin G - August 12, 2022
Verified Purchase
Arrived quickly, installed easily and works well!
★★★★★
★★★★★
Thomas B - August 3, 2022
Verified Purchase
Easy repair, worked great.
The part came in a few days and was easy to replace. Works great!
★★★★★
★★★★★
Jack C - July 29, 2022
Verified Purchase
ICE MAKER INSTALL
We used the online video to understand how to do the install---very helpful. The most difficult part of the install was in removing the sliding basket----this was a Maytag unit with the freezer on the bottom. Removing door was easy. Some clips on the basket were hard to remove, but watching the video several times showed how to push and pull the parts apart.
The ice maker screws were pretty easy to remove. A magnetic screwdriver helps. No problem with removal and installation with ice maker----I think it was just three screws. Make sure the inlet water spout is in position. The "bin full" wire had to be slipped into its slot, so you need to check that before you screw the unit in place.
After installation, the tray did not fill completely. We were ready to adjust the water timer, but decided to change the external water filter on the back of the frig. After that change, the water fill increased. It is not perfect now. Sometimes the water overfills just a bit and all of the cubes are stuck together. And, other times the cubes are small. So it seems a water adjustment won't help. It works good enough and we decided not fix anything that is not "broken."
★★★★★
★★★★★
David S - July 24, 2022
Verified Purchase
Instructions online were great. No more water spilling on the door track and freezing.
Part was correct and works great.
★★★★★
★★★★★
Bruce S - July 13, 2022
Verified Purchase
Easy repair! Worked as expected!
Part was in great condition!
★★★★★
★★★★★
Patrice R - June 4, 2022
Verified Purchase
Whirlpool replacement bottom freezer ice maker
Customer service was excellent. Delivery was fast
★★★★★
★★★★★
Nan H - May 18, 2022
Verified Purchase
So nice to have ice again!
The part we received works great. Not as easy as all the videos made it out to be to install, however we managed and it took about an hour!
< Prev
1
2
3
Next >
Customer Repair Stories
Average Repair Rating: 3.5 / 5.0, 25 reviews.
What's this?
Sort by:
< Prev
1
2
3
Next >
Search filter:
Clear Filter
Your search term must have 3 or more characters.
Keep searches simple. Use keywords, e.g. "leaking", "pump", "broken" or "fit".
Sorry, we couldn't find any existing installation instruction that matched.
Ice maker stopped working
I tested the ice maker first and got no response. So I bought the new ice maker and unplugged the connector in the back, loosened the 2 screws up top and took the bottom screw out. I took out the old one and then plugged the new one in and hung it back on the 2 loosened screws and put the bottom screw in and tightened the screws. I have t
... Read moreo say it’s working great! Have plenty of ice again. Saved a lot of money by doing it myself. Buy your original model number part from Parts Select.
Read less
BRIAN from DEER PARK, NY
Difficulty Level:
Really Easy
Total Repair Time:
15 - 30 mins
Tools:
Screw drivers, Socket set
4 of 4 peoplefound this instruction helpful.
Was this instruction helpful to you?
Thank you for voting!
Ice Maker Not operationl
Have part need instructions to remove old and install new
Kenneth from LAGUNA HILLS, CA
Difficulty Level:
Really Easy
Total Repair Time:
30 - 60 mins
1 personfound this instruction helpful.
Was this instruction helpful to you?
Thank you for voting!
Ice maker was leaking
I first removed the door to the freezer (my frig has a bottom freezer) by loosening the 4 screws and lifting the door up and off. Then, because I'm stubborn, I chose not to remove either of the basket/drawers. It took a little bit of effort to fit my arms/hands in there, but I was able to remove the bottom screw to the old icemaker, and
... Read more loosen the two top screws. (And disconnect the wiring harness.) I could then lift the old icemaker up and off. Putting the new icemaker in was pretty easy-- just slide it down over the two top screws and connect the wiring harness. The hardest part was getting the bottom screw back in! Because I didn't remove the baskets/drawers, I had very little room to work, and I had to "feel" for where that bottom screw went (even used a little mirror to help me). I could have just left this screw out, as the icemaker was sitting in there quite securely. But I kept at it, and after about 20 minutes, I was able to line up the screw with the hole, balanced on the tip of the screwdriver, and get it screwed in. Total repair took about 45 minutes. And no more leaky ice maker!
Read less
Tim from KERRVILLE, TX
Difficulty Level:
Easy
Total Repair Time:
30 - 60 mins
Tools:
Nutdriver, Screw drivers
2 of 2 peoplefound this instruction helpful.
Was this instruction helpful to you?
Thank you for voting!
Icemaker stopped making ice automatically
Unplug the electric flat plug from wall. Loosen up 3 mount support screws , Change out unit. Mount Int back onto 3 support screws . Plug in electronic flag plug , It only goes in one way since the plug as a grove on it.
Larry from Roosevelt, NJ
Difficulty Level:
Easy
Total Repair Time:
30 - 60 mins
Tools:
Nutdriver, Screw drivers
5 of 5 peoplefound this instruction helpful.
Was this instruction helpful to you?
Thank you for voting!
Ice was not ejecting - motor was dead
Followed some online videos. The replacement part actually matched exactly what the videos I found showed. It was my refrigerator that was slightly different where the unit would mount/screw into. The old unit had a bracket which easily attached to the replacement part. It is less than a 1 hour repair for sure. But it took me a few m
... Read moreinutes to figure out the bracket adapter. Plus I forgot to seat the ice maker shut off bar and had to disassemble some things again to get in there to seat it properly. Part was shipped quickly and securely !
Read less
David from PITTSBORO, NC
Difficulty Level:
Really Easy
Total Repair Time:
1- 2 hours
Tools:
Nutdriver, Screw drivers
1 personfound this instruction helpful.
Was this instruction helpful to you?
Thank you for voting!
difficult to reach mounting screws without removing top freezer rack
Loosen the 2 mounting screws on the top about 2 turns; take the one mounting screw on the bottom all of the way out. The top part of the ice maker drops down on the loose top screws. That holds the ice maker while installing the bottom screw. No need to shut off water to the ice maker, just shut off electricity to refrigerator.
Beverly from RIO RANCHO, NM
Difficulty Level:
A Bit Difficult
Total Repair Time:
30 - 60 mins
Tools:
Nutdriver
1 personfound this instruction helpful.
Was this instruction helpful to you?
Thank you for voting!
Had to replace the icemaker.
Took out the bottom drawer, removed one hexhead nut on the unit, unplugged the unit, plugged in the replacement unit, screwed in the hexhead screw, replaced the drawer, that's it! Very user friendly.
Hal from ADDISON, NY
Difficulty Level:
Very Easy
Total Repair Time:
Less than 15 mins
Tools:
Nutdriver
1 personfound this instruction helpful.
Was this instruction helpful to you?
Thank you for voting!
Bottom freezer ice maker quit making Ice
Used a deep well 1/4" nut driver. Loosen 4 screws on inside of door and slip it up and off rack. Remove 2 screws on bottom of ice maker. Loosen top 2. Slip up of screws, unplug ice maker and remove.
JimBob from CRAWFORDSVLLE, AR
Difficulty Level:
Easy
Total Repair Time:
30 - 60 mins
Tools:
Nutdriver
3 of 3 peoplefound this instruction helpful.
Was this instruction helpful to you?
Thank you for voting!
Ice maker not making ice.
Got the right part on the second try but am so happy I did it myself. Easy install 3 screws and a plug. A little hard to reach in bottom drawer freezer but making great ice now.
Frederick from HUDSON, MA
Difficulty Level:
A Bit Difficult
Total Repair Time:
1- 2 hours
Tools:
Nutdriver, Screw drivers
2 of 2 peoplefound this instruction helpful.
Was this instruction helpful to you?
Thank you for voting!
Ice maker not making ice.
This is a bottom freezer refrigerator. Had to remove the freezer door and bottom shelve to make access to the ice maker possible.. Removed the old ice maker using a 1/4" nutdriver to loosen, but not remove, the top 2 screws. Removed the bottom support screw completely.. Detached the wiring harness from the freezer connector and lifted th
... Read moree ice maker up and out of the freezer. Installed the replacement ice maker in reverse order, slipping it over the loosened top screws. Tightened them, making sure the usit was level, then inserted and tightened the bottom support screw . Plugged the wiring harness into the freezer connector.. Unit produced ice within 3 hrs. .
Read less
Carol from SAINT MARYS, GA
Difficulty Level:
A Bit Difficult
Total Repair Time:
30 - 60 mins
Tools:
Nutdriver
1 personfound this instruction helpful.
Was this instruction helpful to you?
Thank you for voting!
< Prev
1
2
3
Next >
Questions and Answers
We're sorry, but our Q&A experts are temporarily unavailable.
Please check back later if you still haven't found the answer you need.
66 questions answered by our experts.
Sort by:
< Prev
1
2
3
Next >
Search filter:
Clear Filter
Your search term must have 3 or more characters.
Keep searches simple. Use keywords, e.g. "leaking", "pump", "broken" or "fit".
Sorry, we couldn't find any existing answers that matched.Try using some different or simpler keywords, or submit your new question by using the "Ask a Question" button above!
Henry
October 24, 2017
Is this the whole ice maker
For model number W10469286
Hi Henry,
Thank you for your question. Yes, this is your entire ice maker. Good luck with your repair.
45 people found this helpful.
Was this helpful?
Thank you for voting!
Sandra
January 13, 2018
Is new wiring harness included?
Hello Sandra, Thank you for your inquiry. The wiring harness is not included, you will have to use the harness from the old ice maker. Hope this helps!
19 people found this helpful.
Was this helpful?
Thank you for voting!
JEFF
January 23, 2019
Does ice maker comes with cycling thermostat and can i tell if ice maker is bad or thermostat
For model number MFF2558DEM00
Hello Jeff, thank you for your question. Yes, the icemaker comes with the thermostat. This thermostat controls and regulates the ice maker ejection cycle by monitoring the temperature inside the freezer to determine when to release the ice into the bin and start the ice making cycle again. If your ice maker is making unusual noises, or if the ice maker is not making or dispensing ice, there could be an issue with the thermostat. You can test this thermostat with a multimeter to see if it has continuity. If the thermostat does not have continuity you would want to replace the thermostat itself. I hope this helps!
13 people found this helpful.
Was this helpful?
Thank you for voting!
George
February 6, 2019
The ice maker does not dispense ice. Will this part resolve this problem?Thank you.
For model number GSF26C5EXY02
Hello George, Thank you for the question. if the ice maker is still making ice then the ice Maker is fine. If the ice is not dispensing, you can try to remove the ice container and let it sit out to thaw any ice build up within the container. If this does not fix the issue you can take the bin apart and check for any damaged parts within the container. You should be able to hear the motor in the container when it is trying to dispense. If the motor is not turning on to dispense, you may have a defective Motor, Part Number: PS11740462. Hope this helps!
I asked this question but it was answered wrong. I stated my refrigerator wont stop making ice, so wondering what to do. The answer i received was regarding an ice maker not working which isn't my issue. The problem is, it keeps making ice, the metal lever doesnt stay up which is supposed to stop it from making ice. Thanks.
For model number kitchenaid fridge krff305ebs
Hi Shari. If the arm won't stay up you can try replacing the shut off arm PS11750229. Thank you for your question and good luck with your repair.
No ice. Water valve functional upon testing with 120v.....water flows......i re started fridge and am waiting for fill valve to energize.....anything i can look for.....would like to test the functions from the front but not sure if i need to......the bar moved when I restarted the equipment.
For model number GX5FHDXVY09 and Serial: K22905993
Hi Ken, thank you for your question. In most cases, if both of the solenoids on your water inlet valve are testing within 500 - 1500 ohms of resistance, then the problem would be with the ice maker not calling up water to start making the ice. Which means that you may have to replace your ice maker itself if the issue is not in your water valve. Good luck with your repair.
5 people found this helpful.
Was this helpful?
Thank you for voting!
John
January 23, 2019
How do you adjust the ice cube size?
Hello John, Thank you for the question. There is a small plastic screw at the front of the icemaker that would be an adjustment screw and you would simply turn it a 1/4 turn counter clockwise but no more than that. Hope this helps!
5 people found this helpful.
Was this helpful?
Thank you for voting!
James
November 13, 2019
What is the part# for the ice maker for the refrigerator model number above
For model number MFF2558DEH00
Hello James, Thank you for contacting us. I have researched the model you have provided and have found the part you are looking for is PartSelect Number PS11765620. Hope this helps!
3 people found this helpful.
Was this helpful?
Thank you for voting!
James
February 15, 2020
1. My fridge is 5 years old and is located in a vacation home. I shut off the r/o water supply to the appliance but forgot to turn the ice maker off by putting the handle in the off position. When i turned the water supply back on, the ice maker wasn't producing ice. 2. Does this model have an internal filter? I can't see one in any obvious locations.
For model number WRB322DMBW00
Hi James. It has what is called a drier filter linked below. The most common for this is replacing the icemaker assembly. Thank you for your question and good luck with your repair.
Does is this compatible with Whirlpool fridge WRB322DMBB00?
Hello Cindy, thank you for writing. Yes, the part PartSelect Number PS11765620 you had chosen is compatible with your model number WRB322DMBB00. We hope to hear from you soon.