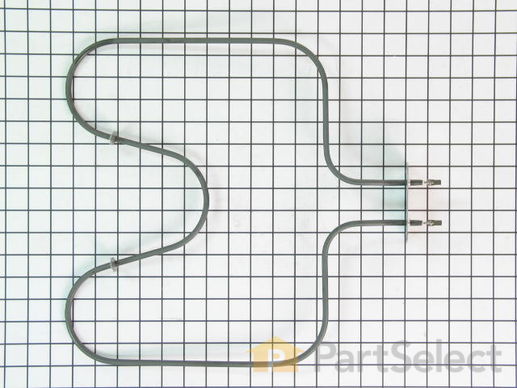
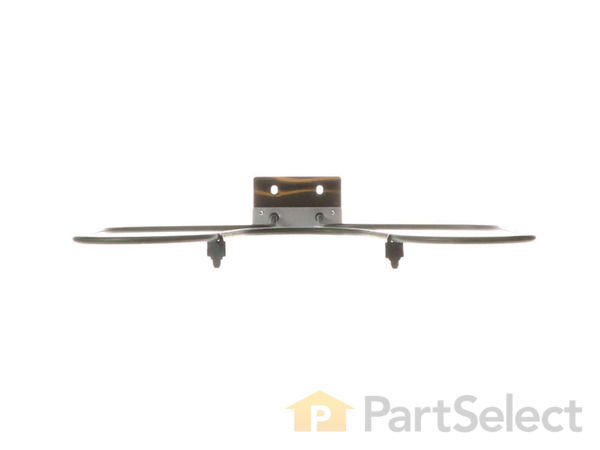
The bake element is located at the bottom of the oven and gives off heat in order to bake evenly. If you notice that the element is not heating up or is not cooking evenly, it could be because it is broken or burnt out. All you need for this simple repair is a small screwdriver. To complete this repair, you will need to first turn the oven off (or shut off the house circuit breaker), remove the two screws that are holding the old element in place, remove the two wires from the old part, and then connect them to the new part and screw back into place.
How Buying OEM Parts Can Save You Time and Money
Part Videos
Replacing your Whirlpool Wall Oven Bake Element
Troubleshooting
This part fixes the following symptoms:
Little to no heat when baking | Element will not heat | Oven not heating evenly
This part works with the following products:
Wall Oven, Microwave Oven Combo, Range.
Part# WPW10207397 replaces these:
AP6017074, 4448696, 4452153, 9760766, W10207397
Customer Reviews
Average Rating:
★★★★★
★★★★★
52 Reviews
4.9
Filter By Rating:
5 Stars
47
4 Stars
4
3 Stars
0
2 Stars
1
1 Star
0
Sort by:
< Prev
1
2
3
Next >
Search filter:
Clear Filter
Your search term must have 3 or more characters.
Keep searches simple. Use keywords, e.g. "leaking", "pump", "broken" or "fit".
Sorry, we couldn't find any existing reviews that matched. Try using some different or simpler keywords.
★★★★★
★★★★★
Debe W - December 7, 2023
Verified Purchase
My oven quit heating properly
We received the baking element very promptly. Installation was simple. Now I’m very happy to have an oven that heats well and I’m able to prepare my families favorite meals an desserts again.
I highly recommend Part Select for asking questions and receiving quality parts. Thank you Part Select!
★★★★★
★★★★★
Michelle A - May 25, 2023
Verified Purchase
Perfect fit
It was a perfect fit and so easy to install!
★★★★★
★★★★★
Christa S - May 19, 2023
Verified Purchase
Back to baking!
This was exactly what we needed when our oven went out. Came quickly and we were back in business!
★★★★★
★★★★★
Mario D - May 12, 2023
Verified Purchase
New element
Parts were a perfect fit to manufacture parts . However they should probably be packed a little better for shipping one of the elements was bent a little when I opened the box ! Was able to bend it back into the correct shape
★★★★★
★★★★★
David S - May 3, 2023
Verified Purchase
fixed the oven
Replaced both upper and lower elements, both work great.
★★★★★
★★★★★
Vincent V - January 1, 2023
Verified Purchase
Quick and easy repair
Very quick and simple repair. The part is working great so far
★★★★★
★★★★★
Elliot S - December 2, 2022
Verified Purchase
Easy Repair, Great Part, Worked great!
Baking element failed. Found this element and it was quickly shipped to our house. Very easy to install and now the oven works as well as it ever has!
★★★★★
★★★★★
Denise L - September 1, 2022
Verified Purchase
So happy to find this replacement element for my oven.
The replacement part came quickly - 10 minutes to install. My oven is working again!!
★★★★★
★★★★★
Debra K - May 19, 2022
Verified Purchase
Right part…easy to self install.
The part was vital to the function of the oven came in quickly and I was able to install.
★★★★★
★★★★★
Gloria J H - May 5, 2022
Verified Purchase
Heating element
The heating element was easy to install and works perfectly. It came quickly and the video helped to put it in the oven. I would recommend Part Select!
< Prev
1
2
3
Next >
Customer Repair Stories
Average Repair Rating: 4.4 / 5.0, 19 reviews.
What's this?
Sort by:
< Prev
1
2
Next >
Search filter:
Clear Filter
Your search term must have 3 or more characters.
Keep searches simple. Use keywords, e.g. "leaking", "pump", "broken" or "fit".
Sorry, we couldn't find any existing installation instruction that matched.
Bottom element not working properly
Verify power is off to the oven, turned main power supply off for the oven at the breaker panel, located the securing screws for the defective element, used a Phillips screw driver to remove the screws, pulled the element slightly out unit wires are exposed, verify 0 volts at the element wiring terminals, used pliers to remove the wires t
... Read moreo complete the uninstalling process, reinstall the element in the reverse order, restored power at the breaker panel
Read less
Stephen from CONYERS, GA
Difficulty Level:
Very Easy
Total Repair Time:
Less than 15 mins
Tools:
Pliers, Screw drivers
2 of 3 peoplefound this instruction helpful.
Was this instruction helpful to you?
Thank you for voting!
The Bake Element burn and stop heating up
I turn off the power in the breaker box and then unscrew the part and replace it with the new one
Emiliano from EASTVALE, CA
Difficulty Level:
Really Easy
Total Repair Time:
15 - 30 mins
Tools:
Screw drivers
1 personfound this instruction helpful.
Was this instruction helpful to you?
Thank you for voting!
Worn out bake element
I was able to remove the old element and planned it with what little time off that I could. This would have been maybe 20-30 minute repair at the most. HOWEVER! I was extremely irritated screws were not included? When I called to ask if they were missing they said they didn’t come with the element. Cost me a very annoying trip to the hard
... Read moreware store. Not sure if I missed it on the site that they don’t provide screws - would have been nice to know that before I started. Still scratching my head as to why screws wouldn’t be included? My old ones were as beat up as the element I replaced. I was so irritated I was looking for a spot to leave feedback. Product is fine. Shipping was fine. Sending these products out as they do? Zero stars on that.
Read less
janet from OLD ORCHD BCH, ME
Difficulty Level:
Easy
Total Repair Time:
15 - 30 mins
Tools:
Screw drivers
2 of 3 peoplefound this instruction helpful.
Was this instruction helpful to you?
Thank you for voting!
The bottom bake element died
Well, the instructions on the computer site were very easy to understand, however, the difficulty lay in the fact that we were 2 78 yr old people and getting to the inside the oven, lifting up the element so that we could see where it should be connected and get it connected was a task. We had to get down on our knees and then get back u
... Read morep. That was a chore within itself. But, the instructions were easy and clear. Bottom line if us old people can do it, anyone can.
Read less
Judith from QUINCY, CA
Difficulty Level:
A Bit Difficult
Total Repair Time:
30 - 60 mins
Tools:
Screw drivers
1 of 2 peoplefound this instruction helpful.
Was this instruction helpful to you?
Thank you for voting!
Had to replace the bake element
Cut the power. Undid the screws to the element. Popped off the old element replaced with new,put screws back in turned power back on and Shazam it was up and going
Roxanne from MARTELL, NE
Difficulty Level:
Very Easy
Total Repair Time:
15 - 30 mins
Tools:
Screw drivers
2 of 2 peoplefound this instruction helpful.
Was this instruction helpful to you?
Thank you for voting!
The video gave me the confidence to order the part
The tech said he used No 2 Phillip's. Once I took the door off and removed the racks I quickly learned a Phillips was not going to work. I am now the proud owner of a Kobslt star and square ratchet screwdriver.
Leroy from SUWANEE, GA
Difficulty Level:
Really Easy
Total Repair Time:
30 - 60 mins
Tools:
Screw drivers
1 personfound this instruction helpful.
Was this instruction helpful to you?
Thank you for voting!
The element had burned up.
Unplugged old element unit and plugged in new element. Took two needle nose pliers and a flexible body. Took about 5 minutes. Works fine. Anybody can do it. Make sure power is off at the box.
Kenyon from CALHOUN, GA
Difficulty Level:
Really Easy
Total Repair Time:
30 - 60 mins
Tools:
Pliers
1 personfound this instruction helpful.
Was this instruction helpful to you?
Thank you for voting!
Dryer was making a very loud squeaking sound.
I followed the instructional video provided on the PartSelect website almost entirely. A couple of things I did that weren't covered in the video: The retaining ring that keeps the drum support roller in place did not retain its shape well after I removed it, so I took a pair of needle-nose pliers and reshaped it a bit before puttin
... Read moreg it back on. Also, after replacing the drum support roller, when I went to put the belt back on, I pulled a panel off the back of the dryer -- this gave me direct access to the idler pulley, making it much easier to loop the belt back through.
Over heating oven and uneven baking. Oven thought it was in self cleaning mode.
Sensor replacement was removing 2 screws and gently pulling on old sensor until the clip comes out. Secured the other end of the wires so that it did not fall back inside. Then connected the new sensor clip to the oven wire, then gently returning wire into oven, and then screwing the sensor into place. The baking eleme
... Read morent was easier than the sensor. Removed the 2 screws holding the element into the back bottom of the oven, and pulled the element forward to disconnect from clamps. Inserted new element into clamps and screwed it in. ***NOTE that there will be a smell from the new element. This smell is normal. If the smell continues after a couple minutes stop the oven and wait an hour before reattempting.
Removed the 2 screws holding the element in place. Unplugged the existing element. Plugged in new element - replaced screws. Took less than 5 minutes. :)
Ellen from EASTVALE, CA
Difficulty Level:
Really Easy
Total Repair Time:
30 - 60 mins
Tools:
Screw drivers
11 of 11 peoplefound this instruction helpful.
Was this instruction helpful to you?
Thank you for voting!
< Prev
1
2
Next >
Questions and Answers
We're sorry, but our Q&A experts are temporarily unavailable.
Please check back later if you still haven't found the answer you need.
17 questions answered by our experts.
Sort by:
< Prev
1
2
Next >
Search filter:
Clear Filter
Your search term must have 3 or more characters.
Keep searches simple. Use keywords, e.g. "leaking", "pump", "broken" or "fit".
Sorry, we couldn't find any existing answers that matched.Try using some different or simpler keywords, or submit your new question by using the "Ask a Question" button above!
Jody
February 19, 2018
The oven reads f3 when turned on and will not heat up
Ho Jody, Thank you for the question. The F3 Error code indicates the Temperature Sensor will need to be replaced. Hope this helps!
10 people found this helpful.
Was this helpful?
Thank you for voting!
Tom
February 16, 2018
What is the amperage or wattage rating of this part?
Hi Tom, Thank you for the question.Very sorry but I do not have the watts of this element. We just have each terminal is 120 Volts. Hope this helps!
6 people found this helpful.
Was this helpful?
Thank you for voting!
Mitch
October 30, 2019
Does this element fit my rf387pxpn0?
For model number RF387PXPN0
Hello Mitch, thank you for your question. The bake element for this unit is actually Part #: PS11740695. Please enter the part number into the site for current price and availability. Good luck with your repair!
I asked a question before but did not include the #9 with the model#. The oven does get hot, however biscuits, corn bread, pizza these do not get cooked on the bottom of these items. Also it takes twice as long to fully cook fish, meat and veggies. Thank you.
For model number RBS275PBD9
Hi Rose, thank you for your question. There are a few parts that could cause this issue in your appliance. First I would say test your elements with a multi meter to see if they are working correctly or not. They should be reading between 0 - 50 ohms to be working correctly. The other part you should check would be your oven temperature sensor. That can also be tested with a multi meter and should be reading between 1000 - 1100 ohms. If those three parts are fine however, then the issue may be in your control board. I hope that helps. Good luck with your repair.
4 people found this helpful.
Was this helpful?
Thank you for voting!
Mary
September 9, 2021
I have a 5 Star oven. The electric element cracked. I am trying to find a replacement but don't see that brand listed anywhere with replacement parts. Will another brand work or is there a universal oven heating element?
Hi Mary,
Thank you for your question. If you could resubmit your question with the model number from your range, we would be happy to help you with this. Here is a link from our website on where you will find model number, https://www.partselect.com/Find-Your-Range-Model-Number.aspx. We hope this helps! If you have any questions, please let us know.
2 people found this helpful.
Was this helpful?
Thank you for voting!
Carlos
July 30, 2021
Are this parts exchanchangeable in all whirpool ranges
Hello Carlos, Thank you for your question. The parts are not interchangeable within all Whirlpool Ranges. You will need to find the specific model number on your range to locate the correct parts list to fit your range. We hope this helps!
1 person found this helpful.
Was this helpful?
Thank you for voting!
Rege
February 4, 2020
The knob for the gas burner broke the small metal connector to the manifold. All i need is a small metal connector, the knob itself is good. Where can i buy the part? I don't know where purchased.
For model number Wfg361lvb1
Hello and thank you for writing.
If the knob is ok you would have to replace the burner valve itself PS11747196 (center and left rear). The knob would fit directly on the d shaped shaft of the burner valve. We hope this helps. Please contact us anytime if you require further assistance.
Hello Celia, Thank you for contacting us. We have researched the model you have provided and have found the part you are looking for is PartSelect Number PS11740695. We hope this helps!
I would like to replace the gas oven components with an electric element, thermostat and control module for a commercial style stove. Can you send me the parts list with cost?
Hello Jeffery, Thank you for the question. Very sorry but Gas appliances can not be converted to Electric. For more specialized assistance or to speak with someone about this, we would suggest calling the manufacturer of the appliance directly. We hope this helps!
Was this helpful?
Thank you for voting!
Karina
October 19, 2021
Heating element is broken it’s GE oven range. Can’t find model number however the number entered is on door of oven will this element fit?
For model number 326B1229P002
Hello Karina, thank you for contacting us, In order for us to locate the correct parts and repair information we will require the model number of the Oven. We will include a link on where to locate the model number sticker. Once you have located the model number please feel free to resubmit the question and we will be happy to help you. We are looking forward to hearing from you!
https://www.partselect.com/Find-Your-Range-Model-Number.aspx
Item is in stock and will ship today if your order is placed before 4:00 PM Eastern Standard Time.
If your order is placed after 4:00 PM EST, the in stock items will ship on the next business day.
On Order
Item is not in stock and usually ships 3-5 business days from the time you place your order.
Special Order
Item is not in stock and usually ships 10-15 business days from the time you place your order.
NLA - No Longer Available
This item is no longer being made by the manufacturer, and cannot be added to your shopping cart.
[{"position":0,"name":"Home","title":"Home","url":"/"},{"position":1,"name":"Element or Burner","title":"Element or Burner","url":"/Wall-Oven-Elements-and-Burners.htm"},{"position":2,"name":"WPW10207397","title":"WPW10207397","url":""}]
You added 1 item to your cart
✖
$
Qty:
Total item(s) in cart:
Order Subtotal
$
*Taxes and shipping will be applied during checkout