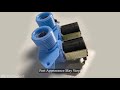
Water Inlet Valve and Thermistor Assembly Specifications
This water inlet valve attaches the water lines to the back of your appliance. The attaching solenoids on the valve open and close according to the desired temperature, or amount of water needed.
How Buying OEM Parts Can Save You Time and Money
Part Videos
Replacing your Whirlpool Washer Water Inlet Valve and Thermistor Assembly
Troubleshooting
This part fixes the following symptoms:
No hot or cold water | Leaking
This part works with the following products:
Washer.
This part works with the following products:
Whirlpool, Kenmore, Maytag, Inglis.
Part# WP3979346 replaces these:
AP6009052, 3979346, 3979347, 8578342, WP3979346VP
Customer Reviews
Average Rating:
★★★★★
★★★★★
18 Reviews
4.6
Filter By Rating:
5 Stars
15
4 Stars
1
3 Stars
0
2 Stars
1
1 Star
1
Sort by:
< Prev
1
2
Next >
Search filter:
Clear Filter
Your search term must have 3 or more characters.
Keep searches simple. Use keywords, e.g. "leaking", "pump", "broken" or "fit".
Sorry, we couldn't find any existing reviews that matched. Try using some different or simpler keywords.
★★★★★
★★★★★
Jeff J - November 1, 2022
Verified Purchase
Perfect replacement
It was a great process for me. Good pictures to help me identify the correct part, easy order process, fast delivery of my exact replacement.
★★★★★
★★★★★
Ann R - September 24, 2022
Verified Purchase
Great Part - Washer working once again
The part is working great. Instructions for installation were easy to follow. You will have to google how to disconnect the water hoses. Other than that just take your time and mark all the connections as you take them off.
★★★★★
★★★★★
Clemente S - March 12, 2022
Verified Purchase
Vale repair
The part came quick and it fit perfect. the washer is working great.
Thank Your!
★★★★★
★★★★★
Larry H - March 2, 2022
Verified Purchase
Working again.
My washing machine hot water would not shut off. Replaces the water valve with the one purchases from Parts Select and it had been working great.
★★★★★
★★★★★
Robert H - November 24, 2021
Verified Purchase
False Alarm
I ordered a replacement inlet water valve for my Maytag washer because only cold water was filling the machine. Would not switch to cool,warm or hot. Ironically the valve started working again the day the valve arrived saving me the task of replacing it Guess I have the part should the valve stop working again!
★★★★★
★★★★★
Scott H - November 22, 2021
Verified Purchase
Water valve replacement
Water valve came broken in the box.
November 22, 2021
We’re sorry to hear you had that experience. We would like the opportunity to fix this situation. We will be sending you an email shortly. Look forward to hearing from you!
★★★★★
★★★★★
Dwight K - March 21, 2021
Verified Purchase
Exact Part
Easy to install once you watch a video.
★★★★★
★★★★★
Tim R - July 17, 2020
Verified Purchase
Great part worked as expected
Part was in good condition and my washer is back up and running
★★★★★
★★★★★
Anthony V - December 12, 2018
Verified Purchase
Easy replacement install.
Perfect match.
★★★★★
★★★★★
Mark S - November 12, 2018
Verified Purchase
part was a great fit
better than factory
< Prev
1
2
Next >
Customer Repair Stories
Average Repair Rating: 3.6 / 5.0, 17 reviews.
What's this?
Sort by:
< Prev
1
2
Next >
Search filter:
Clear Filter
Your search term must have 3 or more characters.
Keep searches simple. Use keywords, e.g. "leaking", "pump", "broken" or "fit".
Sorry, we couldn't find any existing installation instruction that matched.
Tub in washer would not fill with water
First,I checked all of the electrical connectors for continuity. Ev eryone of them checked OK. I had watched a tutorial on you tube that stated the problem with the inlet valve could be mechanical as well as electrical. The tutorial did state that you could take the valve apart to clean it but it wasn't recommended due to the probability
... Read more of it leaking after re assembly. I ordered a new one since this unit is 20 years old. It took 10 minutes to change out the valve once I got the top/ front of the washer off Once everything was in place I plugged it in set in on the wash mode and I had water in the tub again!
Read less
Wesley from GRIFFIN, GA
Difficulty Level:
Really Easy
Total Repair Time:
15 - 30 mins
Tools:
Screw drivers, Socket set
1 personfound this instruction helpful.
Was this instruction helpful to you?
Thank you for voting!
Water inlet valve malfunction
Shut off water and unplugged electricity. Removed hoses, have some thing to catch water in the hoses. Remove the screws that hold the back cover on the controls panel, and the cover for the electrical cord, you do not have to do anything else with the cord. Remove the 2 screws that are holding the top of the washer to the back panel
... Read more and slide the top forward an inch or two until it comes loose in the front. Hold onto lt glass top door a lift it up until you can see the silver metal spring clips that hold the controls panel/ cover in place, with a screw driver press the clips back and lift them up a little bit and this will allow you to move the controls panel forward a half inch and the tabs will release and you can tip the cover forward and this exposes the water valve, there are 5 electrical connections on this valve were I to do this again I might order the wiring loom for the valve at the same time that way you would not have to use the small sharp pick to work the connectors loose and reinstall them on the new valve. Replacing the valve was easy as there are only two screws holding it on. Pull up on the valve and it is off. Make sure all three of the gaskets /prong seals are lined up before you press down on the valve to install it, install the two screws before you plug in the electrical, it makes it easier to tighten the screws. Plug the connectors back onto the valve, 4 on the top of valve on under it and reassemble the washer.
Read less
Mark from ELK HORN, IA
Difficulty Level:
Easy
Total Repair Time:
30 - 60 mins
Tools:
Nutdriver, Screw drivers, Socket set
1 personfound this instruction helpful.
Was this instruction helpful to you?
Thank you for voting!
The tub was filling when the washer was off
I removed the control panel and a few screws on the back took out the valve.the new one was different but I made a bracket and got it to fit
kevin from RUSH CITY, MN
Difficulty Level:
Really Easy
Total Repair Time:
30 - 60 mins
Tools:
Nutdriver, Pliers, Socket set
1 personfound this instruction helpful.
Was this instruction helpful to you?
Thank you for voting!
Water continued to drip in tub after load finished.
Kenmore 11027721600 washers repair & replacement parts
Part Number WP3979346 replaces: 3979346, 3979347, 8578342, WP3979346VP.
Post drip from water inlet To replace the inlet solenoid valve/thermistor assembly: Unplug the washer. Turn the water off and unscrew the hoses from the inlet. Use a pu
... Read moretty knife to release the control panel (slide the putty knife under the front corners to release the clamps on the control panel). Pull the panel out of the way and pop out the two retaining clips that hold the back of the machine to the cabinet. They are located under the control panel. Remove the mounting screw from the valve assembly (1/4-inch driver). Pull the back away from the cabinet far enough to remove the valve, but don't let the wires get cut. Disconnect the wires. To unplug the solenoid connectors, lift the long tab with a screwdriver. Disconnect the water outlet hose. Connect the wires and hose to the new valve assembly. The red connector goes to the hot water valve. The thermistor wires (the two individual connectors) can be connected to either terminal. It does not matter if they are reversed. Put the valve back in place and install the screw. Hook up and turn the water on. Plug in the machine and test the valve. Unplug the power and reinstall the back and the control panel. The back-to-cabinet clips can be snapped back in place easily.
Read less
Darline from Dunn, NC
Difficulty Level:
Easy
Total Repair Time:
30 - 60 mins
Tools:
Nutdriver, Pliers, Screw drivers
1 personfound this instruction helpful.
Was this instruction helpful to you?
Thank you for voting!
Water would not shut off/plugged in or not
Replace inlet valve
William from CROWN POINT, IN
Difficulty Level:
Really Easy
Total Repair Time:
30 - 60 mins
Tools:
Pliers, Screw drivers
1 personfound this instruction helpful.
Was this instruction helpful to you?
Thank you for voting!
Hot water was not hot.
1. Unplug washer 2.turn off water, remove hoses from washer.3. Remove back cover, Remove screw holding inlet valve, carefully remove modular wiring, noting which wire goes where. Discard old inlet valve. Install new part. Reverse the above directions for installation.
Brian from BURLINGTON, NC
Difficulty Level:
Really Easy
Total Repair Time:
30 - 60 mins
Tools:
Nutdriver, Pliers, Screw drivers
3 of 3 peoplefound this instruction helpful.
Was this instruction helpful to you?
Thank you for voting!
Eratic water temperature
Removed the 4 screws and nuts to get the control panel, off. Took-off brass clips that hold the back on. Removed 2 bottom nuts and plastic clips on back of washer. Took the back partially off, and removed the water inlet valve and replaced it. Reversed the procedure to re-assemble.The valve may not have been deffective, since after inspec
... Read moretion, the hot water inlet screen was clogged with gunk.
Read less
Michel from Lynnwood, WA
Difficulty Level:
Easy
Total Repair Time:
15 - 30 mins
Tools:
Nutdriver, Pliers, Screw drivers, Socket set
4 of 7 peoplefound this instruction helpful.
Was this instruction helpful to you?
Thank you for voting!
Two problems - washer stopped and had to open and close lid several times to restart. Problem 2 - could not get inlet valve to take in hot water.
1. Read a repair manual that I bought several years ago for this model. Pictures and notes for removing control panel and back cover of washer were very helpful. Replacing the lid switch was easy as long as you have the lid open when locking it down. The control valve was easy and I swapped out wires one
... Read moreat a time to make sure I didn't swap hot for cold. I then removed valve and locked down new one. Reversing the control panel and back skin were easy with a second set of hands to hold the back panel in place while installing two bottom screws. The parts resolved the problems.
After uplugging and removing the hoses from the back of the washer, 1 - Removed four screws that secure control panel to top of machine and tilted panel toward front. Disconnected wiring plugs as req'd to gain more access. 2 - Removed the two gold colored clips that secure the top to the lower sheetmetal housing and tilted the lower housi
... Read moreng away from the back of the machine. 3 - Removed the shield that is clipped to the back just above the inlet valve assy. 4 - Removed the hose clamp from the valve, disconnected the four wires to the valve (note their position), Removed the single screw that secures the valve assy to the back and removed the valve assy. Installation is reverse of above.
Hot water would not stop running into machine when machine is off.
Unplug machine then removed two screws from the back of the control panel so that the panel could be removed from the top of enclosure. I then removed the two spring clips that fastens the enclosure to the back panel of machine. Stand in front of machine and tilt enclosure back towards you, this opens up the machine to get access to the
... Read moreinlet valve. Remove all electrical wires and the water hose at the bottom of the valve. There was only one bolt that attached the valve to the back panel; remove it and replace water inlet valve.
Read less
Jon from Lafayette, IN
Difficulty Level:
Really Easy
Total Repair Time:
15 - 30 mins
Tools:
Screw drivers, Socket set
11 of 14 peoplefound this instruction helpful.
Was this instruction helpful to you?
Thank you for voting!
< Prev
1
2
Next >
Questions and Answers
Ask our experts a question about this part and we'll get back to you as soon as possible!
26 questions answered by our experts.
Sort by:
< Prev
1
2
3
Next >
Search filter:
Clear Filter
Your search term must have 3 or more characters.
Keep searches simple. Use keywords, e.g. "leaking", "pump", "broken" or "fit".
Sorry, we couldn't find any existing answers that matched.Try using some different or simpler keywords, or submit your new question by using the "Ask a Question" button above!
Steven
October 20, 2017
Hot water is fine in our washer, but recently cold water is being delivered very slowly...it dribbles into the tank instead of flowing as a stream, as it used to. Our cold water line and hose are fine, so it seems to be something wrong in the washer. Can you suggest a solution?
For model number WTW5600SQ0
Hi Steven, Thank you for the question. The water Inlet valve that attaches the water lines to the back of your appliance has two sides, one for the hot and one for the cold. The cold side is not opening up properly to allow the cold water through. The valve will need to be replaced to fix the issue. Good luck with your repair!
13 people found this helpful.
Was this helpful?
Thank you for voting!
Dayna
September 26, 2017
Q1: Sometimes water continues to drip into the tub when the washer isn't running: Do I need to replace the valve/thermistosor? I don't have a water softener and have had the washer 10.5 years.
For model number WTW5800SW0
Hi Dayna, Thank you for the question. If there is water dripping into the tub you will need to replace the Water Inlet Valve and Thermistor Assembly, PartSelect Number: PS11742194. Good luck with the repair!
6 people found this helpful.
Was this helpful?
Thank you for voting!
Paul
February 14, 2018
The water pulsates on and off causing the hoses to jump like crazy, water hammering the dickens out of my pipes. If I close the water valves so no water flows i can hear the solenoids clicking on and off rapidly from the back of the unit.I find that if the control is set for cold, the water flows fine, if I open the hot, the hammering starts.What part would cause this atrocious behavior?
For model number LSW9700PQ1
Hi Paul, Thank you for the question. This sounds like an issue with the Water Inlet Valve, PartSelect Number: PS11742194/ The hot water inlet could be defective or blocked causing the pulsating. Hope this helps!
5 people found this helpful.
Was this helpful?
Thank you for voting!
Jeremy
February 1, 2018
The washing machine does not fill on the rinse cycle but it does fill on the wash cycle. Would this be the water inlet valve?
For model number lsn2000pw4
Hi Jeremy,
Thank you for your question. If your washer is not filling with water, the water inlet valve fixes the issue the majority of the time, but there are some parts that you will need to check to see which one is causing the issue. You will also need to check the water level pressure switch, the direct drive water pump and the lid switch. I hope this helps. Thank you and have a great day!
3 people found this helpful.
Was this helpful?
Thank you for voting!
Rafael Zimmermann
August 23, 2017
Good morning. I need an orientation on which part I need to buy for repair. My washing machine fills with water until it overflows, does not stop filling. What part would I need to replace?
For model number WTW5700SW0
Hi Rafael,
Thank you for the question. If the appliance will not stop filling with water I suggest replacing the water inlet valve. This water inlet valve attaches the water lines to the back of your appliance. The attaching solenoids on the valve open and close according to the desired temperature, or amount of water needed. The valve sounds like it is stuck open.
Hope this helps!
2 people found this helpful.
Was this helpful?
Thank you for voting!
Paul
October 30, 2019
Hot water pulses. The internet sources say that this is usually caused my either the sensor in the inlet valve or the temperature control switch. How can i test to see which is the problem. I have tools and knowledge to test, i would like to know how to know if the sensor is good or bad and diagnostica on the switch.
For model number WTW5700SWO
Hello Paul, thank you for your question. The valve can be tested with a multi meter and should be reading between 500 - 1500 ohms of resistance. The thermostat should be testing at 0 ohms to be working. This should help narrow down the issue. I hope this helps!
2 people found this helpful.
Was this helpful?
Thank you for voting!
Ken Nead
December 6, 2019
A new temperature switch was just purchased and installed. Hot water is selected but warm is all that fills the tub. Cold, tap and warm settings all work correctly, but not hot. Would this be the water valve at fault?
For model number 100.29522800
Hi Ken, this is a possible part to fix your water not heating. Thank you for your question and good luck with your repair!
1 person found this helpful.
Was this helpful?
Thank you for voting!
Yvonne
February 18, 2020
Hello - do i need the water inlet valve and thermistor assembly to fix a wash machine that has the following two problems?:
1) machine does not fill on the rinse cycle (over a couple of month's time the machine would pause at rinse cycle and make a noise and then start filling. the pause/noise became longer and longer with each use of the machine and then it finally stopped working),
2) only hot water works when filling on the wash cycle (this happened suddenly)
thank you so much!
For model number 110.29622800
Hello, Thank you for your question. Typically this is caused from the water inlet valve. We hope this helps.
1 person found this helpful.
Was this helpful?
Thank you for voting!
Austin
February 26, 2020
Does this come with a new hose?
For model number 110.15862400
Hi Austin, thank you for your question. It does not. If you need one of your inlet hoses from the wall to the machine you would need this hose: PS11746820. If you need the inner hose that goes to the syphon, you would need this hose: PS11745951. Good luck with your repair.
1 person found this helpful.
Was this helpful?
Thank you for voting!
Russell
January 31, 2019
Water starts to fill but tub will not fill. Both hot and cold work
For model number Wtw5810sw0
Hello, thank you for your inquiry! If you find it is filling but filling very slowly and not filling enough before the next cycle starts, we recommend checking your water valve to ensure it is allowing the proper flow of water to pass through. If it is not filling at all, we recommend checking your direct drive water pump , PS11741239, as it may be draining when it is not supposed to. We hope this helps!
1 person found this helpful.
Was this helpful?
Thank you for voting!
< Prev
1
2
3
Next >
✖
Ask a Question
Ask our experts a question on this part and we'll respond as soon as we can.