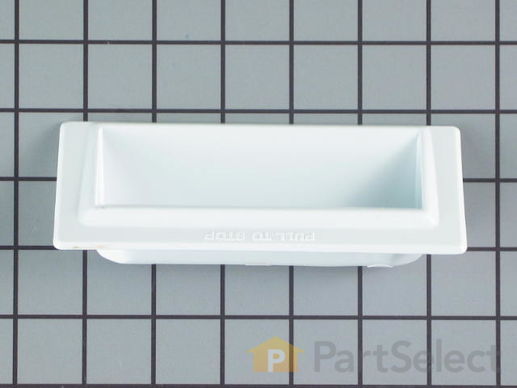
Door Handle
$
51.18
In Stock
Get this part fast! Average delivery time for in-stock parts via standard shipping: 1.8 days.
PartSelect Number PS11741770
Manufacturer Part Number WP348721
Manufactured by
Whirlpool

Check if this fits your product and find model diagrams
Need help finding your model number?
Product Description
Door Handle Specifications
White in color.

How Buying OEM Parts Can Save You Time and Money
Troubleshooting
This part works with the following products:
Dryer, Washer Dryer Combo.
This part works with the following products:
Kenmore, Whirlpool, KitchenAid, Roper.
Part# WP348721 replaces these:
3390781, 348721, 348722, 686893, 686895, 686897, 686899, 687370, 687662, 687737, 687814, 687816, 689326, 689460, 690265, 690268, 690270, 694858, 786089
Questions and Answers
Ask our experts a question about this part and we'll get back to you as soon as possible!
- < Prev
- 1
- Next >
Sort by:
Search filter:
Clear Filter
Your search term must have 3 or more characters.
Keep searches simple. Use keywords, e.g. "leaking", "pump", "broken" or "fit".
Sorry, we couldn't find any existing answers that matched.Try using some different or simpler keywords, or submit your new question by using the "Ask a Question" button above!
Greg
January 10, 2023
Regarding Kenmore dryer handle, Does this part come in. any other colors than white. Looking to replace a more light-tannish colored handle.
For model number 110.64994301

Hello Greg, Thank you for your inquiry. Researching the model number that you have provided, white is the only color that is still available from the manufacturer. We hope this helps.
1 person found this helpful.
Was this helpful?
Thank you for voting!
- < Prev
- 1
- Next >
✖
Ask a Question
Ask our experts a question on this part and we'll respond as soon as we can.
Something went wrong. Please try again later.
Your Question Has Been Submitted!
Our experts will send you an email as soon as your question has been answered.
Customer Repair Stories
Average Repair Rating: 3.5 / 5.0, 2 reviews.
What's this?
- < Prev
- 1
- Next >
Sort by:
Search filter:
Clear Filter
Your search term must have 3 or more characters.
Keep searches simple. Use keywords, e.g. "leaking", "pump", "broken" or "fit".
Sorry, we couldn't find any existing installation instruction that matched.
Motor tried, but could not turn drum
First, I unplugged it and pulled it away from the wall. Then I pryed the front of the top up. It is scary to apply that much force, but the clips did not break. It opens like a car hood. Then I removed the two sheet metal screws that hold the front to the sides. Don't forget to unplug and unclip the door switch wires. Then I lifted the front off the bottom clips. Be sure to hold the drum up when you do this. Three hands will make it easier. Then remove the drum and belt. The belt tensioner will fall off, but that is ok.
I thought the problem would turn out to be the motor, but instead it was the front seal for the drum. It is felt and had broken. It folded under itself and was jamming the drum to the point that the motor couldn't turn it.
I replaced the felt seal, which attaches to the front cover with three clips and also replaced the plastic guides, which clip to the drum. Both were easy to do. I had replaced the rear drum seal a few years ago and so it was ok, otherwise I would recommend doing that too.
While I had it apart, I opened up the back and cleaned out all the lint in the fan housing. I had replaced the heater element, thermal switch and fuse a few years ago, so they were fine.
I also replaced the mosture sensor, just because it only cost $11. I bought a new lint filter, because it had holes in it after 20 years. I replaced the belt, because it was only $10. I replaced the lint filter cover and front door handle, because they had yellowed. I will warn you about the front door handle. It was a bear. I finally had to take the door apart to get the little plastic clip to seat correctly.
Then I put it all back together, which again is easier with 3 hands. Holding up the drum and putting the front cover on the lower clips can be a bit tricky alone. Also, be sure to rotate the drum to make sure the rear seal is not folded under and the front seal is seated correclty.
I fired it up and it ran great, except for the constant whistling. I had wondered what the little clear plastic box in the back did. Turns out it is the lint filter is full whistle warning thing. I took the back off again and found a wire was resting on the flapper door of the box and holding it in the wrong postion. By the way, it is a really irritating sound after the first few minutes. I moved the wire and it works great.
I worked slowly and it went well and was not hard.
Other Parts Used:
-
Chris from Worcester, MA
-
Difficulty Level:Easy
-
Total Repair Time:1- 2 hours
-
Tools:Nutdriver, Screw drivers
29 of 47 people
found this instruction helpful.
Was this instruction helpful to you?
Thank you for voting!
Broken Door Handle on Front of Dryer
Do to age and heat the dryer door handle was brittle and broke. Ordering was easy on line. Part was delivered faster tan expected. Oh and the repair time, Less than 1-minute.
Thanks for the great service.
-
Jeff from Wausau, WI
-
Difficulty Level:Really Easy
-
Total Repair Time:Less than 15 mins
13 of 24 people
found this instruction helpful.
Was this instruction helpful to you?
Thank you for voting!
- < Prev
- 1
- Next >
Customer Reviews
Filter By Rating:
- < Prev
- 1
- Next >
Sort by:
Search filter:
Clear Filter
Your search term must have 3 or more characters.
Keep searches simple. Use keywords, e.g. "leaking", "pump", "broken" or "fit".
Sorry, we couldn't find any existing reviews that matched. Try using some different or simpler keywords.
Richard G - December 25, 2018
Verified Purchase
Not a good fit
Part supplied did not fit snugly, was very loose. I had to use clue to get it to stay in place.
- < Prev
- 1
- Next >
Model Cross Reference
This part works with the following models:
PartSelect Number: PS11741770
Manufacturer Part Number: WP348721
Brand
Model Number
Description