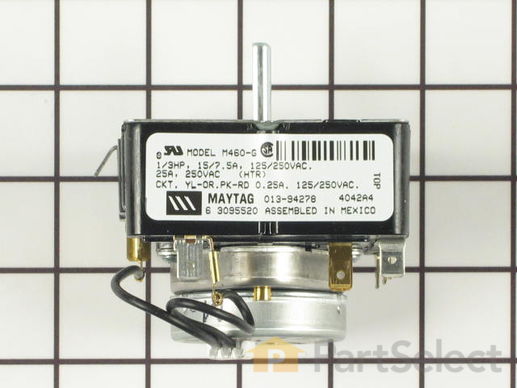
This dryer timer is used to control the unit's cycles by regulating the length of time that power is directed to each setting.
How Buying OEM Parts Can Save You Time and Money
Troubleshooting
This part works with the following products:
Dryer.
This part works with the following products:
Maytag, International.
Part# WP33001632 replaces these:
AP6007932, 33001632
Questions and Answers
We're sorry, but our Q&A experts are temporarily unavailable.
Please check back later if you still haven't found the answer you need.
4 questions answered by our experts.
< Prev
1
Next >
Sort by:
Search filter:
Clear Filter
Your search term must have 3 or more characters.
Keep searches simple. Use keywords, e.g. "leaking", "pump", "broken" or "fit".
Sorry, we couldn't find any existing answers that matched.Try using some different or simpler keywords, or submit your new question by using the "Ask a Question" button above!
John
November 30, 2017
Timer seems to have a dead spot at 2 and 8 o'clock. When timer advances to that position, it keeps running and does not advance. Have to manually advance timer to continue. Possible fire hazard. Is this the timer mechanism?
For model number MDE2600AYW
Hi John, Thank you for the question.Yes I suggest replacing the timer assembly.Hope this helps!
2 people found this helpful.
Was this helpful?
Thank you for voting!
Robert
March 20, 2019
I have a timer that gets stuck in the auto dry spot was wondering if it’s the timer or is there a switch thathelps with the auto dry and makes the timer work
For model number SDE2606AYW
Hello Robert, thank you for your question. The most common part that causes this issue is the timer, however we would recommend you test the Cycling Thermostat Part Number: WP37001136, High Limit Thermal Fuse Part Number: WP40113801, and Limit Thermostat Part Number: WPW10116735 first. Testing these thermostats is very easy. Set your multimeter to the R X 1 setting. Take each of your meter's probes and touch one to each terminal. You are testing for continuity, and you should receive a reading of either zero or infinity. At room temperature, testing the thermostat should produce a reading of zero. But if a thermostat is tested when it is heated to its limit, a reading of infinity should be produced. We strongly recommend that you test your thermostat at room temperature. If the test you conduct with your thermostat does not produce these results, then you should replace the component. I hope this helps!
Was this helpful?
Thank you for voting!
Daniel
August 15, 2019
The heating element comes on when the timer dial is turned. The motor does not run after pressing the start button. The drum turns freely with no smell or humming from the motor when pressing the start button. The dryer worked fine prior to this. Thanks for the help
For model number mde6200ayw
Hello Daniel, thank you for contacting us. This sounds like a faulty Drive Motor, part number PS3500892 for your model. You may also want to consider the Door Switch part number PS1964648. I hope this helps and good luck with your repair!
Was this helpful?
Thank you for voting!
Joseph
May 11, 2023
is there a video on how to replace the timer?
For model number mdg6200aww
Hi Joseph, thank you for reaching out. We do not have a replacement video, but we can give instructions to assist you. Follow the following instructions to replace the timer:
1. Shut off the power supply to the appliance.
2. Take a quarter-inch nut driver to remove the two lower screws at the back of the access panel.
3. Take a Phillips screwdriver to remove the remaining screw from the access panel.
4. After removing the access panel, pull the timer knob off.
5. Using a quarter-inch nut driver, remove the screws holding the timer to the panel.
6. Get access to the timer and remove all the wires connected to it. Before removing it, we suggest you take a picture of the timer and remember the color code of the wire to easily reinstall it.
7. Attach the wires of the timer back to their positions and install the access panel back in its required position.
We hope this information helps!
Was this helpful?
Thank you for voting!
< Prev
1
Next >
Customer Repair Stories
Average Repair Rating: 3.2 / 5.0, 2 reviews.
What's this?
< Prev
1
Next >
Sort by:
Search filter:
Clear Filter
Your search term must have 3 or more characters.
Keep searches simple. Use keywords, e.g. "leaking", "pump", "broken" or "fit".
Sorry, we couldn't find any existing installation instruction that matched.
Timer stopped working
Unplugged dryer. Removed front control knob and removed two bolts behind it using 1/4" nutdriver. Unscrewed three phillips screws along top of control panel. Using slight shaking motion to release tabs, removed control panel from top/back of dryer and pulled forward. Using needle-nose pliers as necessary, removed electrical lines from old timer and inserted them onto corresponding tabs on new timer. These are color-coded, but I found it just as easy to move each line from one timer to the other in order as I removed them. Used nutdriver to attach new timer to control panel. Reattached control panel to top/back of dryer and reassembled housing using the phillips screws. Reattached control knob. Plugged in dryer. Took me 35 minutes -- I am a 70-year old woman who has never done a repair like this before!
Sandra from CHANDLER, AZ
Difficulty Level:
Easy
Total Repair Time:
30 - 60 mins
Tools:
Nutdriver, Pliers, Screw drivers
3 of 3 peoplefound this instruction helpful.
Was this instruction helpful to you?
Thank you for voting!
dryer did not shut off no heat
took control pannel apart removed timer took new timer and replaced wire for wire the mounted new timer . removed old buzzer and replced wire for wire then mounted new buzzer screw was just in case I lost or stripped old one not needed . reassembled control pannel ,tested and found I needed more parts no heat so I opened the bottom and I ordered Igniter, sensor ,and thermostat and new coil kit . now i have heat but thermostat is back ordered timer works but not on regular auto dry but I do have heat ?? it has to be thermostat . now all the repair was relitivly easy but you had to watch and be carefull of what you were doing . when thermostat comes in I hope that will solve all the problems if not
With the Fix app, you can quickly and easily find information on your appliance, along with videos and articles to help you fix it.
"Like magic. I took a picture of the model number on my refrigerator, and the app identified it right away … Very convenient. I'm impressed." ★★★★★ - Clever Jeff
★★★★★
You added 1 item to your cart
✖
$
Qty:
Total item(s) in cart:
Order Subtotal
$
*Taxes and shipping will be applied during checkout