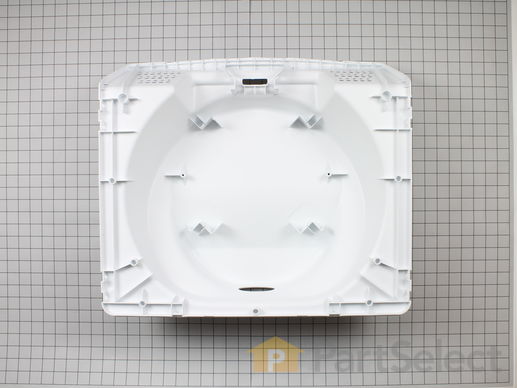
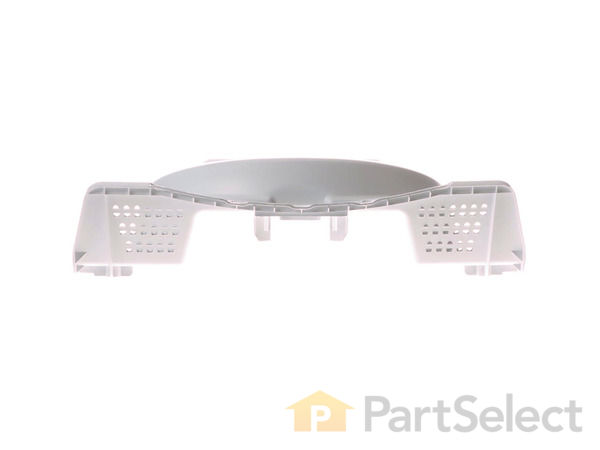
Inner Door - white
Fits your MAH5500BWW!
$
92.83
Special Order
Get this part fast! Average delivery time for in-stock parts via standard shipping: 1.8 days.
Fits your MAH5500BWW!
PartSelect Number PS11739424
Manufacturer Part Number WP22003275
Manufactured by
Whirlpool

Check if this fits your product and find model diagrams
Need help finding your model number?
Product Description
Inner Door - white Specifications
This inner door assembly is twenty-two inches long. It is all white in color and is made of plastic.

How Buying OEM Parts Can Save You Time and Money
Troubleshooting
This part fixes the following symptoms:
Leaking | Lid or door won’t close
This part works with the following products:
Washer.
This part works with the following products:
Maytag, Crosley.
Part# WP22003275 replaces these:
AP6006351, 22003275
Questions and Answers
Ask our experts a question about this part and we'll get back to you as soon as possible!
- < Prev
- 1
- Next >
Sort by:
Search filter:
Clear Filter
Your search term must have 3 or more characters.
Keep searches simple. Use keywords, e.g. "leaking", "pump", "broken" or "fit".
Sorry, we couldn't find any existing answers that matched.Try using some different or simpler keywords, or submit your new question by using the "Ask a Question" button above!
George
September 26, 2017
Want to replace rubber gasket inside door . I will need part and part number also instructions. Model # mah5500bww. Serial # b5785690ge
For model number MAH5500BWW

Hello,
Thank you for contacting us. I have researched the model you have provided and have found the part you’re looking for is the Bellow, PartSelect Number PS2003890.Here is a link to the video on how to install this gasket.https://www.youtube.com/watch?v=3c7vQvxw0OE
Hope this helps!

5 people found this helpful.
Was this helpful?
Thank you for voting!
Related Parts:
- < Prev
- 1
- Next >
✖
Ask a Question
Ask our experts a question on this part and we'll respond as soon as we can.
Something went wrong. Please try again later.
Your Question Has Been Submitted!
Our experts will send you an email as soon as your question has been answered.
Part Videos
Replacing your Maytag Washer Inner Door - white

Customer Repair Stories
Average Repair Rating: 4.0 / 5.0, 12 reviews.
What's this?
- < Prev
- 1
- 2
- Next >
Sort by:
Search filter:
Clear Filter
Your search term must have 3 or more characters.
Keep searches simple. Use keywords, e.g. "leaking", "pump", "broken" or "fit".
Sorry, we couldn't find any existing installation instruction that matched.
inner door was dammaged when i washed my sons football- ribpads.
i removed the door,placed it on the kitchen tabel and removed 8 screws that hold the innerpart to the outer part and exchanged parts . there was a spring and a vent piece that snap on and off too. then i reinstalled the door and ran a load to check for leaks and there were none it was very easy but the best part of the repair was that i ordered the part on saturday nite and recieved it on monday , part select .com i thank you for your excellent service.......
-
enrique from crest hill, IL
-
Difficulty Level:Really Easy
-
Total Repair Time:15 - 30 mins
-
Tools:Pliers, Screw drivers
22 of 23 people
found this instruction helpful.
Was this instruction helpful to you?
Thank you for voting!
Water leaking down the front of the washer
The inner door panel was damaged by something getting caught in between it and the tub wearing a hole in the plastic.
Remove door hinges.
Remove screws on sides(2 on each hinge)and 4 on otherside and 2 on bottom.
Pull inner door panel (plastic) out.
Remove doorlatch by flipping up center tab and squeezing sides together.
Remove metal tabs by tilting up the backside and tilting down the front (screw hole side) and pulling through the back.
Reverse for reassembly - relatively easy.
-
David from Gibsonia, PA
-
Difficulty Level:Easy
-
Total Repair Time:15 - 30 mins
-
Tools:Pliers, Screw drivers
15 of 16 people
found this instruction helpful.
Was this instruction helpful to you?
Thank you for voting!
Door boot tear and softener quick working
The boot tear looked the easiest but turned out to be the toughest.
After removing the door 2 screws, and finding the opposing two screws I removed the face panel.
Removed the two screws located under the face panel directly under the washer top surface. This allows access to the top of the washer. A wire clamp held with a spring holds the boot in place. Remove the spring or roll it over the edge of the front of the washer tub. Two screws hold the sub-face panel onto the carcass of the washer. remove these. The boot comes out easily. Follow the reverse to reinstall. This may sound easy..its not! The problem lies in the wire and spring arrangement. You must hold both ends of the cable in place near the washer drum taughtly but not too tight or the pressure will cause the boot to edge over the washer tub. It became so bad I consulted a Maytag repair guy. He said we use two pair of needle nosed pliers. Tried that caused banged up knuckles and lots of bad words. I made a tool that operates like a pair of scissors holding the wire on one side and the spring on the other. If you are interested you can track me down and I will tell you how. The softener still doesn't work. Drat. I will have to replace the computer next. OUCH
Other Parts Used:
-
Harry from Potosi, MO
-
Difficulty Level:Easy
-
Total Repair Time:30 - 60 mins
-
Tools:Nutdriver, Pliers, Screw drivers, Socket set, Wrench (Adjustable), Wrench set
9 of 13 people
found this instruction helpful.
Was this instruction helpful to you?
Thank you for voting!
An object had gotten wedged between the inner door and the spinning drum causing the grommet to wear down while spinning and the inner door to crack allowing water to trickle down the front of the washer. (word to the wise-never put a hard athletic support cup into a front loading washer)
I ordered the grommet and inner door on a Tuesday and had both parts at my door step the following day. Including shipping it was only $64.00. With only a screwdriver in hand and 45 minutes of time I removed four screws to take the entire door off. I then removed the inner door and vent tube and grommet (very easy). After placing the new grommet into the new inner door I inserted the vent tube and screwed everything back together.
The repair man would have charged $90 for the labor and the parts which he would have had to order would have been extra.
Other Parts Used:
-
Anna from Gibbstown, NJ
-
Difficulty Level:Really Easy
-
Total Repair Time:30 - 60 mins
-
Tools:Screw drivers
7 of 8 people
found this instruction helpful.
Was this instruction helpful to you?
Thank you for voting!
The inner door was dammage with a hole so we needed a new inner door.
Remove the ten screws to the inner door to remove it. There are components in the inner door that we didn't think would be there. Take out the components on the inside of the inner door. The areas where the ten screws go in have the small metal plates that we needed to be transferred to the new inner door. Otherwise the screws will not fit. It flips out. That's the part that took us a while to figure out but it came out easily. The other parts snaps on and off after the two screws are removed.
Just remember what you removed and where it should go. It takes two people to do the work.
-
Trang-Dai from Houston, TX
-
Difficulty Level:Easy
-
Total Repair Time:30 - 60 mins
-
Tools:Screw drivers
5 of 6 people
found this instruction helpful.
Was this instruction helpful to you?
Thank you for voting!
Washing large object broke inner door
First I removed all the screws, which removed the door. Once the door was off, was able to de-install all the parts of the old door and install on the new door. The engineers that design this, made it to be able to replace easily. Inner door part was replaced in less than 30 mins. The most amazing part was I order the part on Monday and the door was fix on Tuesday before 2:00. I was amazed. Thanks
-
Scott from Allen, TX
-
Difficulty Level:Really Easy
-
Total Repair Time:15 - 30 mins
-
Tools:Screw drivers
3 of 3 people
found this instruction helpful.
Was this instruction helpful to you?
Thank you for voting!
Inner door skin worn from carpet backing rubbing in spin cycle.
Ordered part from PARTSELECT.COM, super fast shipping, next day actually, via fed ex. Part was exact replacement with no surprises. Swapped out internal parts snapped door lid cover in and was doing a wash in 15 minutes start to finish.
-
Richard from Seminole, FL
-
Difficulty Level:Really Easy
-
Total Repair Time:Less than 15 mins
-
Tools:Screw drivers
3 of 3 people
found this instruction helpful.
Was this instruction helpful to you?
Thank you for voting!
the inner door was leaking
First I remove the 2 screws that hold the door on then put it on the table on a towel not to scratch the door and unscrewed the inner door and changed it out easy stuff.
-
William from Downers Grove, IL
-
Difficulty Level:Really Easy
-
Total Repair Time:15 - 30 mins
-
Tools:Screw drivers
3 of 4 people
found this instruction helpful.
Was this instruction helpful to you?
Thank you for voting!
Water leak on bottom outer door
Removed outer door and positioned it on counter next to new part.
Transitioned each part element from from one to the other.
Finally re-install door back in place..........
Transitioned each part element from from one to the other.
Finally re-install door back in place..........
-
CHRIS from STERLING HEIGHTS, MI
-
Difficulty Level:Easy
-
Total Repair Time:30 - 60 mins
-
Tools:Pliers, Screw drivers, Wrench set
3 of 5 people
found this instruction helpful.
Was this instruction helpful to you?
Thank you for voting!
Door shroud had cracks and was leaking water
Removed and replaced old shroud with new one. Works great.
-
BENNIE from FT WALTON BCH, FL
-
Difficulty Level:Really Easy
-
Total Repair Time:15 - 30 mins
-
Tools:Screw drivers
2 of 3 people
found this instruction helpful.
Was this instruction helpful to you?
Thank you for voting!
- < Prev
- 1
- 2
- Next >
Customer Reviews
Filter By Rating:
- < Prev
- 1
- Next >
Sort by:
Search filter:
Clear Filter
Your search term must have 3 or more characters.
Keep searches simple. Use keywords, e.g. "leaking", "pump", "broken" or "fit".
Sorry, we couldn't find any existing reviews that matched. Try using some different or simpler keywords.
Terry R - September 7, 2021
Verified Purchase
It was the Right Part
It was brand new and easy to R&R and works well with the washer!!!
James R - October 4, 2020
Verified Purchase
New Inner washer door panel
I bought a washing machine inner door panel from this company for the first time. The price was less then original manufacturer. It arrived promptly and had a simple to replace video. I would buy from this company again .
Janet G - July 31, 2019
Verified Purchase
Easy Repair - fixed in minutes
the part worked like promised. repaired in minutes and back to washing dirty clothes. thank you
Jeffrey A T - May 7, 2019
Verified Purchase
Dryer inner door replacement, easy repair
First part arrived damaged but was quickly replaced. Once recieved, it is simple fit and easy installation. 15 min including removal of the door from the dryer. Then a side by side transfer of the lock, vent tube and door inserts.
Jack C - December 9, 2018
Verified Purchase
It shipped fast and was a perfect match
Used utube tutorial to install
Portia N - August 4, 2018
Verified Purchase
Fit perfectly!
The part was exactly what I needed and found a YouTube video that walked me through exactly how to install it! Perfect!
Ryan A - July 29, 2018
Verified Purchase
Maytag Interior door
Easy to install, and fixed our problem!
William S - July 1, 2018
Verified Purchase
Easy Fix
Part came as promised, nothing special. It fit perfectly, and washing machine is all fixed. I ordered on a Thursday and received following Friday, 1 week later.
- < Prev
- 1
- Next >
Model Cross Reference
This part works with the following models:
PartSelect Number: PS11739424
Manufacturer Part Number: WP22003275
Brand
Model Number
Description