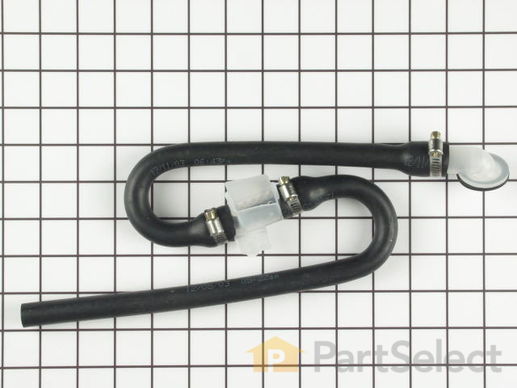
Injector Hose with Air Gap WP206680
$
62.80
In Stock
Get this part fast! Average delivery time for in-stock parts via standard shipping: 1.8 days.
PartSelect Number PS11738785
Manufacturer Part Number WP206680
Manufactured by
Whirlpool

Check if this fits your product and find model diagrams
Need help finding your model number?
Product Description
Injector Hose with Air Gap Specifications
This kit contains a top mounting style injector sleeve. It comes with an air gap as well. This part helps stop the contaminated water from being drawn back into the main water line.

How Buying OEM Parts Can Save You Time and Money
Part Videos
Replacing your Maytag Washer Injector Hose with Air Gap

Troubleshooting
This part fixes the following symptoms:
Leaking
This part works with the following products:
Washer.
This part works with the following products:
Maytag.
Part# WP206680 replaces these:
AP6005726, 2-6680, 2-6683, 206680, 206683
Customer Reviews
Filter By Rating:
- < Prev
- 1
- 2
- Next >
Sort by:
Search filter:
Clear Filter
Your search term must have 3 or more characters.
Keep searches simple. Use keywords, e.g. "leaking", "pump", "broken" or "fit".
Sorry, we couldn't find any existing reviews that matched. Try using some different or simpler keywords.
Kimberly G - 18 days ago
Verified Purchase
Parts being available are key
We have an old Maytag. No computer chip! We will keep replacing parts and having parts available is so awesome, because what a waste to throw away a perfectly good washing machine that cleans clothes just fine and keeps on going with replacing a part here and there. Thanks for making parts available at a decent and fair price.
Mike N - September 7, 2018
Verified Purchase
Easy repair
The part worked as expected. However,disappointed I had to pay extra to receive it in a reasonable time
Caroline U - August 30, 2018
Verified Purchase
Replace injector hose
It worked.
Thomas M - August 11, 2018
Verified Purchase
easy job
part was brand new and fixed my problem with no fuss
Robert T - July 21, 2018
Verified Purchase
Easy repair. Fast delivery. Gteat service!
The part fit perfect! Easy installation!! Back in business!! Thanks!!
Kelly G - July 18, 2018
Verified Purchase
Easy installation
Easy installation. Prompt service
C H T - July 11, 2018
Verified Purchase
Easy repair
Repair went well. It was the exact part which made installation easy. Also thanks for the helpful video about the repair.
Jack C - May 29, 2018
Verified Purchase
Easy repair.
Part came fast. Small modification to make it work with our washer. Video was excellent.
Wayne B - May 23, 2018
Verified Purchase
the part was easy to install.
The part slipped right in and fixedmy problem. Next time when the Maytad breaks I will know where to get the correct part the first time
Thomas M - May 23, 2018
Verified Purchase
a lot cheaper than calling appliance repair
the video helped as my set up was different but the part worked
- < Prev
- 1
- 2
- Next >
Customer Repair Stories
Average Repair Rating: 3.9 / 5.0, 17 reviews.
What's this?
- < Prev
- 1
- 2
- Next >
Sort by:
Search filter:
Clear Filter
Your search term must have 3 or more characters.
Keep searches simple. Use keywords, e.g. "leaking", "pump", "broken" or "fit".
Sorry, we couldn't find any existing installation instruction that matched.
Washing machine was leaking water from the top area
Took off the bad part and replaced it with the new one. The instructions was easy to follow.
-
Paul from GRENOLA, KS
-
Difficulty Level:Very Easy
-
Total Repair Time:30 - 60 mins
-
Tools:Pliers, Screw drivers, Socket set
1 person
found this instruction helpful.
Was this instruction helpful to you?
Thank you for voting!
Intermittent water leak at the air gap when filling.
First time this part was replaced on our 30+ year old Maytag washer. Remove the front panel by removing the two screws near the bottom and swinging the panel out and away from the machine. There are two metal spring-type clips that hold the top of the panel to the top (lid panel) of the washer. Remove two sheet metal screws holding the lid panel to the side panels at the front of the machine. Lid panel is hinged at the back. Lift and swing the lid panel up and against the wall so it does not swing completely backwards. Remove the Injector hose from the top of the tub by turning about a quarter turn and lifting away. Loosen the clamp holding the other end of the hose to the inlet valve at the back of the machine. Remove the old injector hose by pulling it free of the intake valve. Save the clamp to use on the new injector hose. Finally, remove the screw at the air gap to free the old injector hose. Reverse the steps to install the new hose. It is important that the plastic box on top of the air gap faces upward. On my machine the hose clamp screw heads interfered with the side of the machine preventing proper orientation of the air gap. If so, loosen the clamps and rotate them out of the way and re-tighten.
-
Mike from GARRETTSVILLE, OH
-
Difficulty Level:Really Easy
-
Total Repair Time:15 - 30 mins
-
Tools:Screw drivers, Socket set
1 person
found this instruction helpful.
Was this instruction helpful to you?
Thank you for voting!
Washing Machine was leakinc
Replace part, Cant remember name of part. But the provided video clip was easy to follow and explained in easy terms what to do
-
Peter from ROCKVILLE, MD
-
Difficulty Level:Really Easy
-
Total Repair Time:15 - 30 mins
-
Tools:Nutdriver, Pliers, Screw drivers
1 person
found this instruction helpful.
Was this instruction helpful to you?
Thank you for voting!
water was leaking from injector hose
Took old injector hose off, put new hose clamp on lower hose, was a little awkward tightening it, not much room, but took my time, really was not that hard to do, water sprays in tub much faster now, I have had washing machine 28 years, first major repair
Other Parts Used:
-
Stephen from NEW CUMBERLND, PA
-
Difficulty Level:Really Easy
-
Total Repair Time:30 - 60 mins
-
Tools:Pliers, Socket set
2 of 11 people
found this instruction helpful.
Was this instruction helpful to you?
Thank you for voting!
Leaking air gap tube within water injector hose - replace entire injector hose kit
This is for replacement of the complete injector hose kit, item number PS11738785. (1) Run spin cycle to drain any water from the tub. (2) Unplug machine and pull out from wall about 6". It is not necessary to disconnect supply or drain hoses from the wall. (3) Remove two screws at bottom of front panel, swing panel out until it comes loose at the top; set aside. (4)Disconnect the top end of the fabric softener tube from the filler port in the lid. If you let this drop, a small amount of water may drain out. (5) Remove two screws inside the top front corners holding the top to the sides. Raise the top panel on its rear hinges; it will lean back out of the way and remain attached. You can now see the s-shaped injector hose that connects the water valve to the top of the tub, with a small clear plastic box in the middle that contains the air gap tube. You may be able to replace just the small air gap tube inside that box, about 3" long, by disconnecting the front section of the hose from the plastic box - I've done that successfully several times before, but this time the upstream hose was eroded inside and still allowed leakage after replacing the air gap tube, so I ordered and replaced the whole injector hose kit. (7) Remove one screw attaching the plastic box to the side panel. (8) Disconnect the upstream end of the hose from the valve body. You may need to replace the hose clamp there, which doesn't come with the kit. (9) The downstream end of the hose is held in the top rim of the tub by a plastic end fitting; turn the entire hose assembly clockwise - toward your right - about 90 degrees, and lift it out of the hole, and discard. (10) Reverse that step with the new hose; push the fitting down into the hole [it only fits one way, like a car's radiator cap] and rotate the assembly counter-clockwise. (11) Clamp the upstream end of the hose to the valve body, do not over-tighten and cut the hose. (12) Fasten the plastic box to the top of the side panel with the screw from step 7. (13) Lower the top panel into place and reattach the fabric softener hose to the filler port. (14) Plug in and run a brief fill cycle to test for leaks. If OK, run spin cycle to dump water and reduce weight of machine. (15) Reattach top panel at top two corners. (16) Reinstall front panel; holding the bottom out at a 45 degree angle, slide the top brackets under the front edge of the top panel, swing down, reinstall two screws at the bottom corners.
-
Doug from PERRY, KS
-
Difficulty Level:Easy
-
Total Repair Time:30 - 60 mins
-
Tools:Nutdriver, Pliers, Screw drivers
6 of 6 people
found this instruction helpful.
Was this instruction helpful to you?
Thank you for voting!
Hose were old and worn. water was leaking threw.
Instead of replacing one damage hose, i decided to replace the whole piece. the second hose was old and i figure ill just take care of one problem now and prevent a future problem. it was as simple and quick, save me some money from hiring a repair man. it was also a learning experience.
-
carlos from norwalk, CA
-
Difficulty Level:Really Easy
-
Total Repair Time:15 - 30 mins
-
Tools:Pliers, Screw drivers, Socket set
3 of 4 people
found this instruction helpful.
Was this instruction helpful to you?
Thank you for voting!
Air injector nozzle leaking
Watched your repair video.Then removed front panel. Removed nuts that retain top cover. Opened top and replaced hose.
-
Brian from Hope Valley, RI
-
Difficulty Level:Easy
-
Total Repair Time:Less than 15 mins
-
Tools:Nutdriver, Screw drivers, Socket set
1 of 2 people
found this instruction helpful.
Was this instruction helpful to you?
Thank you for voting!
Water would drip from the upper left corner when filling
After reading about previous repairs on PartSelect, I figured there was a small hole in the Injector Hose. Ordering online was simple. It took three days to arrive since we really live in the boonies. It was easy to take the defective part off and put the new hose on. Except when the washer began to load, water sprayed everywhere! Huh? I took apart the Air Gap and determined that the one-way valve was put in on the wrong side of the apparatus. It was easy to put it back together right, however, and it worked fine thereafter. Seemed to have been a QC problem when they were assembled. It is working properly now.
-
Jim from Drummond, WI
-
Difficulty Level:Really Easy
-
Total Repair Time:15 - 30 mins
-
Tools:Nutdriver, Pliers
5 of 7 people
found this instruction helpful.
Was this instruction helpful to you?
Thank you for voting!
Water leaking from bottom of machine
I had trouble initially because I could see that the inside of the machine was wet but could not get it to leak while I was watching. Finally while the machine was filling I put my hand over the fill opening in the tub and then I got plenty of water coming from the air gap in the injector hose. When I dismantled the injector hose and air gap, I could see that the rubber injector vale was bad. I orgered both a rubber injector and injector hose with air gap. I did this because I couldn't determine if the assembly came with the injector valve. It did so I returned the injector valve.
A word of caution. When I started filling the machine water gushed out the air gap. With a little experimenting with the air gap and injector valve, I determined the rubber injector valve was in backward. After reversing the vale, everything worked fine. This was a sealed package so I would have to say this came from the manufacturer wrong.
-
GARY from ILLIOPOLIS, IL
-
Difficulty Level:Really Easy
-
Total Repair Time:15 - 30 mins
-
Tools:Nutdriver
21 of 22 people
found this instruction helpful.
Was this instruction helpful to you?
Thank you for voting!
Water leak from the top of the washing machine.
1. Unplug machine.
2. Removed front cover,(2 screws).
3. Removed top cover,(2 screws).
4. Remove hose at top (twist lock), loosen clap holding hose at bottom.
5. Reverse procedure, attach clamp at bottom, attach hose at top(twist lock).
6. Plug in machine, turn on (fill), check for leaks.
7. Re-attach top
8. Re-attach front.
-
Dan from Houston, TX
-
Difficulty Level:Really Easy
-
Total Repair Time:15 - 30 mins
-
Tools:Pliers, Screw drivers, Socket set
4 of 5 people
found this instruction helpful.
Was this instruction helpful to you?
Thank you for voting!
- < Prev
- 1
- 2
- Next >
Questions and Answers
Ask our experts a question about this part and we'll get back to you as soon as possible!
- < Prev
- 1
- Next >
Sort by:
Search filter:
Clear Filter
Your search term must have 3 or more characters.
Keep searches simple. Use keywords, e.g. "leaking", "pump", "broken" or "fit".
Sorry, we couldn't find any existing answers that matched.Try using some different or simpler keywords, or submit your new question by using the "Ask a Question" button above!
Ralph Ormsbee
December 12, 2018
What makes this back up and over flow
For model number A105
Hello Ralph, Thank you for the question. In most cases it becomes clogged by debris. I suggest removing it and cleaning it out. Thank you for your inquiry, good luck with this repair!
6 people found this helpful.
Was this helpful?
Thank you for voting!
WIL
November 22, 2019
I bought injector valve housing, the siphon break connector & rubber injector valve, yet when replacing these parts i did use the new plastic siphon injector valve gage/ housing because the plastic ribbed section of old one was broken & i feared it was the cause of the old rubber injector valve to split - could that be the cause of random intermittent leaking at this spot?If yes, what is suggested fix?
the machine also seems to be leaking elsewhere...??
where would you suggest looking? - any troubleshooting info you might share is very appreciated!
i thank you in advance for sharing your knowledge.
For model number LA506
Hello Wil, thank you for inquiring. You will want to replace the Injector Tube Seal, part number PS11738906 for your washer. You may also want to consider the Plastic Injector Nozzle, part number PS11738878, and the Injector Tube, part number PS11738907. Good luck with your repair!
1 person found this helpful.
Was this helpful?
Thank you for voting!
Dana
July 30, 2021
Will your injector hose with air gap work on my washer?
For model number Maytag 9200
Hello Dana, Thank you for your inquiry. We have researched your model and confirm that this is the complete kit available for the injector hoses. Good luck with your repair.
1 person found this helpful.
Was this helpful?
Thank you for voting!
Related Parts:
- < Prev
- 1
- Next >
✖
Ask a Question
Ask our experts a question on this part and we'll respond as soon as we can.
Something went wrong. Please try again later.
Your Question Has Been Submitted!
Our experts will send you an email as soon as your question has been answered.
Model Cross Reference
This part works with the following models:
PartSelect Number: PS11738785
Manufacturer Part Number: WP206680
Brand
Model Number
Description