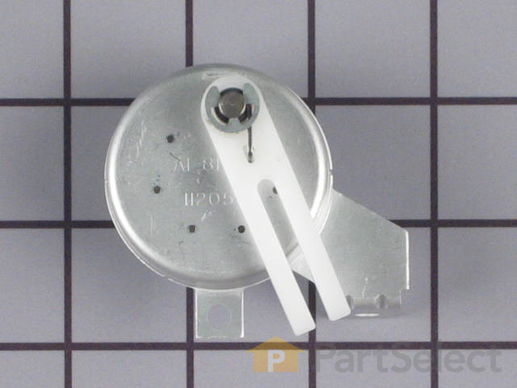
Part Location Diagram of WP1120581 Whirlpool Ice Door Mechanism
See part 12 in the diagram
( Grid squares measure 1x1 inch )
Customer Service Representative

Get in touch, we're here to help!

Daily 8am - 9pm EST

customerservice@partselect.com

Ice Door Mechanism WP1120581

 Fits your 4KSRS22QAW00 Refrigerator!
★★★★★
★★★★★
1 Review

Rated by 3 customers 

Easy 

15 - 30 mins 

Ratings submitted by customers like you who bought this part.

$ 117.84
  In Stock

Get this part fast! Average delivery time for in-stock parts via standard shipping: 1.8 days.

 Fits your 4KSRS22QAW00 Refrigerator!
PartSelect Number PS11738300
Manufacturer Part Number WP1120581
Manufactured by Whirlpool
Troubleshooting
This part works with the following products:
Refrigerator.
This part works with the following products:
Whirlpool, Kenmore, KitchenAid, Roper.
Part# WP1120581 replaces these:
1120581, 2157408, 938665, 983665
Back to Top
Customer Reviews
Average Rating:
★★★★★
★★★★★
1 Review
4.0
Filter By Rating:
  • 5 Stars
    0
  • 4 Stars
    1
  • 3 Stars
    0
  • 2 Stars
    0
  • 1 Star
    0
Sort by:
  • 1
Sorry, we couldn't find any existing reviews that matched. Try using some different or simpler keywords.
  • 1
Customer Repair Stories
 Average Repair Rating: 4.2 / 5.0, 3 reviews. What's this?
Sort by:
  • 1
Sorry, we couldn't find any existing installation instruction that matched.
Ice flap door closing mechanism very slow and noisy
Unplug refrigerator. 1. Using a thin screwdriver, slowly and carefully pry the front panel off that is around the ice and water dispensers starting at the bottom. Once the bottom side has been popped off, carefully lift up on the panel until the top tabs pop loose. 2. Remove the next panel (5 screws) which holds the light and two switches with a screwdriver or nut driver. I then taped it over to the side onto the freezer handle to keep it out of the way. I preferred not to unplug anything. 3. Remove the door mechanism with a nut driver. The same screw holds the water spout and door mechanism together. 4. Reverse the steps and you're done! I now have a silent ice door.
  • Diane from SAN ANTONIO, TX
  • Difficulty Level:
    Really Easy
  • Total Repair Time:
    15 - 30 mins
  • Tools:
    Nutdriver, Screw drivers
3 of 3 people found this instruction helpful.
Was this instruction helpful to you?
Thank you for voting!
Ice Maker Replacement
I have removed the exsisting Ice maker with just a not driver for a tool. I had loosened the two top mount scews and removed the lower mount screw with a 11/32 nut driver (Yellow Handle) and removed the ice maker cradle assembly mount holes out of the exsisting mount clips. The new Ice Maker had come with extension cables and lever arms of differnt type. I used the exsisting lever arm from my ice maker. I also snapped in place my original cover onto the ice maker. Parts were correct match to a T. Reversed the order of removal and within 15 mins I had Ice. Great work Guys! Sincerely, Kurt Wilson Magnolia TX.
Other Parts Used:
Dispenser Overflow Grille - Black Only Replacement Ice Maker Ice Door Mechanism
  • Kurt from Magnolia, TX
  • Difficulty Level:
    Really Easy
  • Total Repair Time:
    Less than 15 mins
  • Tools:
    Nutdriver
1 of 4 people found this instruction helpful.
Was this instruction helpful to you?
Thank you for voting!
Ice Dispenser flap would not close-delay mechanism quit working
The hardest part of this job was removing the front cover over the water and ice dispensing unit.

Step 1: remove front cover by inserting flat head screwdriver into one of small slots on the bottom side of the cover. Push up firmly, but not too hard (don't beak the plastic cover). As you are pushing up, slightly pry the bottom edge away from refrigerator door. Then, do the same for the other side.
Step 2: Now with both edges slghtly pried away for door, you will now need to use your hands and apply an upward pressure on the cover. (Understand that there are three tabs on the top side of the cover that must come about 1/4" out of slots on the top side of the door.) Try wiggling the cover, while applying upward pressure. You may find the door handle restricting one of the tabs, but you can slide the cover to the side to get it out.
Step 3: with the cover removed, now you can use the nut driver to remove the one (1) screw that holds the mechanism in place. Be sure to see how it fits over the dispensing lever.

Step 4: Install the new delay mechanism by inserting the prong over the dispensing lever and seat into place. Insert screw and tighten.
Step 5: ensure that you installed the device properly by actuating the ice dispenser. If everything is OK, proceed to next step. If not, make sure you installed it correctly.
Step 6: Reinstall front cover by insering the three upper tabs into slots at the top of the dispensing area. Apply downward pressure with your hands, then push the bottom side of the cover in. You should hear them snap into place.
Step 7: Dispense ice into a glass, add water, and enjoy your finsihed project
  • Alex from Columbiana, OH
  • Difficulty Level:
    A Bit Difficult
  • Total Repair Time:
    15 - 30 mins
  • Tools:
    Nutdriver, Screw drivers
11 of 11 people found this instruction helpful.
Was this instruction helpful to you?
Thank you for voting!
  • 1
Questions and Answers

Ask our experts a question about this part and we'll get back to you as soon as possible!

1 question answered by our experts.
Sort by:
  • 1
Sorry, we couldn't find any existing answers that matched.Try using some different or simpler keywords, or submit your new question by using the "Ask a Question" button above!
Mike
January 22, 2018
Frost builds up rapidly around ice dispenser. I suspected flapper return spring, part #24, and found it takes up to a minute for flapper to close after use. Should that provide a faster and stronger return? If so, it seems i should replace that part. What do you think? Thank you.
For model number KSSS48DB
PartSelect logo
Hi Mike, Thank you for your question. That would be a fair assumption. The spring is one of the first parts to wear down over time. Unfortunately we would not know how fast the spring back is supposed to be for your door. I hope that helps. Good luck with your repair.

1 person found this helpful.

Was this helpful?
Thank you for voting!
  • 1
Model Cross Reference
This part works with the following models:
PartSelect Number: PS11738300
Manufacturer Part Number: WP1120581
Brand
Model Number
Description
Kenmore
1068516914
Refrigerator
Kenmore
10685282780
Refrigerator - Kenmore Refrigerator Model 106.85282780 (10685282780, 106 85282780) Parts
Kenmore
1068532810
Refrigerator
Kenmore
1068532811
Refrigerator
Kenmore
1068532812
Refrigerator
Kenmore
1068532820
Refrigerator
Kenmore
1068532821
Refrigerator
Kenmore
1068532822
Refrigerator
Kenmore
1068532840
Refrigerator
Kenmore
1068532841
Refrigerator
Kenmore
1068532842
Refrigerator
Kenmore
1068532860
Refrigerator
Kenmore
1068532861
Refrigerator
Kenmore
1068532862
Refrigerator
Kenmore
1068532880
Refrigerator
Kenmore
1068532881
Refrigerator
Kenmore
1068532882
Refrigerator
Kenmore
1068536182
Refrigerator
Kenmore
1068536710
Refrigerator
Kenmore
1068536711
Refrigerator
Kenmore
1068536712
Refrigerator
Kenmore
1068536720
Refrigerator
Kenmore
1068536721
Refrigerator
Kenmore
1068536722
Refrigerator
Kenmore
1068536730
Refrigerator
Kenmore
1068536731
Refrigerator
Kenmore
1068536732
Refrigerator
Kenmore
1068536760
Refrigerator
Kenmore
1068536761
Refrigerator
Kenmore
1068536762
Refrigerator
Customer Service Representative

Get in touch, we're here to help!

Daily 8am - 9pm EST

Contact Customer Service