


Models
>
TAA600 P75751-1W
TAA600 P75751-1W Amana Washer - Overview
Sections of the TAA600 P75751-1W
[Viewing 1 of 1]
Keep searches simple, eg. "belt" or "pump".

Screw, 8/18 x 3/8
PartSelect #: PS11746840
Manufacturer #: WP90767
This screw is sold individually.
$5.42
In Stock

Hose Clamp
PartSelect #: PS11743008
Manufacturer #: WP596669
This hose clamp is used in a wide variety of household appliances. Most often it is found in washers, dishwashers, refrigerators, freezers, dehumidifiers, garbage disposals, or air conditioners. This ...
$11.80
In Stock

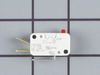
Lid Check Switch
PartSelect #: PS11738787
Manufacturer #: WP207166
This lid switch check is used in washers to detect if the washer lid is open or closed. This prevents a cycle from spinning when the lid is still open and is also used to start your washer once a cert...
$48.41
In Stock

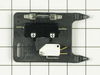
Lid Switch Assembly
PartSelect #: PS11739302
Manufacturer #: WP22001682
This black lid switch assembly comes complete with a bracket, two switches, and a fuse. An open fuse might indicate that the lid switch is bad. The point of the lid switch is for the tub to stop spin...
$42.42
In Stock

Adjustable Leveling Leg
PartSelect #: PS2021026
Manufacturer #: 22003428
If your washer shakes or vibrates loudly when it reaches its max speed, make sure the 4 levelling legs are even. Adjust the legs so that the machine is level, and tighten the locking nuts on the legs ...
$18.47
In Stock

Spring Retaining Clip
PartSelect #: PS11739294
Manufacturer #: WP22001650
This spring retaining clip is just under 1 inch long. The clip is made entirely of metal and is attached to the back wall of the washer, under the console. If your washer is vibrating and louder than ...
$11.10
In Stock

Hose Clamp
PartSelect #: PS11740613
Manufacturer #: WP285655
The hose clamp is used to hold the water hose in place which will prevent the hose from leaking water. Sometimes the clamp may lose its ability to latch on, causing a leaking washer. For the installat...
$11.10
In Stock


Inlet Hose - 5 FT
PartSelect #: PS11746820
Manufacturer #: WP89503
This hose can handle hot or cold water and is five feet long.
$21.53
In Stock

Inlet Hose Washer
PartSelect #: PS11757437
Manufacturer #: WPY013783
This inlet hose washer, also known as a high pressure inlet hose washer, is used in washing machines, refrigerators, freezers, and dishwashers. The function of this part is to create a watertight seal...
$8.00
In Stock

Screw, 8-18 x 1/2
PartSelect #: PS11741443
Manufacturer #: WP3390631
This screw is sold individually.
$7.84
In Stock

Main Tub Bearing Assembly
PartSelect #: PS11742242
Manufacturer #: WP40004201P
This triangular main tub bearing assembly is five inches long. It is made of metal.
$75.63
In Stock
Questions And Answers for TAA600 P75751-1W
We're sorry, but our Q&A experts are temporarily unavailable.
Please check back later if you still haven't found the answer you need.
Common Symptoms of the TAA600 P75751-1W
[Viewing 4 of 4]Will Not Start
Fixed by
these parts
these parts
Show All
Leaking
Fixed by
these parts
these parts


Show All
Will not agitate
Fixed by
these parts
these parts
Show All
Will not drain
Fixed by
these parts
these parts

Show All


Keep searches simple. Use keywords, e.g. "leaking", "pump", "broken" or "fit".
Washer was dead and would not turn on
Well the washer died and would not turn on in the middle of a wash cycle. Absolutely dead. I disconnected it from power and opened up the front panel on which all the control switches and knobs are mounted. This is removed by unscrewing 4 screws at the top of the washer.
Checked the fuse, and found blown. Replaced the fuse, cl ... Read more osed the panel and plugged it in. Still not working. Checked the Check switches and found the Check Switch really limp. Checked with Digital Multimeter and found no continuity at either position. Unscrewed the check switch. Removal and re inspection with DMM of the check switch confirmed it was bad. Opened up the check switch and found contacts were blown.
Installed a new check switch making sure all the connecting wires go in the right places. The wiring diagram in the washer was very helpful in doing so since u dont want these wires reversed. Adjusted the plunger which operates the check switches when the lid is opened to make sure it is not over or under operating the switches. This is done by loosening the bolt holding down the check switch assembly and slidint the whole assembly forwards or backwards till the plunger has just enough push on the switches. This is done to avoid the plunger from exerting excessive pressure on the check switch and the safety switch in lid open or lid closed position. (both switches are operated by the same plunger according to the lid position)
Closed panel cover and plugged the washer in. There u go, it was alive again!
Read less
Parts Used:

-
Suleman from Canoga Park, CA
-
Difficulty Level:Easy
-
Total Repair Time:15 - 30 mins
-
Tools:Screw drivers, Wrench set
109 of 124 people
found this instruction helpful.
Was this instruction helpful to you?
Thank you for voting!
The washer wouldn't start unless you slammed the lid shut.
I suspected the lid switch right away. Where I went wrong was in thinking that I had to get to it from below. After going to all the trouble of removing the front panel and detaching the top panel, I discovered that it was located inside the control section at the top of the appliance. It only took a few minutes to remove four screws and
... Read more
gain access to the old switch assembly and swap it out with the new one. One thing to note; the new switch assembly has to be set in exactly the right place along a slotted channel in order for both contacts to be activated properly. It's not difficult to find the right spot, but you have to do it consciously.
Read less
Parts Used:

-
Richard from Houston, TX
-
Difficulty Level:A Bit Difficult
-
Total Repair Time:Less than 15 mins
-
Tools:Screw drivers, Socket set
84 of 99 people
found this instruction helpful.
Was this instruction helpful to you?
Thank you for voting!
Filled with water OK but nothing more
Used the online trouble shooting info. Tested as was requested. Found the lid switch. Noticed the fuse was bad. Replaced the fuse and noticed only water was cominf in. Ordered new lid switch assembly. Came with 48 hrs! Replaced and washed clothes! Great service!
Parts Used:
-
Basil from St Charles, MO
-
Difficulty Level:Easy
-
Total Repair Time:15 - 30 mins
-
Tools:Nutdriver, Screw drivers
28 of 31 people
found this instruction helpful.
Was this instruction helpful to you?
Thank you for voting!