This ice maker (Complete Icemaker Assembly, Whirlpool Icemaker Kit, Ice Maker Assembly, Refrigerator Ice Maker, Icemaker) receives water from the water inlet valve, freezes it, and dispenses it into t...
The “Icemaker Control Assembly” (Module & Motor Assembly, Ice Maker Control Module, Icemaker Module, Refrigerator Ice Maker Module) is what controls the actions of your ice maker. The control turns th...
The crisper drawer is clear plastic and is located inside the refrigerator. It is used to store fruits and vegetables at a certain temperature to ensure food will last longer. If your drawer is cracke...
This handle end cap kit, also known as a door handle end cap, includes both the upper and lower door handle caps for freezers and fresh food compartment handles. Used in refrigerators and freezers, th...
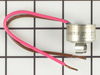
This is a bimetal defrost thermostat for your refrigerator. It stops the fridge from overheating during the defrost cycle by protecting the evaporator. This clip-on thermostat will sense the temperatu...
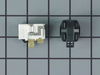
The single water inlet valve, also known as a water solenoid valve, is used for refrigerators. This part is a solenoid-operated switch that releases water from the supply line to the water valve and i...
The door shelf retainer bar end cap connects to the retainer bar on your refrigerator’s door shelf, and attaches it to the refrigerator door. If your shelf retainer bar has become disconnected, a dama...
This refrigerator ice maker fill cup dispenses the water into the ice cube mold during the fill cycle. Replacing the water fill cup is a possible solution if you notice that the ice maker is leaking, ...
This is the replacement water tube kit for your refrigerator. This tubing is made of plastic, is 1/4 inch in diameter, and comes with 2 inserts. This tube may be longer than the original tube, and may...
$36.12
In Stock
Questions And Answers for RT16LMXEW00
Be the first to ask our experts a question about this model!
✖
Ask a Question
Ask our experts a question on this model and we'll respond as soon as we can.
I backed out the 2 top screws about a quarter inch and then removed bottem screw with a quater inch nut driver. I then lifted Ice Maker clear of the two top screws and lowered it enough to unclip the power connection with a small screwdriver. The new Ice Maker was wired correctley for my refrigeator so all I had to do wea reconnect the
... Read morepower connection and mount new Ice Maker on the two top screws and install the bottem screw. It took e while for the new Ice Maker to start it's cycle but after it did, it worked GREAT. Part Select service was OUTSTANDING, ordered part one day and received the next. THANKS!!!!
removed flap door in front of icemaker...removed 3 screws with bolt heads...removed one additional screw with bolt head and ice unit slid out. I removed motor unit (pops out no screws). Replaced and had ice within 3 hours.
I am NOT a handyman, and my family laughed at me when I said I was going to fix the ice maker all by myself. I ordered a replacement ice maker. When it arrived, I opened the box and read the instructions. It seemed easy. I removed the old ice maker, with a socket set. I then took off the shut off lever from the old one and placed it
... Read moreon the new one, since the new one didn't come with it. I then put the new one in place. All the parts fit perfectly. The ice machine was making ice within an hour. My family was amazed... and I got the last laugh!