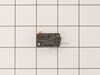
This door switch, also known as a safety switch, is a genuine OEM replacement part for microwaves. It is a safety mechanism that sends signals to the microwaves control system, telling it when the doo...
$37.08
In Stock
Order within the next 11 hrs and your part ships today!
This is a high limit thermostat designed for microwaves, ranges and ovens. Made of plastic and metal, this thermostat is designed to open the electrical circuit for your appliance when it reaches a sp...
$28.98
In Stock
Order within the next 11 hrs and your part ships today!
This rubber cushion is supplied by the original manufacturer and has a shaft approximately 1 inch long. The cushion acts as a layer of protection between the oven door and oven frame/cavity. It preven...
$6.59
In Stock
Order within the next 11 hrs and your part ships today!
The temperature sensor, also referred to as a thermostat, probe, or thermistor sensor, is responsible for measuring the temperature inside your oven. It is a platinum-resistance sensor with a resistan...
$196.02
In Stock
Order within the next 11 hrs and your part ships today!
This hexagon nut cap, also known as a nut cover cap, is a nylon-insulated cylindrical cap with left-hand threads and a 4mm thread size, for counterclockwise tightening. It is sourced from the original...
$10.56
In Stock
Order within the next 11 hrs and your part ships today!
This terminal block assembly is designed for use within various models of ranges and is sold as an individual OEM part without any other hardware included. Terminal blocks are responsible for receivin...
$85.05
In Stock
Order within the next 11 hrs and your part ships today!
This flange nut is designed for use within various cooking appliances like ranges, microwaves and wall ovens. Flange nuts are typically used to evenly distribute pressure across its application surfac...
$5.40
In Stock
Order within the next 11 hrs and your part ships today!
This OEM convection fan motor assembly is compatible with ovens and ranges and assists with heating the appliance by circulating the hot air required for cooking. It comes without any hardware or extr...
$193.26
In Stock
Order within the next 11 hrs and your part ships today!
I took off the back cover after I looked at youtube similar problems. Then removed the little thermostat and un hooked the 2 wires. I looked up the part and after is was delivered couple days later I connected the 2 wies and after putting the back cover on the oven was back to normal. Was such an easy repair and the part was only $11.
Other tools that are usefull long needle nose pliers, long thin blade screw driver and small magnetic flashlight. Place the microwave on a work bench and remove the case it cover 3 sides. Place the microwave on a chair so it can stand with the controls up. You are replacing the lower door microswitch. The switch is located behind the
... Read morecontrol panel in the lower part of the area. The switch is several inches inside this area and your hands will not fit. Take care when moving wires and a couple of sensors. Use the thin blade screwdriver to release a tab holding the switch in place. Do not break this tab. Take the needle nose pliers and remove the switch. Put the wires on the new switch, open the door a short distance so a door lever moves enough to put the microswitch back into the bracket.
First remove the internal fan guard, (two Philips Screws). Holding the fan blade and using a nut driver (10mm?) attempt to carefully remove the nut off of the shaft. If it loosens with a counterclockwise rotation, it is a Right Hand thread, Part#: PS11720788. If it loosens clockwise, it is Left Handed and is Part# PS11720787. When the co
... Read morerrect fan arrives, check to make sure it matches, then continue with installation. TURN THE POWER OFF Following the door removal instructions in the Owners Manual, remove both upper and lower doors. Remove the screws that go into the cabinet on the sides, I believe there are (6). The bottom vent cover is also attached with the bottom screws, so you can remove that and set it aside.
Get some help to assist you with moving the stove out of the wall cavity, it's not heavy, but awkward. I used a small furniture cart, and the second time I used blocking on the cart to raise it to just below the oven and was able to easily slide out/in. Rotate the oven so you can visualize the back. There are two panels on the back to remove, Starting with the bottom one, remove the screws, (a couple in the middle too) and slide the panel up, (Tabs into a notch on the top of each side of the panel) The second panel comes off the same way, there may be some screws on the side and top you need to be aware of. Once you open the back, the fan that needs to be replaced should be identical. If you have already removed the guard and fan blade from the inside compartment, it should be a simple swap out. Put it back together in reverse order, put power back on and check to see if it worked. If so, slide it back into the cabinet, be careful the flex conduit is aligned so it doesn't interfere. Second time around it only took me about an hour total and I didn't need assistance. Fan works, Oven quiet, Happy Wife, Happy Life.


 Samsung Wall Oven")
 Samsung Wall Oven")
 Samsung Wall Oven")
 Samsung Wall Oven")
 Samsung Wall Oven")
 Samsung Wall Oven")