


Models
>
LMX25981ST
LMX25981ST ((ASTCGSC)) LG Refrigerator - Overview
Sections of the LMX25981ST
[Viewing 7 of 7] LG Refrigerator")
 LG Refrigerator")
 LG Refrigerator")
 LG Refrigerator")
 LG Refrigerator")
 LG Refrigerator")
 LG Refrigerator")
Keep searches simple, eg. "belt" or "pump".

Plastic Tube - 5/16 Inch
PartSelect #: PS3536013
Manufacturer #: MJU62070602
This water tube, or plastic tube, is used in refrigerators and freezers. The tube ensures water is directed to parts of the refrigerator that need it, such as the water dispenser and ice maker. If you...
$16.92
In Stock

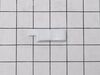
Handle Screw
PartSelect #: PS8752913
Manufacturer #: MJB63190001
This handle screw, also known as a mounting bolt, is a mounting screw to help secure the door handle to your refrigerator door. If your handle is loose, you may just need to tighten the screw. If your...
$9.35
In Stock

Refrigerator Water Filter
PartSelect #: PS3591904
Manufacturer #: 5231JA2006F
This OEM filter measures 2.5 inches deep, 12.5 inches high, 5 inches wide and roughly 1.5 lbs. It is recommended to replace this filter every six months or 300 gallons, whichever comes first. If you n...
$86.63
In Stock

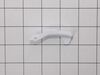
Door Stopper
PartSelect #: PS3523083
Manufacturer #: 4620JJ2009A
The door stop, or door stopper, is used in refrigerators. This door stop helps keep the door in position and in balance. This part is attached to the bottom of the door and it keeps it from opening an...
$13.56
In Stock

Deli Drawer
PartSelect #: PS8749643
Manufacturer #: AJP73874601
This deli drawer is for refrigerators.
Deli drawer holds meats, vegetables and snacks in the fresh food compartment of the refrigerator.
Follow the instructions in the owner's manual when installing this part.
$80.31
In Stock

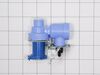
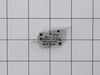
Water Inlet Valve Assembly
PartSelect #: PS3533117
Manufacturer #: AJU72992601
This includes the primary and secondary valves along with the wire harness.
$123.82
In Stock

Door Shelf Bin
PartSelect #: PS8748031
Manufacturer #: AAP73871501
Sold individually.
$33.33
In Stock

Primary Water Valve - Single Coil
PartSelect #: PS3536019
Manufacturer #: MJX41178908
$65.09
In Stock

Cam,Shaft
PartSelect #: PS3522958
Manufacturer #: 4430JJ2004B
The purpose of the door latch cam is to keep the door latched when you shut it. If your door is not staying shut, you may need to replace the door latch cam. This part is made of white plastic and is ...
No Longer Available

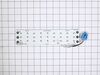
Ice Maker Assembly
PartSelect #: PS3532293
Manufacturer #: AEQ36756901
The wire harness is NOT available separately. Refrigerator ice maker kit AEQ36756901 is an original equipment manufacturer (OEM) part that fits some refrigerators in these series: Kenmore 795; Kenmore...
$304.94
In Stock


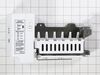
Evaporator Fan Motor
PartSelect #: PS3523323
Manufacturer #: 4681JB1027C
This is a genuine OEM evaporator motor that directly powers the evaporator mechanism within your refrigerator. This mechanism is responsible for pulling air over the evaporator coils, which are cold, ...
$91.02
In Stock
Questions And Answers for LMX25981ST
We're sorry, but our Q&A experts are temporarily unavailable.
Please check back later if you still haven't found the answer you need.
Common Symptoms of the LMX25981ST
[Viewing 8 of 8]Leaking
Fixed by
these parts
these parts


Show All
Door won’t open or close
Fixed by
these parts
these parts

Show All
Not dispensing water
Fixed by
these parts
these parts
Show All
Ice maker not making ice
Fixed by
these parts
these parts
Show All
Ice maker won’t dispense ice
Fixed by
these parts
these parts


Show All
Noisy
Fixed by
these parts
these parts

Show All
Light not working
Fixed by
these parts
these parts
Show All
Fridge too warm
Fixed by
these parts
these parts
Show All


Keep searches simple. Use keywords, e.g. "leaking", "pump", "broken" or "fit".
replace leaking water inlet valve assembly
1. Shut off water to refrigerator. 2. Removed bottom sheet metal cover (6 screws). 3. Removed leaking water inlet valve assembly from refrigerator (1 screw). 4. Remove water inlet tube (loosen nut) and tube back to refrigerator (pull from water valve after remove cotter pin washer). 5. Detach two electrical wire harnesses. 6. Install new
... Read more
water inlet valve assembly to refrigerator (1 screw). 7. Replace both water tubes to water inlet assembly. 8. Re-attach both wiring harnesses. 9. Turn water to refrigerator on. 10. Check for leaks. 11. Re-attach bottom sheet cover (6 screws).
Read less
Parts Used:
-
Richard from JACKSONVILLE, FL
-
Difficulty Level:Really Easy
-
Total Repair Time:15 - 30 mins
-
Tools:Screw drivers
28 of 48 people
found this instruction helpful.
Was this instruction helpful to you?
Thank you for voting!
Replace Thermistor in back of freezer
Turn off power, remove upper and lower drawers (may need to open upper refrigerator doors to remove large freezer bin,) remove drawer supports (upper and lower), remove rear freezer panel (trick is to loosen 4 screws on fan bumpout to get the panel to come free from the freezer side wall), test thermistor with multimeter (should have cont
... Read more
inuity or near zero resistance across 2 orange fuse wires) before cutting zip ties, cut zip ties holding Thermistor in place, remove old Thermistor, install new Thermistor, install new zip ties, replace rear freezer panel, install upper and lower drawer supports, install drawers, turn on power, should be fixed if error code doesn't return after 6 hours.
Read less
Parts Used:

-
Scott from JUPITER, FL
-
Difficulty Level:Easy
-
Total Repair Time:1- 2 hours
-
Tools:Pliers, Screw drivers
12 of 16 people
found this instruction helpful.
Was this instruction helpful to you?
Thank you for voting!
Water feed line running from water valve to filter housing was leaking
Shut off water supply. Disconnect main supply line. Remove rear lower panel on back of refrigerator. Remove all tubing clamps on back. Disconnect leaking tubing from water supply valve. Remove water filter and unscrew/remove water filter housing. Replace tubing - connect to water filter housing then to water supply valve. Reconnect filter
... Read more
housing and filter. Reinstall lower panel, then main water supply line, then all tubing clamps. Turn water back on and check for leaks after discarding several glasses of water to fill filter. Job complete!
Read less
Parts Used:
-
Tom from EASTON, PA
-
Difficulty Level:Easy
-
Total Repair Time:30 - 60 mins
-
Tools:Screw drivers, Wrench (Adjustable)
11 of 18 people
found this instruction helpful.
Was this instruction helpful to you?
Thank you for voting!