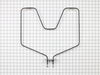
The oven rack is sold individually. It is chrome in color and measures approximately 24 inches wide by 17-1/2 inches deep. The rack is used to hold cookware in the oven and slides back and forth for e...
$67.42
In Stock
Order within the next 3 hrs and your part ships today!
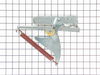
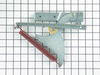
The metallic clip, or also known as a broil element support, is for a oven element on a range. This part holds the broil element in place on top of the oven. If your support clip is broken then this r...
$16.68
In Stock
Order within the next 3 hrs and your part ships today!
1st I opened the oven door and removed the 2 screws that hold the outside and inside of the door together. With the door separated I removed the 2 screws that hold the end caps in place, then removed the old end caps. I put the new end caps on the oven door handle, aligned the holes for the end cap screws and reinstalled the screws,then
... Read morereinstalled the oven door screws,closed the oven door and started cooking.
After turning off the breaker to cut power to the oven, I opened the oven door and, using the PartSelect exploded diagram as a guide, I removed 3 screws from the underside of the control panel - I was then able to slide the panel up and out to remove it. Leaving all of the control wires (especially the ribbon) connected to control panel,
... Read moreI saw the fan assembly mounted to the rear of the control box.
I noted the position of the two attached wires - black on top (or left), white on bottom (or right). Using a nutdriver with an extension bar, I unscrewed 4 screws holding the assembly in place. I removed the old fan and installed the new fan in its place. It was necessary to bend the new fan's legs out a bit to get them to line up with the holes. I reconnected the wires as mentioned above, then reinstalled the control panel.
I tested the oven by turning the breaker back on and letting the oven heat up to 450 degrees. The fan turned on as expected. After the oven cooled off, I reinstalled the 3 screws to secure the control panel.