


How to Build and Plant a Raised Garden Bed
With warmer summer days on the horizon, now is the perfect time to get your garden ready for planting. Raised planter boxes are the perfect option if you’re looking to keep things organized, add some visual interest to your yard, or if your soil quality isn’t great for growing. Follow along to see how we’ve built this economical option, and how to prepare it for gardening season.
Build the Garden Bed
-
Things You’ll Need
- 2” x 10” boards (3)
- 2” x 4” boards (3)
- Drill
- Deck screws (approximately 50)
- Measuring tape
- Level
- Straight edge
- Pencil
- Saw
We used regular SPF lumber for this project. Untreated wood will eventually rot, however there are concerns that treated lumber will leach chemicals into your soil. Do your research on what type of wood is best for your garden needs. Something like cedar will last much longer, but comes at a higher cost.

Step 1: Choose the Location
First, decide what you want to plant in these garden boxes, then determine where has enough sunlight. Most veggie gardens will require full sunlight (at least six hours per day, preferably more) but leafy greens like cabbages can tolerate some shade. If your boxes are just for flowers or shrubs, many will grow just fine in partially or fully shaded areas. But typically you’re going to want southern exposure, without any trees or fences blocking the light. Additionally, you’ll want to make sure your hose is long enough to reach the garden bed location for frequent watering.
Step 2: Measure For Size
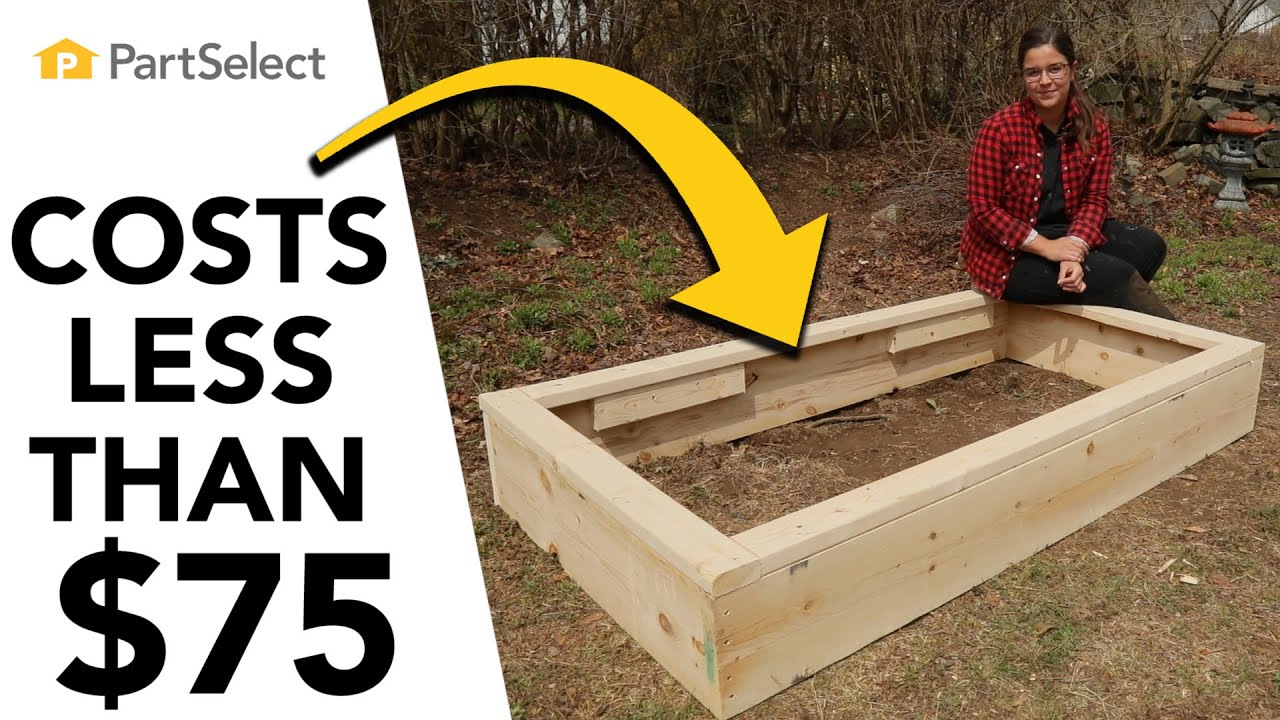
Determine what size works for your space and budget. In this guide, we’re building a 3-foot-by-6-foot bed for less than $75 (based on 2020’s lumber prices – we realize this may not be feasible in 2021!). The larger the box, the more you’ll pay for materials to both build and to fill it with soil.

Step 3: Cut 2x10s To Size
If you don’t own a saw, or aren’t comfortable using one, you can have the hardware store cut the wood for you if you bring your measurements along. Otherwise, use your tape measure, straightedge, and pencil to mark your desired length on your 2x10 board. Make sure you’re wearing proper PPE (personal protective equipment) when operating any power tools – ear and eye protection are important!
You’re going to repeat this process so you have two boards of equal size for the length (6 feet), and two boards of equal size to be the width (3 feet).

Step 4: Fasten Corners
For this step you will need a drill and deck screws. The reason we’re using deck screws is that they’re made for the outside and will not rust. If you use interior screws they will eventually rust, and you don’t want that getting into your soil. We’re going to use four screws per corner to fasten the boards together. At this point, if you just want a basic garden box, you’re all done!

Step 5: Cut 2x4s To Size
If you want to add a ledge for seating and some support, we’re now going to measure and cut our 2x4s to size. We’re going to be starting with the short ends of the garden box, measuring from outside edge to outside edge. Like before, mark your measurements with the pencil and straightedge, and cut your lengths with the saw.

Step 6: Attach Ledges
At this point, we’ve only measured and cut the 2x4s for the short ends of our box. We're going to attach these using 4 deck screws. Once both ends are attached, we’ll then measure the inside edges for the length of the box. Once again measure, mark, and make your cuts.

Step 7: Attach Ledge Supports
Keep any extra pieces cut from the 2x4s. Before we attach the long ledges, we’re going to use the extra wood to provide additional structural support for the ledge. Fasten them to the interior of the planter box, then place the long cuts of 2x4 on top and screw them into place.

Step 8: Make Sure It’s Level
Once you’ve checked that your work is level, you’re ready to start planting!

Plant the Bed
Now that you’ve got your raised garden bed built, it’s time to plant it! Depending on the time of year, and where you’re located, you may be able to go right to planting, otherwise, you can get things prepped and wait until the threat of frost has passed.

-
Things You’ll Need
- The garden bed you just built
- Weed barrier (cardboard or landscape fabric)*
- Soil
- Rake
- Source of nitrogen
- Your transplants or seeds
- Hose
* If your garden bed is less than 6 inches deep, you’ll want to put down a weed barrier before adding the soil. Cardboard or landscaping fabric are both great options. If you used lumber sizes as we recommended, your bed should be 10 inches high, and we can skip this step.
Step 9: Fill Bed With Soil
First we’ll need to determine how much soil is needed for the raised bed. If your planter is rectangular, this should be a simple volume equation of length x width x height. However, there are many calculators available online specifically for measuring soil quantity. Determine the number of bags you’ll need, or if you have multiple beds, you may be better off having soil delivered by the cubic yard. Use a rake to level out the soil as you’re dumping it in.

Step 10: Add Nitrogen Source
Plants need nitrogen in order to grow, and without enough their growth can be stunted. There are a few different ways you can add this to your garden beds. The first is purchasing enriched soil, typically classified as NPK for nitrogen, phosphorus, and potassium. This is the pricier option, so if you’re on a budget you can use campfire ashes as a source of phosphorus and potassium, while used coffee grounds will provide nitrogen. So if you enjoy your French press in the morning and a backyard campfire in the evening, keep a hold of those coffee grounds and ashes! The third option is to include nitrogen-fixing plants like peas in the garden bed. Peas produce their own nitrogen and will add it to the soil, which your other plants will benefit from.

Step 11: Time to Plant!
Depending on your region, once the risk of frost has passed, you are “good to grow!”
Be mindful of the spacing requirements necessary for your seeds or transplants, as you don’t want to overcrowd your plants. Dig a small hole to place your plant or seed into, and cover with soil. Once you’ve got everything planted, be sure to give it a good drink of water. Daily watering in the morning or evening will help the roots to set or to germinate the seeds. With proper care and some patience, you’ll soon be able to enjoy your delicious homegrown fruits and veggies, or beautiful flowers!


Crafting a hand-made cutting board is a beautiful and practical project tha...

Moss adds character and vivid green color to any garden setting. Learn how ...

Help pollinators do their important work by planting flowers and plants tha...