


How to Fix a Sparking Microwave
About this repair:
- Rated as REALLY EASY
- 1 repair story
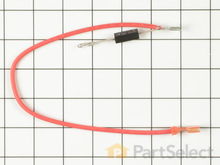
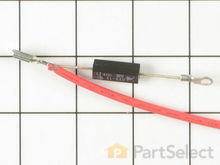
High Voltage Diode
If there are sparks inside your microwave while it is running, the high voltage diode may be shorted or opened. The diode working alongside the capacitor and the magneton to provide the heat the microwave needs to work.
How to test a microwave high voltage diode with a multimeter.
- Disconnect your appliance from the power source; you will be handling electrical components.
- Remove the cabinet and discharge the high voltage capacitor to avoid getting an electrical shock. Next, locate and remove the high voltage diode in order to test it for continuity.
- You will need to check for continuity in both directions. Begin by setting your multimeter to Rx1 and touching the probes to the terminals. Next, reverse the probes in order to check for continuity in the opposite direction. You should find that there is continuity in one direction, but not both directions.
- If the results of your test show that there is continuity in both directions, or that there is no continuity in either direction, you will need a replacement high voltage diode.

Stirrer
The stirrer helps ensure there is even heating inside your microwave. The stirrer helps to evenly distribute the energy your appliance is creating. If the stirrer in your microwave is not working properly and energy is concentrating in one area of your microwave, instead of distributing evenly throughout the unit, it can lead to burning and sparking. There are two reasons why your stirrer would not be working: either the drive motor is broken, or the stirrer belt is broken.
How to inspect a microwave stirrer belt:
- Before beginning, ensure you disconnect your appliance from the power source.
- In order to access the stirrer belt, you will first need to remove the outer cabinet. Locate your stirrer belt in order to inspect it. It will most likely be found at the very top of the appliance.
- Examine the area around the belt to identify if there are any objects blocking its movement. Next, verify that the belt is correctly installed, often just a small adjustment is needed. Finally, visually inspect your belt for any signs of fraying, cracking, burning, or other damage.
- If you identify any issues during your inspection, you will need a replacement stirrer belt.


More Repair Parts
Still not sure which part is broken? We can offer you custom troubleshooting help if you search with your model number.