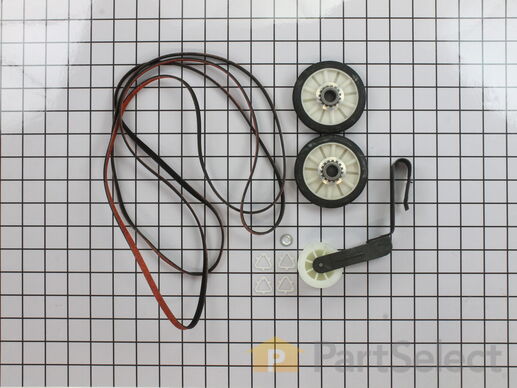
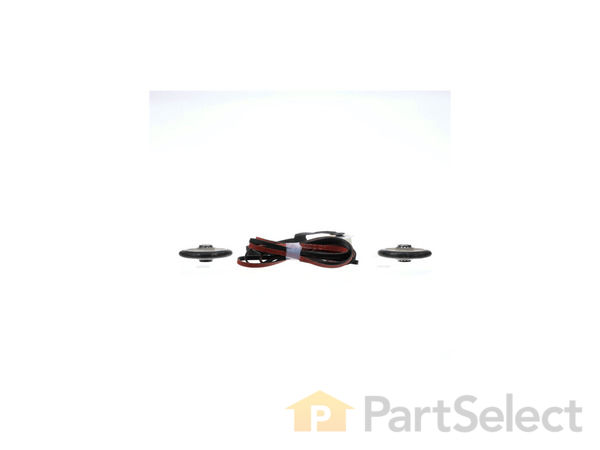
( Grid squares measure 1x1 inch )
Customer Service Representative

Get in touch, we're here to help!

Monday to Saturday
8am - 9pm EST

customerservice@partselect.com

Maintenance Kit 4392065

 Fits your CEDS832VQ1!
★★★★★
★★★★★
310 Reviews

Rated by 63 customers 

Easy 

30 - 60 mins 

Ratings submitted by customers like you who bought this part.

$ 37.44
  In Stock
Get FREE EconoShip on orders over $100! T&C apply

Get this part fast! Average delivery time for in-stock parts via standard shipping: 1.8 days.

 Fits your CEDS832VQ1!
PartSelect Number PS373087
Manufacturer Part Number 4392065
Manufactured by Whirlpool for Whirlpool, Kenmore, Roper, Inglis
Product Description

Maintenance Kit Specifications

The drum support roller kit (Dryer Repair Kit) allows the dryer to tumble properly by supporting the drum cylinder. The idler pulley provides the tension required for a multi-ribbed belt. The belt attaches to the drum, idler pulley, and motor pulley. If your dryer is damaged, it may be making loud, squeaking, and/or squealing noises while the drum is turning. This is from normal wear and tear. The drum may eventually stop turning all together. This is a sign the part should be replaced. This is one complete maintenance kit. The kit includes the drum belt, drum support rollers, one idler pulley, four tri-rings, and one clip. The parts are constructed of plastic, metal, and rubber, and come in black/white/silver.
How Buying OEM Parts Can Save You Time and Money

How Buying OEM Parts Can Save You Time and Money

Part Videos
Difficulty: Easy | Tools Required: Screw drivers,Nutdriver
Repair Tip: Clean the lint from the motor and heater when installing this kit. The idler may not be the same as the original but it is an improved design.

Replacing your Whirlpool Dryer Maintenance Kit

Replacing your Whirlpool Dryer Maintenance Kit
Troubleshooting
This part fixes the following symptoms:
Noisy | Drum Not Spinning | Marks left on clothes | Heat stays on after drum has stopped
This part works with the following products:
Dryer, Washer Dryer Combo.
Part# 4392065 replaces these:
AP3131942, 587636, 4392065, 2014, 26000279435, 26000279436, 279435, 279436, 279708, 279708MS, 279709, 279709MS, 279860, 279948, 4392065VP, 691366K3, 80046, 8106, 8237, 8238
Back to Top
Customer Reviews
Average Rating:
★★★★★
★★★★★
310 Reviews
4.7
Filter By Rating:
  • 5 Stars
    270
  • 4 Stars
    19
  • 3 Stars
    5
  • 2 Stars
    4
  • 1 Star
    12
Sort by:
  • 1
  • 2
  • 3
Sorry, we couldn't find any existing reviews that matched. Try using some different or simpler keywords.
  • 1
  • 2
  • 3
Customer Repair Stories
 Average Repair Rating: 3.3 / 5.0, 63 reviews. What's this?
Sort by:
  • 1
  • 2
  • 3
Sorry, we couldn't find any existing installation instruction that matched.
Install Maintenance Kit and Drum Felt Seal
Disassembly went well. Ordered maintenance kit that website said would fit my dryer. Belt is to short and idler was wrong. Reassembled with original, old parts. Contacted customer service, twice, via email. No reply to my request for a price adjustment. As a customer of several other purchases, will source the needed parts, and other future parts from another supplier.
Other Parts Used:
SEAL Maintenance Kit
  • John from LAKE ORION, MI
  • Difficulty Level:
    Very Difficult
  • Total Repair Time:
    30 - 60 mins
  • Tools:
    Nutdriver, Pliers, Socket set
4 of 5 people found this instruction helpful.
Was this instruction helpful to you?
Thank you for voting!
Loudly clunking clothes drum due to worn out roller
Followed video on Parts Select site for comparable model showing roller and drive belt replacement.

The triangle plastic retaining clips were the most difficult part , to put
on and take off. They required careful , firm stretching with needle nose pliers.
Other Parts Used:
Roller Shaft Washer Maintenance Kit
  • KENNETH from WEST ORANGE, NJ
  • Difficulty Level:
    A Bit Difficult
  • Total Repair Time:
    1- 2 hours
  • Tools:
    Pliers, Screw drivers, Socket set
7 of 7 people found this instruction helpful.
Was this instruction helpful to you?
Thank you for voting!
The dryer was making a squeaking sound when running
Installation went very well. Raised the top of the dryer, removed the front of the dryer, remove the drum, at this point the dryer‘s wide open removed the police and the tensioner also remove your tire rings replace everything back in order as how are you get apart. Repair took about an hour and 15 minutes
Other Parts Used:
Roller Support Tri-Ring Maintenance Kit Rear Drum Support Roller Kit
  • David from PATASKALA, OH
  • Difficulty Level:
    Easy
  • Total Repair Time:
    1- 2 hours
  • Tools:
    Nutdriver, Pliers, Screw drivers
12 of 13 people found this instruction helpful.
Was this instruction helpful to you?
Thank you for voting!
Clothes still damp after a dry cycle and a high pitched sound while the drum is tumbling
Installing the cycling thermostat was easy. Where I encountered difficulty was disconnecting the door switch connector so I can remove the front cover. The other area I found difficulty was removing the old tri-rings from the rear drum roller shaft. I ended cutting them up with diagonal pliers.

All in all, it was well worth it. I’m the type that try to fix things instead of throwing it away and buying new ones. It’s more earth friendly.
Other Parts Used:
Dryer Cycling Thermostat Lint Filter with Handle Maintenance Kit
  • James from BOLINGBROOK, IL
  • Difficulty Level:
    A Bit Difficult
  • Total Repair Time:
    More than 2 hours
  • Tools:
    Nutdriver, Pliers, Screw drivers
4 of 5 people found this instruction helpful.
Was this instruction helpful to you?
Thank you for voting!
Noise from dryer
Just view the how to video on this repair on the Partselect website. The steps shown make this an easy repair for any DIY with the maintenance kit. Make sure to vacuum / clean your dryer vent from accumulated lint.
Other Parts Used:
Lint Filter with Handle Maintenance Kit
  • Karl from MINNEAPOLIS, MN
  • Difficulty Level:
    Really Easy
  • Total Repair Time:
    30 - 60 mins
  • Tools:
    Nutdriver, Screw drivers
3 of 3 people found this instruction helpful.
Was this instruction helpful to you?
Thank you for voting!
Bad motor noises
I had put in a new maintenance kit a year ago and it became obvious that my motor was not as healthy as it once was. So I got a new motor, (get a new blower fan too as you may destroy the old one to get it out). Replaced the motor and the maintenance kit now the dryer is like new
Other Parts Used:
Drum Support Roller Shaft - Right Side Dryer Blower wheel Blower Motor Shaft Seal Maintenance Kit Drive Motor with Pulley
  • David from CENTERVILLE, UT
  • Difficulty Level:
    A Bit Difficult
  • Total Repair Time:
    1- 2 hours
  • Tools:
    Nutdriver, Pliers, Screw drivers, Socket set, Wrench (Adjustable)
2 of 3 people found this instruction helpful.
Was this instruction helpful to you?
Thank you for voting!
the drum was moving back and forth and taking longer to dry chloths.
I just watched all your how to videos before I ordered the parts and after I saw how easy it was I just ordered and followed the instructions.
Other Parts Used:
Seal and Bearing Maintenance Kit Rear Drum Seal Kit
  • ludwig from EDISON, NJ
  • Difficulty Level:
    Easy
  • Total Repair Time:
    1- 2 hours
  • Tools:
    Nutdriver, Pliers, Screw drivers
1 person found this instruction helpful.
Was this instruction helpful to you?
Thank you for voting!
Belt broke
Perfect!
  • Thomas from Okemos, MI
  • Difficulty Level:
    Very Easy
  • Total Repair Time:
    30 - 60 mins
  • Tools:
    Nutdriver, Screw drivers
1 of 2 people found this instruction helpful.
Was this instruction helpful to you?
Thank you for voting!
Broken belt
As seen in video, All Good !
  • Mark from MILFORD, CT
  • Difficulty Level:
    Very Easy
  • Total Repair Time:
    15 - 30 mins
  • Tools:
    Pliers, Screw drivers, Socket set
1 person found this instruction helpful.
Was this instruction helpful to you?
Thank you for voting!
Loud, low-pitched thumping noise
First, let me say the t videos are excellent. Check them out if you haven't already.

I came across the video on diagnosing the causes of odd dryer noises. After watching that, I decided that the issue was probably a drum roller.

I took a chance and ordered the maintenance kit to avoid having to take the dryer part to confirm the diagnosis and then put it back together again while waiting for the parts to arrive (BTW - the parts arrived within two days of my ordering them) .

Even if you know your issue is only the roller, I recommend getting the entire kit. It takes no extra time to replace the drive belt and the idler pulley while you have to dryer apart and I consider it good preventative maintenance.

Definitely watch the how-to video PartSelect provides on how to perform the repair using the maintenance kit. It's very clear and very helpful. I'm not sure I could have figured out how the belt fit through the idler pulley without it.

As video shows, the repair is pretty straightforward. As others have noted, you'll likely find a couple of dollars in change and a goodly layer of lint in the bottom of the cabinet. Have your shop back handy.

It seems kind of silly, but I found the hardest part of the whole repair was getting the front panel to slide onto the two bottom clips that support it.

One thing to watch out for are two small metal clips surrounding the screw holes at the top of the front panel. The nut screws that hold the panel in place screw into these, not the panel itself. After I struggled to get the panel in place I realized that in the process I had knocked the clips off and so had to remove the front panel again in order to retrieve the clips from the bottom of the cabinet. Minor frustration. And with all the practice I had the first time around, the panel went on much more easily the second time :-)

It was very gratifying to plug the dryer in, turn it on and have it run perfectly. Better yet, it impressed my wife.
  • Joseph from SKANEATELES, NY
  • Difficulty Level:
    Really Easy
  • Total Repair Time:
    30 - 60 mins
  • Tools:
    Nutdriver, Screw drivers
3 of 3 people found this instruction helpful.
Was this instruction helpful to you?
Thank you for voting!
  • 1
  • 2
  • 3
Questions and Answers

We're sorry, but our Q&A experts are temporarily unavailable.
Please check back later if you still haven't found the answer you need.

62 questions answered by our experts.
Sort by:
  • 1
  • 2
  • 3
Sorry, we couldn't find any existing answers that matched.Try using some different or simpler keywords, or submit your new question by using the "Ask a Question" button above!
Pritam
December 6, 2017
Hi i have squeaking issue with my Kenmore 700 series dryer. Will this kit help me or do i need anything else?
For model number 11067761600
PartSelect logo
Hi Pritam, Thank you for your question. Depending on what is causing the squeaking in your appliance it may. If it is your rollers, belt, or your pulley causing the squeaking then this would definitely help with that. I hope that helps. Good luck with your repair.

26 people found this helpful.

Was this helpful?
Thank you for voting!
Elsa
July 20, 2017
My dryer is super noisy and the drum seems to be lacking stability and I’m looking to completely overhaul it. Is this the kit I would need to do that?
PartSelect logo
Hi Elsa, this dryer repair kit 4392065 will work with your model. The belt will be just shy of 0.25 inches shorter than your belt, and will have 4 instead of 5 grooves. We suggest using turbine oil on the rollers, shafts, and idler pulley (just a few drops). This will help situate the parts, and should give them a longer life span. Best of luck with this repair.

17 people found this helpful.

Was this helpful?
Thank you for voting!
Basem
July 20, 2017
Will this stop the screeching noises
PartSelect logo
Hello Basem, this dryer maintenance kit 4392065 includes everything you need to get rid of the squeaking noise. Please let us know if you have any further questions.

10 people found this helpful.

Was this helpful?
Thank you for voting!
Kirk
October 31, 2017
Does this kit work with my model dryer? The belt with this kit seems to be the same, but the rollers shown on this page show a different part number than the roller kit that comes up when I search for my particular model #. Also, the noise that I hear is a screeching that seems to be coming from the rear of the dryer. When I spin the drum counterclockwise manually, I can hear the noise. A google search comes up with the suggestion to replace drum bearings when hearing noises in the rear. Is there a drum bearing part for this model?
For model number PYE2300AYW
PartSelect logo
Hi Kirk, Thank you for the question. This kit will not work on your model number sorry. You will need to order the Multi Rib Belt - 92-1/4", Part Number: PS346995 and the Rear Drum Support Roller Kit, Part Number: PS2162268. Your model dose not have the drum that requires a bearing.Your drum rides on the lip at the back of the appliance, on the lip there is a felt seal that prevents the noise you are hearing. I suggest replacing the Drum Felt Seal, Part Number: PS11740735. Hope this helps!

8 people found this helpful.

Was this helpful?
Thank you for voting!
Roger
December 7, 2017
Dryer making a squeaky sound
For model number MAYTAG MDE9206AYW
PartSelect logo
Hi Roger, Thank you for your question. If your dryer is making a squeaking sound, there are some parts that you will need to check to see which one is causing the issue. You will need to check the drum support rollers, the roller shaft, the front glides, the idler pulley wheel and bearing and the belt. I hope this helps. Thank you and have a great day!

7 people found this helpful.

Was this helpful?
Thank you for voting!
Heather
August 14, 2017
The power on my dryer comes on but it will not run. Will this fix the problem?
For model number WED6400SW1
PartSelect logo
Hi Heather, Thank you for your inquiry. I would actually suggest checked your door switch and your thermistor to see if either of those parts are malfunctioning. If anything in the maintenance kit was not working, you would either hear it squeaking or have a burning rubber smell. You can test your door switch and your thermistor with a multi-meter to see if either of those parts are not working. Good luck with your repair.

6 people found this helpful.

Was this helpful?
Thank you for voting!
Sara
July 20, 2017
I know depending on the model dryer they have different number of rollers. This kit only has 2 rollers do I need to buy extra or does it come with everything I need?
PartSelect logo
Hi Sara, this repair kit will work for your model and you do not need to purchase extra rollers, it comes with enough. The video above should give you a brief overview of how to install the parts, however they may look slightly different for your model. I hope this helps.

5 people found this helpful.

Was this helpful?
Thank you for voting!
Beth
December 7, 2018
My dryer makes a thumping sound while it’s running, will this kit help fix thie problem? Thank you
For model number WED7000DW1
PartSelect logo
Hello Beth, thank you for your question. Yes, this kit is manufactured for that appliance and would help fix that problem. The belt, rollers and idler pulley are the first parts we recommend replacing when this issue arises. I hope this helps!

5 people found this helpful.

Was this helpful?
Thank you for voting!
Scott
December 5, 2017
When we start the dryer, it makes a pretty loud squealing, that seems to go away after about 30-ish seconds. I'm assuming this kit should fix my issue?Thanks for your help
For model number MED6400TB0
PartSelect logo
Hello Scott, Thank you for your inquiry. Yes, we show that this kit contains the most common parts that would fix that issue. Hope this helps!

4 people found this helpful.

Was this helpful?
Thank you for voting!
John
September 7, 2021
I'm looking for the correct belt/roller maintenance kit. After entering my model number on the Whirlpool website for the kit, it returned item number 587636. I copied that information to search for the kit, landing me on your site. However, after reading some questions, the kit may not be compatible. My drum requires a 92 1/4", has 4 ribs, and is marked made in usa, 8066065, fsp, cpt 1a. Will you please provide me with the correct maintenance kit i need to make the repairs.Kindest regards, john g.
For model number Whirlpool LGR8620PW0
PartSelect logo
Hello John, thank you for your question. We have researched the model you have provided, and the part number PS373087 is the correct part for your unit. We hope this helps!

3 people found this helpful.

Was this helpful?
Thank you for voting!
  • 1
  • 2
  • 3
You May Also Need ?
Model Cross Reference
This part works with the following models:
PartSelect Number: PS373087
Manufacturer Part Number: 4392065
Brand
Model Number
Description
Kenmore
11060012001
Dryer
Kenmore
11060172001
Dryer
Kenmore
11060232001
Dryer
Kenmore
11060522900
Dryer
Kenmore
1106062110
Dryer
Kenmore
11061202010
Dryer
Kenmore
11061202011
Dryer
Kenmore
11061252010
Dryer
Kenmore
11061252011
Dryer
Kenmore
11062102310
Dryer - 29" ELECTRIC DRYER
Kenmore
11062202101
Dryer
Kenmore
11062212101
Dryer
Kenmore
11062512101
Dryer
Kenmore
11062514101
Dryer
Kenmore
11062602101
Dryer
Kenmore
11062612101
Dryer
Kenmore
11062622101
Dryer
Kenmore
11062702101
Dryer
Kenmore
11062712101
Dryer
Kenmore
11062722101
Dryer
Kenmore
11062724101
Dryer
Kenmore
11062802101
Dryer
Kenmore
11062812101
Dryer
Kenmore
11062822101
Dryer
Kenmore
11062824101
Dryer
Kenmore
11062852101
Dryer
Kenmore
11062872101
Dryer
Kenmore
11063102100
Dryer
Kenmore
11063112100
Dryer
Kenmore
11064102300
Dryer
Customer Service Representative

Get in touch, we're here to help!

Monday to Saturday
8am - 9pm EST

Contact Customer Service