Keep searches simple. Use keywords, e.g. "leaking", "pump", "broken" or "fit".
Sorry, we couldn't find any existing answers that matched.Try using some different or simpler keywords, or submit your new question by using the "Ask a Question" button above!
Ralph
November 14, 2017
Does the kit include 2 front drum slides or do I have to purchase another kit?
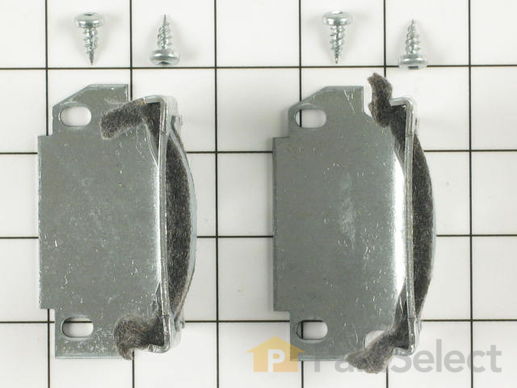
Hi Ralph, Thank you for the question. According to the site description, This front drum slide kit comes with two slides and the apppropriate mounting hardware.Hope this helps!
2 people found this helpful.
Was this helpful?
Thank you for voting!
John
April 10, 2019
Very low heat, also drum is very hard to spin. Lent trap is good. Vent is clean. Drum is a little noisy but not bad. I think I have 2 different things going on. Would you suggest new drive belt and rear drum bearing for hard spin issue? And for the low heat problem would you suggest thermostat limit and high limit thermostat?
For model number DDE 8200 GDL
Hello John, thank you for inquiring. For the dryer having very low heat, you may want to replace either the High Limit Thermostat part PS268083, the Limit Thermostat part PS268095, or the Cycling Thermostat part PS268096. For the dryer's drum not tumbling well, you may want to replace either the Drive Belt part PS2350043, the Idler Pulley Wheel part PS265721, or the Rear Drum Bearing Kit part PS267529. We hope this helps.
Was this helpful?
Thank you for voting!
Customer Repair Stories
Average Repair Rating: 2.9 / 5.0, 12 reviews.
What's this?
Keep searches simple. Use keywords, e.g. "leaking", "pump", "broken" or "fit".
Sorry, we couldn't find any existing installation instruction that matched.
the rear drum bearing was worn the dryer became very noisy
i removed the scews just above thr opened dryer door, i was then able to swing the dryer top cover back. i then removed the lower front panel screws ,the the screws securing the front of the dryer ( where the door is ) and removed it. there are just 2 wires to disconnect. after the front is removed you gain full access for drum removal, remove the belt make sure the wires are not in the way and remove the drum.i also used a vacuume to clean the inside of the dryer. the front drum slides are very easy to replace only 2 screws each.remove old parts install new parts then just put the dryer back together in the reverse order i took it apart. after re-assembly i turned the dryer on it was so quiet running my wife and dogs were very happy. ps. i just want to thank the people at partselect for having all my parts in stock and for the speed in which i received them. other than having to repair my dryer it was a very pleasant experiance.
Opened up machine per instructions. After examining drum slides and rear drum bearing, determined that all should be replaced due to excessive wear. Drum slides were the chief cause of the squealing, and they were as simple to replace as removing 4 nut drive screws, pulling off the old parts, and replacing with new. The drum bearing had to be coaxed out by tapping with a screwdriver, but the old was just able to be pushed in. All parts came with instructions, so the repair was easy. And no more squealing!
pulled off door, front panel and rear access panel. unscrewed drum. cleaned every thing. removed and replaced front slides, belt idler pulley and rear bearing. Reassembled everything. Dryer is as quiet as a it was when brand new.
Dryer making incredibly loud squeaking noise as it heated up
Replaced drum bearings, adjusted screw levelers trying to find the source of the noise. It was hard tracking it down. Finally lubricated the drum slides with WD40 and it resolved the problem for a couple days. Decided to try replacing the drum slides. The old ones did not look worn out - still had teflon surfaces - it was not metal on metal like I suspected. But when I got the replacement parts, there were 2 tubes of lubricant with notes that only this specific lubricant needed to be used on these slides. The teflon slides have a fiber material under them, and soaks up the lubricant. Problem appears to be solved. Whether it would be possible to purchase the lubricant only (since the slides looked OK) might be a question, however, the replacement kit cost was reasonable given that it solved the problem.
Kenneth L from Chesterland, OH
Difficulty Level:
Really Easy
Total Repair Time:
30 - 60 mins
Tools:
Nutdriver
14 of 16 peoplefound this instruction helpful.
Was this instruction helpful to you?
Thank you for voting!
Clothes pinching between the drum and door opening.
The drum slides on my dryer had worn down to the point that an opening formed that allowed clothes to enter the gap and get pinched between the spinning drum and the door. This would leave a mark and sometimes a cut on the clothes. To repair: open the door and undo the screws above the door opening that hold the top on the dryer. It's hinged in the back so it swings up from the front once the screws are removed. Undo hex head screws on either side at the top that hold on the front of the dryer. Also loosened the same at the bottom of the front panel (includes the door). Pull the front off of the dryer. This exposes the drum slides on either side in the front of the drum. They're fastened to the frame of the dryer. Undo the hex head screws (2 each) and remove drum slide, then replace. I recommend one slide at a time so the other one helps hold the dryer in place. The kit includes both slides. Pretty easy once I discovered how worn the old slides were! The drum turns much easier and quieter now too!
Curtis from Natchez, MS
Difficulty Level:
Easy
Total Repair Time:
15 - 30 mins
Tools:
Nutdriver, Screw drivers
11 of 14 peoplefound this instruction helpful.
Was this instruction helpful to you?
Thank you for voting!
rear dryer bearing assembly not threaded
The rear bearing plate had no threads where the screws go to hold it to the back of the dryer drum. I have never bought anything else that needed threads cut in it to be used as a replacement part.
unknown 25 year old GE dryer started making strange scraping noises when running. This even when there were no items in the appliance. Turning off the gas, and unplugging the power I disassembled the unit to find the nylon drum bushings worn down. Especially the felt like material under them that I think dissipates friction heat. A quick order to GD for the parts, 2 days later I had the part installed, and noise was gone.
Kevin J. Reynolds.
Kevin from Glenwood, IL
Difficulty Level:
Easy
Total Repair Time:
15 - 30 mins
Tools:
Nutdriver, Screw drivers
2 of 5 peoplefound this instruction helpful.
Was this instruction helpful to you?
Thank you for voting!
Replace heater coil and drum slides
I removed the screws holding the top on and screws holding the front panel and rear access panel. I then removed the 3 screws holding the drum. I proceeded to take the belt off then lift the drum out. I replaced the heater coil and then the slides. I reassembled the dryer and dried the towels that were in the washer. I saved $20 by ordering from Part Select and not going through the local repair store, not to mention how much they would have charged to do what I did. I’m not a pro at fixing things but can hold my own. Thanks Part Select I will order again from you if I need a part!
dryer would make clunking noise and sometimes a scraping noise
I looked on the internet for instructions to take the dryer apart,took the parts out one at a time ,and replaced them.It was easy and it made the dryer quiet again.I could see the obvious wear on the parts.I was happy to save the money a new dryer would cost.
Larry from Tolono, IL
Difficulty Level:
Easy
Total Repair Time:
15 - 30 mins
Tools:
Nutdriver, Screw drivers
1 of 3 peoplefound this instruction helpful.
Was this instruction helpful to you?
Thank you for voting!
Dryer leaving marks on clothes. Clothes were getting caught between drum and outside ring. Worn slides.
Remove top panel and front panel. 12 Screws. Be sure to vacuum entire inside of cabinet free of lint.
Keep searches simple. Use keywords, e.g. "leaking", "pump", "broken" or "fit".
Sorry, we couldn't find any existing reviews that matched. Try using some different or simpler keywords.
★★★★★
★★★★★
Michael H - February 9, 2021
Verified Purchase
Front Drum Slide Kit's a Hit!
My dryer was a squeakin'
Wifey was a weepin'
And the rodents were a peepin' in time.
Picked up a drum kit
Thought it was a good fit
Opened my dryer with a dime.
Now I fixed that fittin'
And it's purrin' like a kitten.
My squeak is a thing o' the past.
The purchase is a winner
Now I'm eatin' my dinner
And I'm hopin' that part's a gonna last!
Cheers!
Mike H.
★★★★★
★★★★★
Seth L - February 14, 2018
Verified Purchase
Simple repair. (4 screws... remove / replace)
Solid, high quality, rugged part.
Model Cross Reference
This part works with the following models:
PartSelect Number: PS267600
Manufacturer Part Number: WE25X60
With our Fix app model plate image recognition technology, we'll recommend the parts guaranteed to fit your appliance. Simply snap a photo, and we'll take care of the rest.
"I love love love this app. It's so nice to have useful information (receipts, manuals, parts lists, warranty info, pictures, etc.) on all of my household appliances and devices in one place."
You added to your cart
✖
$
Qty:
Total item(s) in cart:
Order Subtotal
$
*Taxes and shipping will be applied during checkout