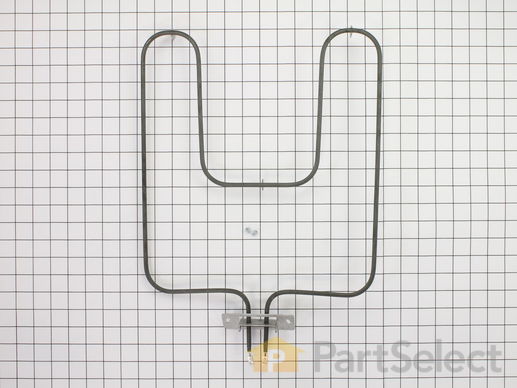
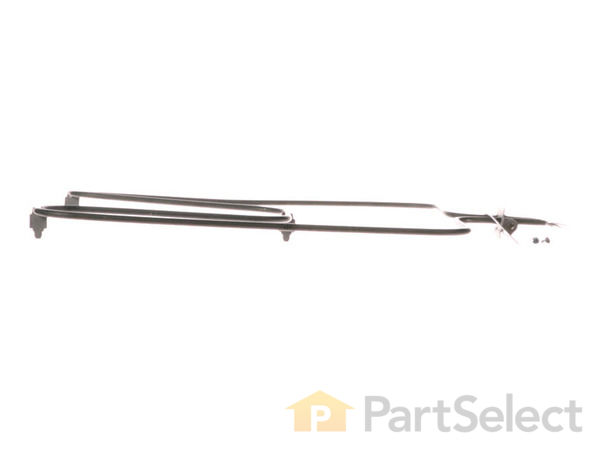
Part Location Diagram of WB44X200 GE Bake Element - 240V
See part 650 in the diagram
( Grid squares measure 1x1 inch )
Customer Service Representative

Get in touch, we're here to help!

Open until 12am EST

customerservice@partselect.com

Bake Element - 240V

 Fits your RK777G*D2!
★★★★★
★★★★★
105 Reviews

Rated by 181 customers 

Really Easy 

15 - 30 mins 

Ratings submitted by customers like you who bought this part.

$ 44.60
  In Stock

Get this part fast! Average delivery time for in-stock parts via standard shipping: 1.8 days.

 Fits your RK777G*D2!
PartSelect Number PS249424
Manufacturer Part Number WB44X200
Manufactured by GE
Customer Service Representative

Get in touch, we're here to help!

Open until 12am EST

customerservice@partselect.com

Check if this fits your product and find model diagrams

Need help finding your model number?
Product Description

Bake Element - 240V Specifications

This is a 240 volt bake element for your oven or range. The kit comes with two installation screws and the element. The element functions by supplying heat from the bottom of the oven to bake or cook your food. You may need to replace the bake element if your oven is not heating properly. This is a black metal part (Width 13 inches, length 16.5 inches, depth 1-1/2 inches ) which can be installed onto your range with a screwdriver. Installation is rated as "medium" difficulty. This element is the part that heats to allow cooking, and if broken or missing you'll be unable to cook. This part attaches to the lower section of the range. Refer to your model number and user manual to ensure this part is right for you. Each screw gets screwed into each wire terminal with a Phillips screw driver. Hold the wires forward to make sure the wires do not fall back through the rear of the oven. Unplug your appliance or shut off your circuit breaker to the appliance before installing the new part.
How Buying OEM Parts Can Save You Time and Money

How Buying OEM Parts Can Save You Time and Money

Troubleshooting
This part fixes the following symptoms:
Little to no heat when baking | Element will not heat | Oven not heating evenly | Will Not Start
This part works with the following products:
Range, Wall Oven, Microwave Oven Combo.
This part works with the following products:
General Electric, Hotpoint.
Part# WB44X200 replaces these:
AP2031031, 3267, WB44X200, WB44X0160, WB44X0200, WB44X160, WB44X200R, WB44X6200
Back to Top
Questions and Answers

We're sorry, but our Q&A experts are temporarily unavailable.
Please check back later if you still haven't found the answer you need.

116 questions answered by our experts.
  • 1
  • 2
  • 3
Sort by:
Sorry, we couldn't find any existing answers that matched.Try using some different or simpler keywords, or submit your new question by using the "Ask a Question" button above!
Rick
August 1, 2017
What are the dimensions of this element?
For model number Hotpoint
PartSelect logo
Hi Rick. Thank you for your question. Only counting from the mounting plate and onward. The bake element is approximately 16 1/2 " x 13 ". I hope that helps!

40 people found this helpful.

Was this helpful?
Thank you for voting!
Cindy
April 13, 2018
Will this element work for this model?
For model number JKP070D2AD
PartSelect logo
Hello Cindy, Thanks for your question. Yes, this part is compatible with your model. I hope this helps.

17 people found this helpful.

Was this helpful?
Thank you for voting!
Dale
November 22, 2017
I need to replace the bake element. I believe this is a 1990 model. What is the proper replacement part number i need?
For model number JKP07G0J5BG
PartSelect logo
Hi Dale, Thank you for your inquiry. The part number for the baking element for your appliance is PS249424. I hope this helps. Thank you and have a great day!

10 people found this helpful.

Was this helpful?
Thank you for voting!
Garylyn
February 13, 2018
I have a GE wall mount oven, serial #vs604190g. I need the bottom baking element replacement. The oven is approximately 40 years old.
For model number JKP07G0H1BG
PartSelect logo
Hello Garylyn, Thank you for contacting us. I have researched the model you have provided and have found the part you’re looking for is Part Number: PS249424. Hope this helps!

9 people found this helpful.

Was this helpful?
Thank you for voting!
PAMELA
April 29, 2018
I need to find a replacement bottom heating element for my self-cleaning single wall oven.
For model number JKP07001AD
PartSelect logo
Hi Pamela, Thank you for your question. The part number listed under your model number for the bake element is PS249424. I hope this helps. Thank you and have a great day!

6 people found this helpful.

Was this helpful?
Thank you for voting!
Edward
August 4, 2018
Our GE wall oven/microwave combo needs a bake element. What is the correct part number? Can a neophyte safely do the replacement?
For model number JKP62G0K2 BG
PartSelect logo
Hello Edward, thank you for your question. The bake element is part number PS249424 for this appliance. This repair is very easily done by a do-it-yourselfer. You can see installation stories and instructions when you search the part on our site. I hope this helps!

6 people found this helpful.

Was this helpful?
Thank you for voting!
Joy
May 2, 2018
My bake element is not heating but looks ok. The light does not come on the knob when i turn to bake but when i turn to broil the light comes on and the broil element heats. Do you think replacing the bake element will fix the problem? Thanks
For model number JK140R3HT
PartSelect logo
Hi Joy, Thank you for your question. It could be your bake element but it could also be your control. I would suggest testing the bake element with a multi meter first to see whether or not that part is working. If that part is fine then it would be your control that you would have to replace. I hope that helps. Good luck with your repair.

3 people found this helpful.

Was this helpful?
Thank you for voting!
Willie
May 3, 2018
Need element for upper oven. 1980 model. Model number not found on your search.
For model number JKP27G006BG
PartSelect logo
Hello Willie, thank you for your question. The upper oven elements are as follows: Range bake element Parts #: WB44X200 and Range broil element Parts #: WB44X185. Please enter the part number into the site for current price and availability. Good luck with your repair!

2 people found this helpful.

Was this helpful?
Thank you for voting!
Linda
March 30, 2018
Get no results when searching this model for baking element. Is it too old ?
For model number RJ7420012
PartSelect logo
Hello, Thank you for your inquiry. We are showing that part# WB44X200 would fit the model you provided. Hope this helps!

2 people found this helpful.

Was this helpful?
Thank you for voting!
Robert
December 6, 2018
Will this fit GE Hotpoint wall oven model #rk747g0j5?
For model number RK747G0J5
PartSelect logo
Hello Robert, Thank you for contacting us. I have researched the model you have provided and have found the part you are looking for is PartSelect Number PS249424. Thank you for your inquiry, good luck with this repair!

2 people found this helpful.

Was this helpful?
Thank you for voting!
  • 1
  • 2
  • 3
Customer Repair Stories
 Average Repair Rating: 4.3 / 5.0, 181 reviews. What's this?
  • 1
  • 2
  • 3
Sort by:
Sorry, we couldn't find any existing installation instruction that matched.
Replacment of the bake unit
The hardest part was removing the old nuthead screws off the old bake burner. Once those were off installing the new bake element was simple. One screw in each wire terminal, two hex head screws to hold the unit in place. Works like a charm!
  • Beth from Matthews, NC
  • Difficulty Level:
    Easy
  • Total Repair Time:
    Less than 15 mins
  • Tools:
    Nutdriver, Socket set
609 of 623 people found this instruction helpful.
Was this instruction helpful to you?
Thank you for voting!
oven lower burner burned out
Very easy, remove two screws, pull burner unit out slightly, then remove the two screws attaching the wires, one to each side, remove old unit and replace with new unit and replace screws.

Works fine perfect replacement.
  • james from franklin, TN
  • Difficulty Level:
    Really Easy
  • Total Repair Time:
    Less than 15 mins
  • Tools:
    Nutdriver, Screw drivers
505 of 587 people found this instruction helpful.
Was this instruction helpful to you?
Thank you for voting!
Bake element was on its last legs, starting to crack but still functional.
Removed the racks, unscrewed the back plate which holds the element, unscrewed the leads from the element, removed the old part.

Reversed the process to install the new element.

Turned the oven on for a few minutes to burn any contaminates off the new element, replaced the racks.

And that was it; quite easy.
  • Lawrence from San Jose, CA
  • Difficulty Level:
    Easy
  • Total Repair Time:
    Less than 15 mins
  • Tools:
    Nutdriver, Screw drivers
222 of 370 people found this instruction helpful.
Was this instruction helpful to you?
Thank you for voting!
bottom heating element burned out
I shut off the power at the breaker. Then I checked that the power was off by turning on the stove. Light did not come on, power is off. [ By the way, I locked the breaker box, in case somebody helpful came along to turn the power back on !] Then I undid the screws holding the old element . Pulled it out, and undid the screws holding the wire leads to the element. Screwed wire leads to new element. Pushed back in, and screwed brace screws back in. Went out to breaker box and turned power back on. Turned on oven. Worked. Second time I've done this. I kind of forgot how, since the last time was about 6 years ago, but anyone could figure this out, unless they didn't want to. Took 20 minutes. A little hard working in a small space , but beats buying a new stove.
  • Tony from Rancho Cordova, CA
  • Difficulty Level:
    Really Easy
  • Total Repair Time:
    15 - 30 mins
  • Tools:
    Screw drivers, Wrench (Adjustable)
185 of 327 people found this instruction helpful.
Was this instruction helpful to you?
Thank you for voting!
Lower back element had burned out with a piece melted out of it.
First I opened the shipping box that the new part came in and figured out which tools I would need. Then I went down to the cellar and clicked off the breaker that supplied power to the oven. In this case, it was the only 50 amp breaker in the panel so It was easy to figure out.
Then I hung a drop light inside the oven so I could see clearly and used a quarter inch drive ratchet with a quarter inch sized socket to remove the two self tapping screws that hold the element plate to the back of the oven. Then I used the same sized socket to remove the small screws that hold the wires and terminal ends to the element contacts.
Then I removed the old unit, placed the new one inside and reversed my steps till the new elements leads and bracket were both securely in place and the element supports were resting on the bottom of the oven. I then turned the power back on and set the oven for 350 degrees and switched the 'bake' selector on. Within thirty seconds, I had a nice even heating new element that glowed brightly from one end to the other. Success! Piece of cake. In the future, I plan to get all my appliance parts at PartsSelect.com and do a lot more repairs myself instead of just replacing the entire appliance.

Greg G. - Peabody, Massachusetts
  • Gregory from Peabody, MA
  • Difficulty Level:
    Really Easy
  • Total Repair Time:
    Less than 15 mins
  • Tools:
    Pliers, Socket set
181 of 262 people found this instruction helpful.
Was this instruction helpful to you?
Thank you for voting!
Needed to replace cracked bake & broil element
This repair is very simple and only required about 15-20 minutes per unit. After turning off the power to your oven at the main breaker box, it's just a matter of removing two 1/4" screws and pulling out the units. The tricky part is removing the power plugs to the elements and not letting them slip back into the insulation. Once you plug in the new elements and screw them back in you are good to go. Once note, while you have everything out, it is a great opportunity to give your oven a good cleaning.
Other Parts Used:
Broil Element
  • Harry from Rancho Santa Margarita, CA
  • Difficulty Level:
    Easy
  • Total Repair Time:
    15 - 30 mins
  • Tools:
    Socket set
158 of 227 people found this instruction helpful.
Was this instruction helpful to you?
Thank you for voting!
Element had blown a hole in itself during failure.
total of 4 screws to remove and replace. Took out the first 2 and pulled element out a few inches. now remove the screws from the element itself but be sure you don't loose the wire out the back of the oven. The only challenge was to keep the wires from falling back through the rear of the oven. This could be easily avoided if you have a clamp of some type ie. clothes pin, hemostst, shop clamp ect.
  • Robert from Columbus, OH
  • Difficulty Level:
    Easy
  • Total Repair Time:
    Less than 15 mins
  • Tools:
    Screw drivers
14 of 15 people found this instruction helpful.
Was this instruction helpful to you?
Thank you for voting!
Replaced bake element
Cut off power, but needed flashlight to see what I was doing. Couldn't get the flashlight to shine on right spot and had no one to hold it. Oven is 19 years old, so screws holding it into the oven wall and to the connection were very old and very difficult to loosen. Finally held prong with pliers and wrenched the screw loose after repeated tries and using a little WD40. Very proud of myself! I am a wife and mother of two teenage boys, but I end up doing all these projects. So proud that I posted a photo of the oven on facebook! Goes from 0 -350 in three minutes now. Yippee!
  • Jill from Marietta, GA
  • Difficulty Level:
    A Bit Difficult
  • Total Repair Time:
    30 - 60 mins
  • Tools:
    Pliers, Screw drivers, Wrench (Adjustable)
11 of 14 people found this instruction helpful.
Was this instruction helpful to you?
Thank you for voting!
oven heating element would not heat
First, and most importantly, flipped the circuit breaker and turned off the power to the oven. Next, Unscrewed the old element and disconnected the wiring. Then, removed the old element and replaced it with the new one.
Reconnected the wiring to the new bake element and screwed it back onto the oven.

Voila! Turned the oven on and watched the new element heat to a bright red. We had an oven once again, and saved ourselves more than $100. Yay!
  • Margaret from Stone Mountain, GA
  • Difficulty Level:
    Easy
  • Total Repair Time:
    30 - 60 mins
  • Tools:
    Screw drivers
11 of 15 people found this instruction helpful.
Was this instruction helpful to you?
Thank you for voting!
Heating elements burned out
The Baking elements takes 10-15 minute each but the Broil Element is a bit tricky as the screws holding the element is difficult to get to. I also used duct tape to temporarily hold the element to stay in place.
Other Parts Used:
Broil Element
  • Stephen from Wilton, CT
  • Difficulty Level:
    A Bit Difficult
  • Total Repair Time:
    30 - 60 mins
  • Tools:
    Pliers, Screw drivers
11 of 16 people found this instruction helpful.
Was this instruction helpful to you?
Thank you for voting!
  • 1
  • 2
  • 3
Customer Reviews
Average Rating:
★★★★★
★★★★★
105 Reviews
4.9
Filter By Rating:
  • 5 Stars
    96
  • 4 Stars
    7
  • 3 Stars
    0
  • 2 Stars
    0
  • 1 Star
    2
  • 1
  • 2
  • 3
Sort by:
Sorry, we couldn't find any existing reviews that matched. Try using some different or simpler keywords.
  • 1
  • 2
  • 3
Model Cross Reference
This part works with the following models:
PartSelect Number: PS249424
Manufacturer Part Number: WB44X200
Brand
Model Number
Description
General Electric
JK1201
Range - GE Range/Stove/Oven Model JK1201 Parts
General Electric
JK14*08
Range - GE Range/Stove/Oven Model JK14*08 Parts
General Electric
JK14*09
Range - GE Range/Stove/Oven Model JK14*09 Parts
General Electric
JK14*R3
Range - GE Range/Stove/Oven Model JK14*R3 Parts
General Electric
JK140R1BC
Range - GE Range/Stove/Oven Model JK140R1BC Parts
General Electric
JK19*08
Range - GE Range/Stove/Oven Model JK19*08 Parts
General Electric
JK25*02
Wall Oven
General Electric
JK25*R3
Range - GE Range/Stove/Oven Model JK25*R3 Parts
General Electric
JK25002
Range - GE Range/Stove/Oven Model JK25002 Parts
General Electric
JK25102
Range - GE Range/Stove/Oven Model JK25102 Parts
General Electric
JK25202
Range - GE Range/Stove/Oven Model JK25202 Parts
General Electric
JK25302
Range - GE Range/Stove/Oven Model JK25302 Parts
General Electric
JK25402
Range - GE Range/Stove/Oven Model JK25402 Parts
General Electric
JK29*06
Wall Oven
General Electric
JK29*07
Wall Oven
General Electric
JK29*08
Wall Oven
General Electric
JK29*09
Wall Oven
General Electric
JK29006
Range - GE Range/Stove/Oven Model JK29006 Parts
General Electric
JK29007
Range - GE Range/Stove/Oven Model JK29007 Parts
General Electric
JK29008
Range - GE Range/Stove/Oven Model JK29008 Parts
General Electric
JK29009
Range - GE Range/Stove/Oven Model JK29009 Parts
General Electric
JK29106
Range - GE Range/Stove/Oven Model JK29106 Parts
General Electric
JK29107
Range - GE Range/Stove/Oven Model JK29107 Parts
General Electric
JK29108
Range - GE Range/Stove/Oven Model JK29108 Parts
General Electric
JK29109
Range - GE Range/Stove/Oven Model JK29109 Parts
General Electric
JK29206
Range - GE Range/Stove/Oven Model JK29206 Parts
General Electric
JK29207
Range - GE Range/Stove/Oven Model JK29207 Parts
General Electric
JK29208
Range - GE Range/Stove/Oven Model JK29208 Parts
General Electric
JK29209
Range - GE Range/Stove/Oven Model JK29209 Parts
General Electric
JK29306
Range - GE Range/Stove/Oven Model JK29306 Parts
Customer Service Representative

Get in touch, we're here to help!

Open until 1am EST

Contact Customer Service