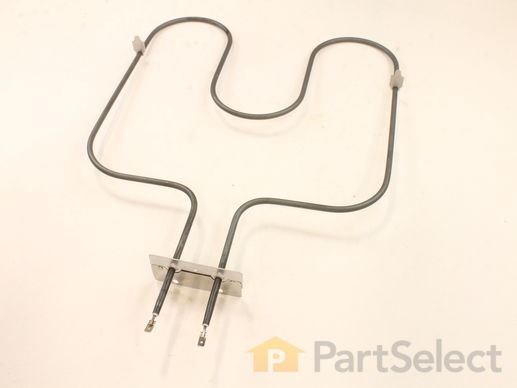
This bake element is used in ranges and located at the bottom of the oven. The bake element supplies heat for baking. If your symptoms include: your oven is not heating evenly, not starting, or the heating is not consistent, then replacing the element can be the solution. Remove two retaining screws, make sure to disconnect the two connecters at each end of the element, and replace with the new one. Before starting this replacement, make sure the range is unplugged from the power source or shut off from the house circuit breaker. The tool needed is a Phillips screwdriver.
How Buying OEM Parts Can Save You Time and Money
Troubleshooting
This part fixes the following symptoms:
Little to no heat when baking | Element will not heat | Oven not heating evenly
Keep searches simple. Use keywords, e.g. "leaking", "pump", "broken" or "fit".
Sorry, we couldn't find any existing answers that matched.Try using some different or simpler keywords, or submit your new question by using the "Ask a Question" button above!
Pat
September 21, 2017
Will this heating element fit my appliance?
For model number JKP15WW1WW
Hi Pat,
Thank you for your question. Yes, this is actually the correct part for your model information. GE has removed the 0 between your Ws. Good luck with your repair.
10 people found this helpful.
Was this helpful?
Thank you for voting!
Audrae
February 26, 2020
Will this part be the correct size for my old oven? I need the heating element. It burned up during self cleaning.
For model number JRP24GOV1BB
Hello Audrae, thank you for your question. The bake element for this unit (lower element) is PartSelect Number: PS249249. This will fit your unit. Good luck with your repair!
4 people found this helpful.
Was this helpful?
Thank you for voting!
Michael
April 2, 2019
Want to make sure that this is the correct bake element for my oven.
For model number JMP31W0W2WW
Hello Michael, Thank you for contacting us. I have researched the model you have provided and have found the part you are looking for is PartSelect Number: PS8688123. Thank you for your inquiry, good luck with this repair!
Need baking heating element for this GE wall oven. In your search there is no "0" after the "g" does this matter
For model number JKP26G0P4BG
Hi Joe, thank you for your question. Yes, that would be correct. You no longer need that 0 in your model number. So this element would be the correct part for your model. I hope that helps. Good luck with your repair.
1 person found this helpful.
Was this helpful?
Thank you for voting!
Ellen
October 16, 2019
Looking for top broiler model # above. Serial # 5g573811q
For model number 9114042593
Hello Ellen, Thank you for contacting us. I have researched the model you have provided and have found the part you are looking for is PartSelect Number PS249244. Hope this helps!
Hello Carol and thanks for writing.
If the oven temperature is higher than the level set, then most likely the thermostat needs replacement. Heating elements: The oven can also overheat if there is a malfunction with its heating element. ... A problem with the sensor can cause the oven to overheat. We hope this helps. Please contact us anytime
1 person found this helpful.
Was this helpful?
Thank you for voting!
David
September 9, 2021
My baking heat unit has gone out and will not heat. What baking heat unit will be a good replacement for my GE built in electric oven?
For model number JRP14G0P4BG
Hello David, Thank you for contacting us. We have researched the model you have provided and have found the part you are looking for is PartSelect Number: PS249424. If you need help placing an order, customer service is open 7 days a week. Please feel free to give us a call. We look forward to hearing from you!
Could the elements be the problem if the oven doesn't heat up enough? My oven reads 350 but temperature reads 220.
For model number JRS04BW1BB
Hello Jeanne, Thank you for the question. I Suggest testing the Oven Sensor, PartSelect Number PS236043. Testing the temperature sensor probe on your oven is easy. With the sensor at room temperature, measure the resistance between the two prongs at the end of the sensor connector. The resistance of the sensor should read approximately 1080 – 1090 ohms at room temperature. Thank you for your inquiry, good luck with this repair!
What are the dimensions of this part and does it have smallish slide on connectors to the stove - part wb44k5013
For model number 6790-688031
Hi John, we cannot find parts based on part dimensions as even parts that are the same size can have small differences that make them incompatible with your model. However if you could supply your model number we would be happy to research the correct parts for you. Thank you for your question and good luck with your repair!
Was this helpful?
Thank you for voting!
Michelle
July 23, 2021
I purchased a new baking element and when I removed the old one, I can see the connector has been compromised. It is slightly singed and corroded. Do you sell the connectors so I may replace it?
Hello Michelle, thank you for contacting us, In order for us to locate the correct parts and repair information we will require the model number of the unit. Once you have located the model number please feel free to resubmit the question and we will be happy to help you. We are looking forward to hearing from you!
Keep searches simple. Use keywords, e.g. "leaking", "pump", "broken" or "fit".
Sorry, we couldn't find any existing installation instruction that matched.
bake element shorted out, sparking like a sparkler
first, made sure circuit breaker was off second, used nut driver to remove 2 screws on old element, pulled it from the back of the oven third, removed 2 wires from old element (spade connectors) fourth, connected new element and pushed back into oven. fifth, reinstalled 2 screws securing new element
this was all done by my 15 yr old son under my supervision.
Carl from Wynnewood, PA
Difficulty Level:
Really Easy
Total Repair Time:
Less than 15 mins
Tools:
Nutdriver
89 of 96 peoplefound this instruction helpful.
Was this instruction helpful to you?
Thank you for voting!
bake element burned itself out ( as a welding rod does with all the fireworks)
removed 4 screws of the back fan cover, then removed the two screws holding the element and disconnected the slip-on electrical wire connections. replaced enement and cover in reverse. this was all done after i cut power at circut breaker duhh
joseph from ferrisburg, VT
Difficulty Level:
Really Easy
Total Repair Time:
30 - 60 mins
Tools:
Nutdriver, Socket set
20 of 24 peoplefound this instruction helpful.
Was this instruction helpful to you?
Thank you for voting!
Bake Element Burned Through A Weak Section Of The Tube.
I removed the two mounting screws then pulled the element forward and disconnected the two element screws. I reversed the process to install the new one/ this oven is over 30yrs old.
PAUL from CAMDEN, AR
Difficulty Level:
Really Easy
Total Repair Time:
Less than 15 mins
Tools:
Nutdriver, Screw drivers
17 of 17 peoplefound this instruction helpful.
Was this instruction helpful to you?
Thank you for voting!
Baking element broke in half
I removed the screws holding the old element in place, then pulled it out a few inches from the back oven wall. Then I pulled the wires away from the old baking element (pulled off easily), and being careful to keep the wires on the same sides as before, pushed the new element on to the wires. It was then just a matter of inserting the wires and insulation back into the opening and tightening the screws. Simple!
Nancy from West Harrison, IN
Difficulty Level:
Really Easy
Total Repair Time:
Less than 15 mins
Tools:
Wrench set
10 of 10 peoplefound this instruction helpful.
Was this instruction helpful to you?
Thank you for voting!
the bottom baking element broke on my upper oven... cracken in half
It was very simple.. first turn off the electricity... next take out the two screws holding the element to the back of the oven... then pull the two plugs apart( male and female ends) ... throw away old part. put new part in by plugging the male and female ends back together... push back into oven back.. get all insulation back in... put two old screws back in to secure... done.. turn on power... don't be afraid.. it was very, very easy.
Kathy from Naperville, IL
Difficulty Level:
Easy
Total Repair Time:
Less than 15 mins
Tools:
Pliers, Wrench set
8 of 10 peoplefound this instruction helpful.
Was this instruction helpful to you?
Thank you for voting!
Lower element burned out
Remove the screws inside the oven holding the back of the element to the rear wall of the oven. These scrrews are a square drive. Pull element forward and remove 2 screws that hold wires in place. Both sets of screws needed to be replaced with a different size. Reverse order to install.
John from Germantown, WI
Difficulty Level:
A Bit Difficult
Total Repair Time:
15 - 30 mins
Tools:
Screw drivers
7 of 7 peoplefound this instruction helpful.
Was this instruction helpful to you?
Thank you for voting!
26 year old oven, lower element burned into two pieces.
I first removed the broken element by removing the two hexhead screws on either side of the element bracket. Then I gently pulled the wires through the opening and removed two more screws that attached the wiring to the element. I then compared the new and old elements and found a few differences.
First, the screw holes where the wires connect to the element were tiny in the new element, about a third the size of the holes in the old one. Secondly, the mounting bracket was not as long as the original, and the holes to mount it to the back of the oven are located at the top of the bracket, instead of the sides.
Since this was the only element that I have found, that comes close to the original, I decided to make it work.
I took my drill and a small bit and bored out the screw holes, just enough to get a self taping screw to fit and reconnected the wires.
Now I'm not sure that I would recomment the next step to anyone, but I did this: I held the new bracket against the back of the oven and drilled new holes to match the new bracket, and again used self tapping screws. The reason that I don't encourage this is that the new bracket fits just inside of the old opening, but the insulation cannot be seen as long as the element does not get moved. I then plugged the original bracket holes with the original hex head screws.
It took a little more time and effort than I had expected, but well worth it, after eight months without the use of my oven.
marsha from oklahoma city, OK
Difficulty Level:
A Bit Difficult
Total Repair Time:
1- 2 hours
Tools:
Nutdriver, Screw drivers
5 of 5 peoplefound this instruction helpful.
Was this instruction helpful to you?
Thank you for voting!
Bad element
Removed mounting screws and element only pulled out about 2 inches. Disconnected wires and had to drill slightly bigger hole in element ends to reattach wires. Element mounting bracket was different than old element. Had to use one existing screw hole in oven back and drill a new one.
Ed from Talladega, AL
Difficulty Level:
A Bit Difficult
Total Repair Time:
15 - 30 mins
Tools:
Nutdriver, Pliers
3 of 3 peoplefound this instruction helpful.
Was this instruction helpful to you?
Thank you for voting!
Baking element quit
Removed burned out element and discovered replacement element had a different back plate and different hole pattern. Also, the electical connecttion from power wires to ends of element were a TOTALLY different size, both in hole size and size of material that hole was placed. This tood a lot of slow increasing the size of the hole time. Also, the backplate was a different size with a two hole pattern at the top of the plate, as oppossed to the original plate with holes centered at the sides of the plate. Had to drill holes in back oven wall higher than I wanted, as the oven wall had a depression in the back wall and I could not drill at that point. By drilling holes that were higher than previous holes, there was now a 1/2" opening at the bottom of this plate. Used a hack saw and cut off a piece of the old plate to slip underneath, then screwed in the new plate, thus filling the remaining opening, and securing the additional hand made additional plate. This was a lot more than I had bargain for, and when I turned on the oven, it did not work! I re-checked the connection of the power wires to the grid element and found one of the connections to be disconnected. Reconnected this wire and everything is just ducky now.
Richard from Laguna Niguel, CA
Difficulty Level:
Very Difficult
Total Repair Time:
More than 2 hours
Tools:
Nutdriver, Pliers, Socket set, Wrench (Adjustable), Wrench set
3 of 3 peoplefound this instruction helpful.
Was this instruction helpful to you?
Thank you for voting!
Oven element burned out
Truned off the power took out the two screws holding the old element disconnect the power leads and put in the new element. Was great to recieve the new element in one day, the day before Xmas.
Keep searches simple. Use keywords, e.g. "leaking", "pump", "broken" or "fit".
Sorry, we couldn't find any existing reviews that matched. Try using some different or simpler keywords.
★★★★★
★★★★★
Cathleen H - 6 days ago
Verified Purchase
Easy ordering, fast delivery and simple to replace
The part came the next day and I was easily able to replace the bake element in my GE oven that's over 20 years old. I definitely would order from this company again.
★★★★★
★★★★★
Kent V - January 3, 2023
Verified Purchase
Heat Element
Work like it should!
★★★★★
★★★★★
Larry B - December 16, 2022
Verified Purchase
Easy Repair, part working fine
Exact fit working fine
★★★★★
★★★★★
Deniece S - December 9, 2022
Verified Purchase
Fast fix, great part
Our lower baking element in our oven went out right before Thanksgiving so I ordered this part and it got here just in time to make dinner. It works great and was lso an easy install.
★★★★★
★★★★★
Chris D - December 2, 2022
Verified Purchase
Good Part, does what it should
Install was easy
★★★★★
★★★★★
Lawrence D - October 13, 2022
Verified Purchase
Exact replacement
The part arrived in a damaged carton which had obviously been opened and then resealed with tape. However, the part itself did not appear to be damaged.
I have replaced oven heating elements before and this one went quickly and smoothly. The part was an exact fit and has worked perfectly since installation.
★★★★★
★★★★★
John O - October 2, 2022
Verified Purchase
easy repair - part worked just as expected
Fast delivery - operators were friendly and wonderful to work with.
Thank You so much - GREAT !!
★★★★★
★★★★★
Bill Y - July 22, 2022
Verified Purchase
Perfect!
This was exactly what I needed. Arrived quickly, easy to install. Very satisfied!
★★★★★
★★★★★
Wilson O - May 9, 2022
Verified Purchase
Excellent service and Correct Part 1st Time
I called and was assisted quickly by knowledgeable and customer-service minded staff. Part was easy to order, it arrived quickly and in good condition.
I quickly installed it without any issues. All around, the way things should be. I highly recommend Parts Select due to great over the phone service and website. Kudos.
★★★★★
★★★★★
Nancy S - February 9, 2022
Verified Purchase
Easy repair!
Part came in n a timely manner. Watched the video and replaced the part in 5 minutes.
With our Fix app model plate image recognition technology, we'll recommend the parts guaranteed to fit your appliance. Simply snap a photo, and we'll take care of the rest.
"I love love love this app. It's so nice to have useful information (receipts, manuals, parts lists, warranty info, pictures, etc.) on all of my household appliances and devices in one place."
You added to your cart
✖
$
Qty:
Total item(s) in cart:
Order Subtotal
$
*Taxes and shipping will be applied during checkout