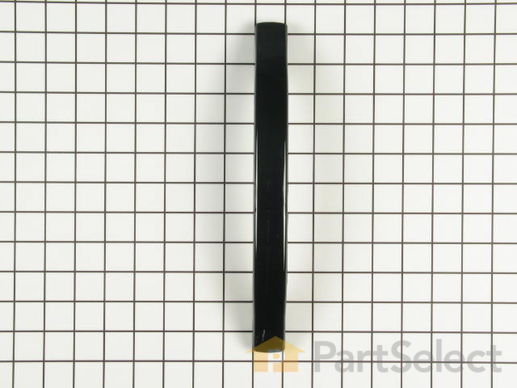
Part Location Diagram of WB15X10022 GE Door Handle
See part 3 in the diagram
( Grid squares measure 1x1 inch )
Customer Service Representative

Get in touch, we're here to help!

Open until 12am EST

customerservice@partselect.com

Door Handle

★★★★★
★★★★★
12 Reviews

Rated by 25 customers 

Easy 

30 - 60 mins 

Ratings submitted by customers like you who bought this part.

$ 56.49
  In Stock

Get this part fast! Average delivery time for in-stock parts via standard shipping: 1.8 days.

PartSelect Number PS232102
Manufacturer Part Number WB15X10022
Manufactured by GE
Customer Service Representative

Get in touch, we're here to help!

Open until 12am EST

customerservice@partselect.com

Check if this fits your product and find model diagrams

Need help finding your model number?
Product Description

Door Handle Specifications

Screws NOT included.
How Buying OEM Parts Can Save You Time and Money

How Buying OEM Parts Can Save You Time and Money

Troubleshooting
This part fixes the following symptoms:
Door not closing properly
This part works with the following products:
Microwave.
This part works with the following products:
General Electric, Hotpoint, Kenmore.
Part# WB15X10022 replaces these:
AP2021173, 245428, WB15X10022, WB15X10083
Back to Top
Questions and Answers

Ask our experts a question about this part and we'll get back to you as soon as possible!

19 questions answered by our experts.
  • 1
  • 2
Sort by:
Sorry, we couldn't find any existing answers that matched.Try using some different or simpler keywords, or submit your new question by using the "Ask a Question" button above!
Rigoberto
September 2, 2019
How do you replace this handle on the microwave
PartSelect logo
Hello Rigoberto, Thank you for the question. Here is some information that a customer has left on our website as to how they installed the part, "With a #2 flathead screw driver pry loose the plastic screen from the INSIDE of the door. With a #1 cross tip screw driver remove the top and bottom screw from the broken handle. Remove broken handle and replace with new handle. Replace the top and bottom screw, then press the plastic screen back in. All finshed." I hope this helps. Thank you and have a great day!

7 people found this helpful.

Was this helpful?
Thank you for voting!
Laurent
February 28, 2019
The handle on my microwave has broken - the handle itself is fine but the connection at the bottom has broken. I can't quite tell if it's the handle or the part of the frame that the handle attaches to that is broken. How do i disassemble the door to figure that out and is it possible to replace the frame/bracket if that's what's broken? Do i need to get a new door?
For model number jvm1660SB008
PartSelect logo
Hi Laurent, Thank you for your question. Here is some information on installing a microwave door handle that you may reference on how to take the microwave door apart. Before you begin any repair please unplug the appliance from the electrical outlet. You will need to remove the plastic lining around the inside of the door. There are retainer clips holding the liner in place and you will need to use a putty knife to remove it. Depending on the type of microwave you have, you may have to come in from the bottom or from the top to remove the lining. Gently slide the putty knife in between the lining and the frame and go around the frame and gently pry it loose. On the hinge side you will need to come in from the backside to pry the lining off. If after you remove the lining you only see 2 screws, unthread them to see if the handle will come off. If it does not come off, you will have to remove the inside door panel in the same way you removed the lining. Once removed, unthread the remaining 2 screws and remove the old handle. Install the new door handle and reinstall both the inner door panel and the lining. Restore power to the microwave and everything should now work for you. I hope this helps. Thank you and have a great day!

5 people found this helpful.

Was this helpful?
Thank you for voting!
Paulina
March 5, 2018
I have the GE microwave need a handle replacement, which item should i by. I got one from amazon for $5 , but it was like an inch longer, the distance between the screws is around 9 1/2 in. I do not wish to by the wrong item again.Thanks
For model number model JVM1190SY 001
PartSelect logo
Hello Paulina, thank you for your question. The manufacturer of this appliance did not make the handle a separate replaceable part. The handle was only available as part of the whole door assembly part number WB55X10208. Unfortunately, the manufacturer has discontinued production on this part, and we have no stock left over. I hope this information helps.

2 people found this helpful.

Was this helpful?
Thank you for voting!
Shirley
April 12, 2023
Do you carry a replacement for a new touch control panel? Also, the grease filters, 7 3/4 x 9 3/32 inches for same microwave?
For model number JVM1440BH01
PartSelect logo
Hi Shirley, Thank you for writing. The Grease Filter for this model would be PartSelect Number PS255242, however the Touch Pad has been discontinued sorry. Our suggestion here would be to call the manufacturer and see if they can provide you with a substitution for these part numbers and contact us back with the updated substitution number. We hope this helps!

2 people found this helpful.

Was this helpful?
Thank you for voting!
Daniela
November 8, 2017
I have a 1998 GE microwave that the handle just broke on. Trying to find the right replacement part for it. Can you help? Thanks, daniela
For model number JVM1330BW 004
PartSelect logo
Hi Daniela, Thank you for your question. The part number of the handle for your microwave is PS232100. I hope this helps. Thank you and have a great day!

1 person found this helpful.

Was this helpful?
Thank you for voting!
Eldon
December 3, 2017
Need to replace door handle -- is part available and how to do. Thanks for answering!
For model number DVM1850DM4BB
PartSelect logo
Hi Eldon, Thank you for your question. The handle for your microwave is in stock and the part number for it is PS1480981. Here is some information that a customer has left on our website as to how they installed the part, "With a #2 flathead screw driver pry loose the plastic screen from the INSIDE of the door. With a #1 cross tip screw driver remove the top and bottom screw from the broken handle. Remove broken handle and replace with new handle. Replace the top and bottom screw, then press the plastic screen back in. All finshed." I hope this helps. Thank you and have a great day!

1 person found this helpful.

Was this helpful?
Thank you for voting!
Elvera
September 10, 2019
Does this handle take take screws? If so, are they included? Can i do this myself on my miccrwave?
For model number jvm1410bc001
PartSelect logo
Hi Elvera, this handle takes screws which sadly aren't included, this repair can be done on your own. Thank you for your question and good luck with your repair!

1 person found this helpful.

Was this helpful?
Thank you for voting!
Lynn
November 27, 2017
I need to replace my door handle. Will this fit?
For model number JVM1440BH04
PartSelect logo
Hello Lynn, Thanks for your question. This door handle is compatible with your model. I hope this helps!

Was this helpful?
Thank you for voting!
Ray
December 18, 2017
Is this the correct replacement handle for my microwave?
For model number VM1460BA 001
PartSelect logo
Hi Ray, Thank you for your question. Yes, this is the correct handle for your microwave. I hope this helps. Thank you and have a great day!

Was this helpful?
Thank you for voting!
Cynthia
January 3, 2019
I have a GE profile microwave oven. I need handle as old one is broken. Do you have one to replace
For model number JVM1090BW001
PartSelect logo
Hello Cynthia, Thank you for contacting us. I have researched the model you have provided and have found the handle is only sold as part of the door assembly. I looked up the part and it is listed as No Longer Available/Discontinued. There is no part substitutions listed. My suggestion here would be to call the manufacturer and see if they can provide you with a substitution for these part numbers. Hope this helps!

Was this helpful?
Thank you for voting!
  • 1
  • 2
Customer Repair Stories
 Average Repair Rating: 3.2 / 5.0, 25 reviews. What's this?
  • 1
  • 2
  • 3
Sort by:
Sorry, we couldn't find any existing installation instruction that matched.
Door handle broke
I removed a plastic cover that goes around the glass on the back of the microwave, There are two screws that hold the handle, I took the two screws out, put the new handle in place and put the screws back on and thight them. Make sure handle was secured and then put back the plastic cover around the glass door, took me about 15 minutes.
  • Eduardo from Cypress, TX
  • Difficulty Level:
    Easy
  • Total Repair Time:
    15 - 30 mins
  • Tools:
    Screw drivers
57 of 69 people found this instruction helpful.
Was this instruction helpful to you?
Thank you for voting!
Microwave Handle Broke at Base
First open the microwave door. On the back you will see a plastic part about 3/4 inch wide surrounding the glass in the door. I used a butter knife as suggested by other users to pry it off by slipping the knife along the outer edge and prying the part out. Being careful not to crack tabs. This exposes 2 screws on the handle. Remove screws. Next, pry out the metal surround shield in the same manner with butter knife. This exposes another set of 2 screws. Remove screws. Note which ones these are. Handle then comes off and you can replace new handle, insert 2 inner screws just removed, snap metal surround shield back in place, insert last 2 screws then snap plastic surrounding part back in place.
  • ROBERT from Austin, TX
  • Difficulty Level:
    A Bit Difficult
  • Total Repair Time:
    30 - 60 mins
  • Tools:
    Screw drivers
27 of 31 people found this instruction helpful.
Was this instruction helpful to you?
Thank you for voting!
Door handle broke off due to usage
I followed advice posted here, and used the knife to pry apart the plastic front away from the door housing. I then had access to remove the 4 screws holding the handle in place. I then installed the new handle with the 4 screws. But one thing to look out for is to first screw in the outer 2 screws, then secure the front panel, and then screw in the 2 inner screws. Saved me lots of dough!
  • LEON from Columbia, MD
  • Difficulty Level:
    Easy
  • Total Repair Time:
    15 - 30 mins
  • Tools:
    Screw drivers
16 of 24 people found this instruction helpful.
Was this instruction helpful to you?
Thank you for voting!
The handled is bolted on the outside door panel and inside to a window panel. Not knowing if all would break when snapping it apart. No screws to disassemble the door. Every part snaps together and when snappin apart you've got to have good skills to recognize how to remove each part without brea
removed the inside cover (plastic) around the glass. removed the 2 screws inside the the panel.
Snapped of the door panel and removed 2 more screws. Replaced the handle by screwing it in two places on the door panel. Snapped that panel back on to the door then placed the 2 screws back in to connect handle to an inside panel for sturdiness. Replaced the inside plastic modeling that surround the door carefully and then it was done. Removing all panels require caution because of ease in breaking them.
  • wade from indianapolis, IN
  • Difficulty Level:
    Very Difficult
  • Total Repair Time:
    More than 2 hours
  • Tools:
    Screw drivers
15 of 18 people found this instruction helpful.
Was this instruction helpful to you?
Thank you for voting!
The handle was broken at bottom.
I gently removed the plastic outer cover of the door. I was able to remove two screws. I then removed the inside plastic cover, that allowed me to remove the two inner screws. I replaced the handle, screwed in the two inner screws. Replaced the inside plastic cover. After that I screwed in the two outer screws. The handle was secured. I then replaced the outer plastic cover. I was surprised at how easy I did it. It looked hard at first. I felt good about myself afterward, and save a lot of money.
  • Frank from Oak Point, TX
  • Difficulty Level:
    Easy
  • Total Repair Time:
    15 - 30 mins
  • Tools:
    Screw drivers
12 of 14 people found this instruction helpful.
Was this instruction helpful to you?
Thank you for voting!
Door handle broken on microwave.
Fortunately I had my handyman here to repair a leak under my kitchen sink and asked him to replace the handle on my microwave. There were no instructions included with the handle but I had printed out descriptions from the web site of what others had done. He pried off the inside of the door which revealed two screws, which he removed. He then had to pry off another covering which revealed the other two screws that removed the handle. He attached the new handle and put the two parts that were pried off back on. It would not be an easy process for the ordinary householder and it would have been nice if detailed instructions had come with the handle (with pictures showing exactly which areas of the door needed to be removed). I was going to try the repair myself but am extremely glad my handyman was there as I probably would have ruined the microwave and would have had to purchase a new one. Kudos to my handyman.
  • Shari from Sarasota, FL
  • Difficulty Level:
    A Bit Difficult
  • Total Repair Time:
    15 - 30 mins
  • Tools:
    Screw drivers
8 of 10 people found this instruction helpful.
Was this instruction helpful to you?
Thank you for voting!
door handle broke ge nolonger stocked door or handle
took a screw driver and pride off plastic on inside of door. be carfule not to break it. only one of two screws that go into handle were visable. had to drill a hole in metal braket to get at second screw. you can just bend the metal braket back inorder to use drill. bend it back when done. took off handle and replaced it. snapped plastic piece I took off back in place and finished.
ge told me i needed to replace whole door. which they nolonger stock and I could not find a whole door for my model on web. found handlw on this website and did it my self
  • robert from stamford, CT
  • Difficulty Level:
    Easy
  • Total Repair Time:
    30 - 60 mins
  • Tools:
    Screw drivers
7 of 11 people found this instruction helpful.
Was this instruction helpful to you?
Thank you for voting!
Cracked Door Handle
Removed Old Handle with minor difficulty, two screws came out easy other two had to drill out back plate to get to other two screws, after that, repair went fine.Took about an hour total time for repair, and sure saved alot of money!!
  • Brenda from St. Peters, MO
  • Difficulty Level:
    Easy
  • Total Repair Time:
    30 - 60 mins
  • Tools:
    Screw drivers
6 of 6 people found this instruction helpful.
Was this instruction helpful to you?
Thank you for voting!
handle popped off leaving part of the handle in place
I followed the exact details of one of your customers, removing the inner plate of the door, replacing the screws
that were left inside, into the new handle. I was finished in a few minutes and thank the earlier pioneer for his help.
I am a 75-year old grandmother and the help gave me the courage to try it. Very proud of myself.
  • Nancy from Martinez, GA
  • Difficulty Level:
    Really Easy
  • Total Repair Time:
    15 - 30 mins
  • Tools:
    Screw drivers
5 of 6 people found this instruction helpful.
Was this instruction helpful to you?
Thank you for voting!
Door handle broke off and the door frame broke also.
My repair did not go so well. The screws for the handle are hard to get to, but since my handle was already broken i just broke it off the rest of the way. The problem I had was getting the outer door frame off. It is snapped on , and when I tried to remove it the glass broke. I think after years of use the glass and outer frame got stuck together. I hope this helps in your repair.
Other Parts Used:
Outer Door Frame
  • Dale from Novato, CA
  • Difficulty Level:
    Difficult
  • Total Repair Time:
    30 - 60 mins
  • Tools:
    Screw drivers
5 of 6 people found this instruction helpful.
Was this instruction helpful to you?
Thank you for voting!
  • 1
  • 2
  • 3
Customer Reviews
Average Rating:
★★★★★
★★★★★
12 Reviews
4.3
Filter By Rating:
  • 5 Stars
    7
  • 4 Stars
    3
  • 3 Stars
    1
  • 2 Stars
    1
  • 1 Star
    0
  • 1
  • 2
Sort by:
Sorry, we couldn't find any existing reviews that matched. Try using some different or simpler keywords.
  • 1
  • 2
Model Cross Reference
This part works with the following models:
PartSelect Number: PS232102
Manufacturer Part Number: WB15X10022
Brand
Model Number
Description
Kenmore
36362709200
Microwave
Kenmore
36362709300
Microwave
General Electric
EMO2000C01BB
Microwave - Counter Top
General Electric
EMO2000C02BB
Microwave - Counter Top
General Electric
EMO3000CBB001
Microwave - Counter Top
General Electric
EMO3000CBB02
Microwave - Counter Top
General Electric
EMO3000CBB03
Microwave - Counter Top
General Electric
EMO3000CBB04
Microwave - Counter Top
General Electric
EMO3000CSS001
Microwave - Counter Top
General Electric
EMO3000CSS02
Microwave - Counter Top
General Electric
EMO3000CSS03
Microwave - Counter Top
General Electric
EMO3000CSS04
Microwave - Counter Top
General Electric
GLMV168KB003
General Electric
JVM1410BC001
Microwave - Counter Top
General Electric
JVM1410BC002
Microwave - Counter Top
General Electric
JVM1420BB01
Microwave - Counter Top
General Electric
JVM1420BB02
Microwave - Counter Top
General Electric
JVM1421BC002
Microwave - Counter Top
General Electric
JVM1421BC01
Microwave - Counter Top
General Electric
JVM1428BHC02
Microwave
General Electric
JVM1429BAC03
Microwave
General Electric
JVM1429BAC04
Microwave
General Electric
JVM1430B
Microwave - GE Microwave Model JVM1430B Parts
General Electric
JVM1430BA01
Microwave - Counter Top
General Electric
JVM1430BD001
Microwave - Counter Top
General Electric
JVM1430BD002
Microwave - Counter Top
General Electric
JVM1430BD01
Microwave - Counter Top
General Electric
JVM1430BD02
Microwave - Counter Top
General Electric
JVM1430BD03
Microwave - Counter Top
General Electric
JVM1430BDC01
Microwave
Customer Service Representative

Get in touch, we're here to help!

Open until 1am EST

Contact Customer Service